White Chocolate Raspberry Cheesecake: The Showstopping Dessert You’ll Make for Every Special Occasion

White Chocolate Raspberry Cheesecake – Creamy, Stunning, and Worth Every Single Step
White Chocolate Raspberry Cheesecake is one of those desserts that earns a moment of genuine silence the first time someone takes a bite. Not the polite, performative silence of someone being kind about your baking — the real kind, where the fork pauses mid-air and the eyes close for just a second before the person looks up and says something like “this is incredible.” It is a dessert that carries weight. It delivers on every promise its beautiful appearance makes before the first slice is even cut.
The combination of white chocolate and raspberry is one of the most naturally harmonious pairings in the dessert world. White chocolate brings richness, warmth, and a sweet creaminess that turns the already luxurious cheesecake filling into something almost impossibly silky. Raspberry cuts through all of that with its bright, slightly tart, deeply fruity personality and reminds your palate that richness and freshness can coexist in the same bite. The contrast is not subtle. It is vivid, deliberate, and deeply satisfying in a way that neither ingredient could achieve on its own.
This recipe was built to be thorough and foolproof. Whether this is your first cheesecake or your twentieth, the steps here are clear, the techniques are explained, and the tips are drawn from the kind of real experience that comes from making this cake enough times to understand exactly where things can go wrong — and exactly how to prevent them.
Why This White Chocolate Raspberry Cheesecake Recipe Works
Every element of this recipe is intentional. The crust is thick enough to provide genuine structure but not so thick that it overwhelms the filling. The filling is built on full-fat cream cheese that is beaten properly — smooth enough to bake without cracks and rich enough to hold the white chocolate and vanilla without tipping into sweetness overload. The raspberry swirl is made from a simple, concentrated sauce that provides real fruit flavor rather than the artificial pink color that many recipes substitute with jam or food coloring.
A water bath is used in this recipe, and it is non-negotiable. More on that in the tips section, but the short version is this: a water bath is the single most important technique in cheesecake baking, and every extra minute it takes to set one up is repaid in a crack-free, evenly baked, beautifully smooth surface that requires nothing to hide and everything to admire.
Ingredients for White Chocolate Raspberry Cheesecake
Here is everything you need to make one 9-inch cheesecake serving 12 to 14 people.
For the Graham Cracker Crust
2 cups graham cracker crumbs (about 16 full crackers) ¼ cup granulated sugar ½ cup unsalted butter, melted Pinch of salt
For the White Chocolate Cheesecake Filling
32 oz (4 blocks) full-fat cream cheese, softened to room temperature 1 cup granulated sugar ½ cup sour cream, room temperature 1 teaspoon pure vanilla extract 4 large eggs, room temperature 8 oz good quality white chocolate, melted and slightly cooled 2 tablespoons all-purpose flour
For the Raspberry Swirl Sauce
1½ cups fresh or frozen raspberries 3 tablespoons granulated sugar 1 tablespoon fresh lemon juice 1 teaspoon cornstarch mixed with 1 tablespoon cold water
For the Optional Topping
½ cup fresh raspberries 2 oz white chocolate, melted (for drizzling) Whipped cream for garnish
Equipment You Will Need
9-inch springform pan Large roasting pan (for the water bath) Heavy-duty aluminum foil Stand mixer or hand mixer Medium saucepan Fine mesh strainer Rubber spatula Offset spatula Mixing bowls Measuring cups and spoons

Step-by-Step Instructions for White Chocolate Raspberry Cheesecake
Step 1 – Make the Raspberry Sauce
In a small saucepan over medium heat, combine the raspberries, sugar, and lemon juice. Cook, stirring occasionally, for about 5 to 7 minutes until the raspberries break down completely and the mixture becomes thick and syrupy. Add the cornstarch slurry and stir continuously for 1 to 2 minutes until the sauce thickens noticeably. Remove from heat and strain through a fine mesh strainer, pressing firmly with the back of a spoon to extract as much liquid as possible and leave the seeds behind. Set the strained sauce aside to cool completely. The sauce must be at room temperature before it goes near the cheesecake batter.

Step 2 – Prepare the Crust
Preheat your oven to 325°F (163°C). In a medium bowl, combine the graham cracker crumbs, sugar, melted butter, and a pinch of salt. Mix until the crumbs are evenly moistened and the mixture resembles wet sand that holds its shape when pressed. Press the mixture firmly and evenly into the bottom of a 9-inch springform pan, using the flat bottom of a measuring cup to compact it into a dense, even layer. Press a small amount of the crust mixture about an inch up the sides of the pan. Bake for 10 minutes until lightly golden and fragrant. Remove from the oven and allow to cool while you prepare the filling. Do not turn off the oven.
Step 3 – Melt the White Chocolate
Place the chopped white chocolate in a heatproof bowl set over a pot of barely simmering water, making sure the bottom of the bowl does not touch the water. Stir gently and continuously until the chocolate is completely melted and smooth. Remove from heat and allow to cool until it is warm to the touch but no longer hot — approximately 10 minutes. If white chocolate is added to the batter while it is still very hot, it can partially cook the eggs and create a grainy filling.

Step 4 – Make the Cheesecake Filling
In a large bowl using a stand mixer or hand mixer on medium-low speed, beat the softened cream cheese for about 3 minutes until completely smooth with no lumps whatsoever. Scrape down the sides and bottom of the bowl frequently. Add the sugar and beat for another 2 minutes until fully combined and smooth. Add the sour cream, vanilla extract, and flour, and mix on low speed until incorporated. Add the eggs one at a time, mixing on the lowest possible speed after each addition just until the yolk disappears. Do not overmix once the eggs are in — this is the most critical moment in cheesecake preparation. Overmixing after the eggs are added incorporates too much air, which causes the cheesecake to puff dramatically in the oven and then collapse and crack as it cools. Finally, pour in the cooled melted white chocolate and fold gently with a rubber spatula until completely incorporated.
Step 5 – Assemble the Swirl
Pour the cheesecake filling over the cooled crust and spread evenly with an offset spatula. Drop small spoonfuls of the cooled raspberry sauce across the surface of the filling — approximately 8 to 10 drops evenly distributed. Using a toothpick, thin skewer, or the tip of a butter knife, swirl the raspberry sauce through the filling in slow, deliberate figure-eight motions. Do not over-swirl or the raspberry will become muddied into the batter and lose its visual definition. Four to six passes is typically enough to create a beautiful marbled pattern while keeping the raspberry color vivid and distinct.

Step 6 – Prepare the Water Bath
Wrap the outside of the springform pan tightly in at least two layers of heavy-duty aluminum foil, pressing the foil up around the sides firmly to prevent any water from seeping in. Place the wrapped pan inside a large roasting pan. Place the roasting pan in the preheated 325°F oven, then carefully pour enough hot water into the roasting pan to reach about one inch up the sides of the springform pan. This is your water bath, and it is the key to a smooth, crack-free surface.
Step 7 – Bake
Bake the cheesecake in the water bath for 60 to 70 minutes. The cheesecake is done when the edges are set and the center still has a gentle wobble — it should jiggle like firm gelatin when the pan is nudged, not slosh like liquid. Do not wait for it to look completely set in the oven. A fully set cheesecake in the oven is always an overbaked one on the plate.
Step 8 – Cool Gradually
Turn off the oven and crack the oven door open about one inch. Leave the cheesecake inside the oven with the door cracked for 1 full hour. This gradual cooling is essential. Rapid temperature changes cause the top of the cheesecake to contract faster than the interior, creating the cracks that ruin an otherwise perfect surface. After one hour in the cooling oven, remove the cheesecake from the water bath, remove the foil, and allow it to cool on a wire rack at room temperature for another hour before transferring to the refrigerator.

Step 9 – Chill and Serve
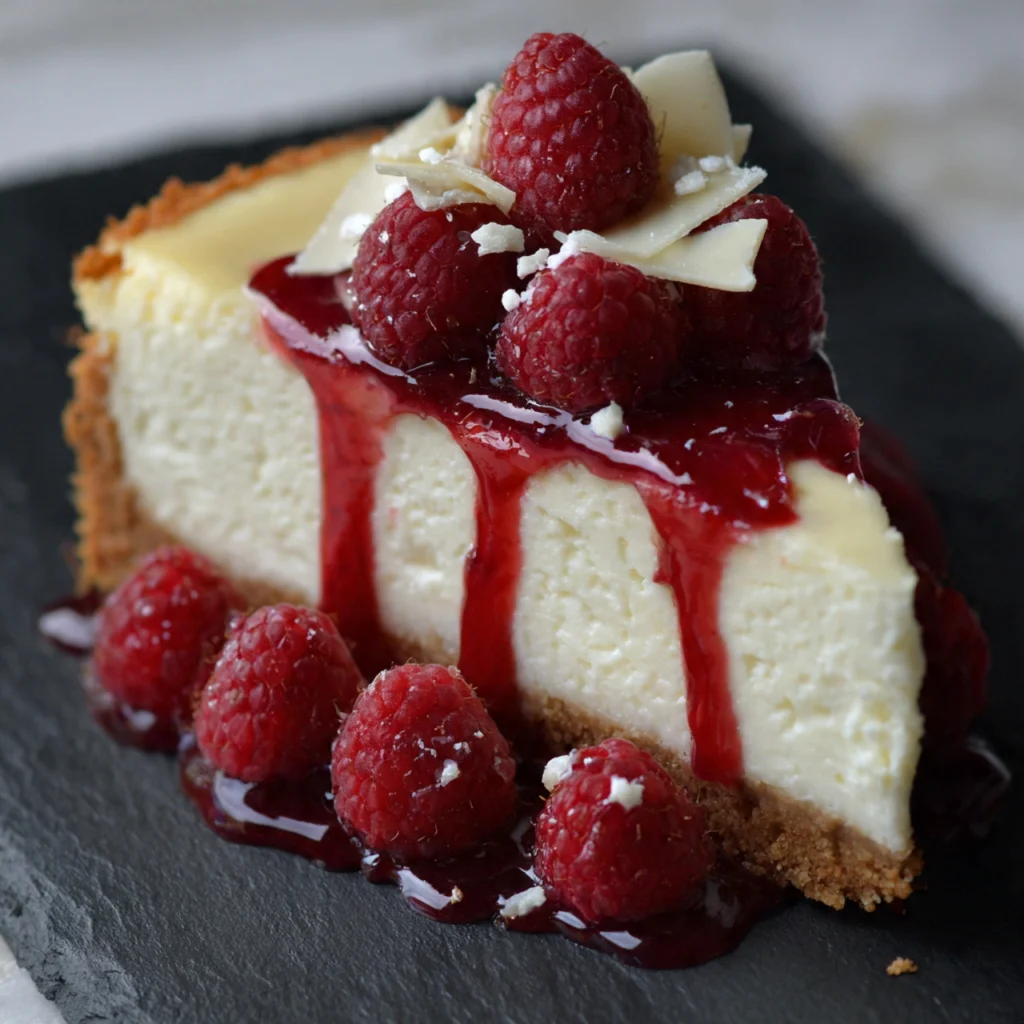
Refrigerate the cheesecake for a minimum of 6 hours, though overnight is strongly preferred. The texture improves significantly with a full overnight chill — the filling becomes denser, creamier, and easier to slice cleanly. When ready to serve, run a thin knife around the inside edge of the springform pan before releasing the latch. Decorate with fresh raspberries, a drizzle of melted white chocolate, and piped whipped cream if desired. Slice with a sharp knife dipped in hot water and wiped clean between cuts for the cleanest possible slices.
Pro Tips for the Perfect White Chocolate Raspberry Cheesecake
Room Temperature Ingredients Are Not Optional
Cold cream cheese does not beat smooth. It stays lumpy regardless of how long you run the mixer, and those lumps bake into dense, unpleasant pockets in the finished cheesecake. Cold eggs create the same problem and can also cause the batter to seize when the warm melted chocolate is added. Pull all your dairy ingredients out of the refrigerator at least 1 to 2 hours before baking.
Use a Quality White Chocolate Bar, Not Chips
White chocolate chips contain stabilizers that prevent them from melting smoothly and incorporating cleanly into the batter. A good quality white chocolate baking bar — brands like Ghirardelli, Lindt, or Valrhona — melts silky and smooth and contributes a genuine depth of flavor to the filling that chips simply cannot match.
The Water Bath Is Not Negotiable
Every experienced cheesecake baker has at some point convinced themselves the water bath is unnecessary and baked without one. The result is always the same — a cracked, slightly rubbery-edged cheesecake that tastes fine but looks nothing like what was intended. The water bath keeps the oven environment humid and the heat gentle and even, which is exactly what cream cheese needs to set properly. Wrap the pan well and use it every time.
Do Not Rush the Chilling Time
Six hours is the absolute minimum. Overnight is the real target. A cheesecake that has been chilled for only a few hours is soft, difficult to slice, and has not yet developed the full density and creaminess that makes a great cheesecake what it is. Plan ahead, make it the day before, and serve it at its absolute best.
Make the Raspberry Sauce Ahead
The raspberry sauce needs to be completely cooled before it goes on top of the batter. If it is even slightly warm, it will sink into the filling rather than sitting on the surface, and the swirl will disappear during baking. Make the sauce a day ahead, refrigerate it, and bring it to room temperature before using.
Common Mistakes to Avoid When Making White Chocolate Raspberry Cheesecake
Overmixing After the Eggs Are Added
This is the single most common cause of cracked cheesecake, and it is entirely preventable. Once the eggs go in, switch to the lowest speed on your mixer and add them one at a time, stopping the moment each one disappears into the batter. Any air beaten in at this stage will cause the cheesecake to soufflé in the oven and collapse as it cools.
Using Low-Fat Cream Cheese
Full-fat cream cheese is the only appropriate choice for a baked cheesecake. Low-fat and reduced-fat versions contain more water and less fat, which means they produce a filling that is watery, less stable, and significantly less flavorful. There is no substitute that produces the same result.
Opening the Oven Door During Baking
Every time the oven door opens during baking, a significant amount of heat and humidity escapes. Temperature fluctuations during the bake cause uneven cooking and increase the likelihood of cracking. Set your timer and leave the oven completely undisturbed until the baking time has elapsed.
Skipping the Gradual Cooling Step
Removing a freshly baked cheesecake from a hot oven and placing it on a cold counter is the fastest way to crack the surface. The gradual cooling process — oven off, door cracked, one full hour — is not optional. It is as important as the bake itself.
Not Straining the Raspberry Sauce
An unstrаined raspberry sauce contains seeds that create an unpleasant texture when eaten and an uneven, spotty appearance when swirled into the batter. Always strain through a fine mesh strainer. It takes two minutes and makes a visible difference in both appearance and eating experience.
Storage and Serving Suggestions
How to Store White Chocolate Raspberry Cheesecake
Store the cheesecake covered loosely with plastic wrap or in an airtight container in the refrigerator for up to 5 days. The flavor and texture are actually best on day two and three after baking, once the cheesecake has had ample time to fully set and the flavors have deepened and melded. Do not store at room temperature for more than 2 hours.
The cheesecake freezes beautifully for up to 2 months. Freeze it whole or in individual slices — wrap each slice tightly in plastic wrap, then in aluminum foil, and place in a freezer-safe bag. Thaw overnight in the refrigerator and add any fresh garnishes after thawing.
Serving Suggestions
This cheesecake is a statement dessert and deserves to be served accordingly. Bring it to the table whole before slicing so guests can appreciate the full visual impact of the raspberry swirl and white chocolate drizzle. Pair each slice with a small spoonful of additional fresh raspberry sauce on the side for anyone who wants an extra hit of fruit. A light dusting of powdered sugar just before serving adds a delicate finish. For a more elaborate presentation at a dinner party, serve alongside a glass of late harvest Riesling or a sparkling rosé — both complement the white chocolate and raspberry flavors in the cheesecake extraordinarily well.
Frequently Asked Questions About White Chocolate Raspberry Cheesecake
Can I make this cheesecake without a water bath?
Technically yes, but the results will be noticeably different. Without a water bath, the edges of the cheesecake will overbake and become slightly rubbery before the center is set, and the surface is almost guaranteed to crack. If you are determined to skip the water bath, place a separate pan of hot water on the rack below the cheesecake to add some humidity to the oven environment — it is not a complete substitute but it helps.
Can I use frozen raspberries for the sauce?
Absolutely. Frozen raspberries work just as well as fresh for the sauce because they are cooked down completely. In fact, frozen raspberries are often more intensely flavored than out-of-season fresh ones. Use them straight from frozen — no need to thaw before cooking.
Why did my cheesecake crack?
The most common causes are overmixing the batter after the eggs were added, baking at too high a temperature, skipping the water bath, or cooling the cheesecake too quickly after baking. A small crack can be disguised with fresh raspberries and a drizzle of white chocolate. A lesson for next time is to follow each step with care, particularly around mixing technique and the cooling process.
Can I make this cheesecake ahead of time?
Yes — and it is actually encouraged. This cheesecake is better on day two than day one. Make it the day before serving, refrigerate overnight, and add the fresh garnishes just before serving. It takes all the stress out of baking for guests and produces a better result.
Can I use a different crust?
Absolutely. An Oreo cookie crust adds a chocolate contrast that pairs beautifully with the white chocolate and raspberry. A digestive biscuit crust is a lighter, less sweet alternative that lets the filling shine. A shortbread crust adds a rich, buttery depth. Any of these work well — simply follow the same method of combining crumbs, butter, and sugar, pressing firmly into the pan, and pre-baking for 10 minutes before adding the filling.
Can I add more raspberry to the filling?
You can increase the amount of raspberry sauce used for the swirl slightly, but be careful not to add too much or the extra moisture will affect the texture of the filling. If you want a more intensely raspberry-flavored cheesecake, fold 2 to 3 tablespoons of the raspberry sauce directly into one third of the batter before layering and swirling for a deeper color and flavor throughout.
Approximate Nutrition Information
Per slice based on 12 servings without additional garnishes:
Calories: 520 Total Fat: 34g Saturated Fat: 20g Cholesterol: 145mg Sodium: 310mg Total Carbohydrates: 46g Sugars: 36g Protein: 8g Fiber: 1g
Please note these values are approximate estimates based on standard ingredient amounts and will vary depending on the specific brands used and any modifications made to the recipe.
Why White Chocolate Raspberry Cheesecake Is Worth Every Minute You Put Into It
There are desserts that are easy and good. There are desserts that are impressive and complicated. And then there are desserts that sit in that rare space between the two — where the process is involved enough to feel like an achievement and the result is good enough to justify every minute of effort it required. White Chocolate Raspberry Cheesecake lives permanently in that space.
It is a dessert that teaches patience. The cooling in the oven. The overnight chill. The restraint required not to over-swirl the raspberry. Every instruction that asks you to slow down and wait is asking you to trust the process, and the process — when followed with care — produces something genuinely beautiful and delicious.
Make it for a birthday, a holiday dinner, a dinner party, or a quiet weekend when you want to spend a few hours doing something that will make someone genuinely happy. Make it the day before so the only thing left to do when your guests arrive is slice it, plate it, and watch their faces when they take the first bite.
That moment is worth every step that came before it.

White Chocolate Raspberry Cheesecake
Ingredients
Equipment
Method
- In a small saucepan over medium heat, combine the raspberries, sugar, and lemon juice. Cook, stirring occasionally, for 5 to 7 minutes until the raspberries break down and the mixture is thick and syrupy. Add the cornstarch slurry and stir for 1 to 2 minutes until thickened. Strain through a fine mesh strainer, pressing firmly to extract all liquid and remove seeds. Set aside to cool completely to room temperature.
- Preheat oven to 325°F (163°C). Combine graham cracker crumbs, sugar, melted butter, and salt in a bowl until the mixture resembles wet sand. Press firmly and evenly into the bottom and about 1 inch up the sides of a 9-inch springform pan. Bake for 10 minutes until lightly golden. Remove and cool while preparing the filling.
- Place chopped white chocolate in a heatproof bowl set over barely simmering water, not touching the water. Stir gently until completely melted and smooth. Remove from heat and cool until warm to the touch but no longer hot, about 10 minutes.
- Beat softened cream cheese on medium-low speed for 3 minutes until completely smooth with no lumps, scraping the bowl frequently. Add sugar and beat 2 minutes. Add sour cream, vanilla, and flour and mix on low until incorporated. Add eggs one at a time on the lowest speed, mixing just until each yolk disappears — do not overmix. Fold in cooled melted white chocolate with a rubber spatula until fully combined.
- Pour the cheesecake filling over the cooled crust and spread evenly. Drop 8 to 10 small spoonfuls of the cooled raspberry sauce across the surface. Using a toothpick or thin skewer, swirl through the filling in slow figure-eight motions — 4 to 6 passes — to create a vivid marbled pattern without over-mixing the colors.
- Wrap the outside of the springform pan tightly in two layers of heavy-duty aluminum foil, pressing up the sides firmly. Place inside a large roasting pan. Set the roasting pan in the preheated oven, then carefully pour enough hot water to reach 1 inch up the sides of the springform pan.
- Bake at 325°F for 60 to 70 minutes until the edges are set and the center still has a gentle wobble like firm gelatin. Turn off the oven, crack the door open about 1 inch, and leave the cheesecake inside for 1 full hour. Remove from the water bath, remove foil, and cool on a wire rack for 1 hour before refrigerating.
- Refrigerate the cheesecake for a minimum of 6 hours, preferably overnight. When ready to serve, run a thin knife around the inside edge of the pan before releasing the springform latch. Decorate with fresh raspberries, a drizzle of melted white chocolate, and whipped cream if desired. Slice with a sharp knife dipped in hot water, wiping clean between each cut.


