Soft Red Velvet Cookies with Oreo Buttercream Frosting — 12 Unbelievably Delicious Cookies
The Cookie That Makes Every Other Cookie Jealous
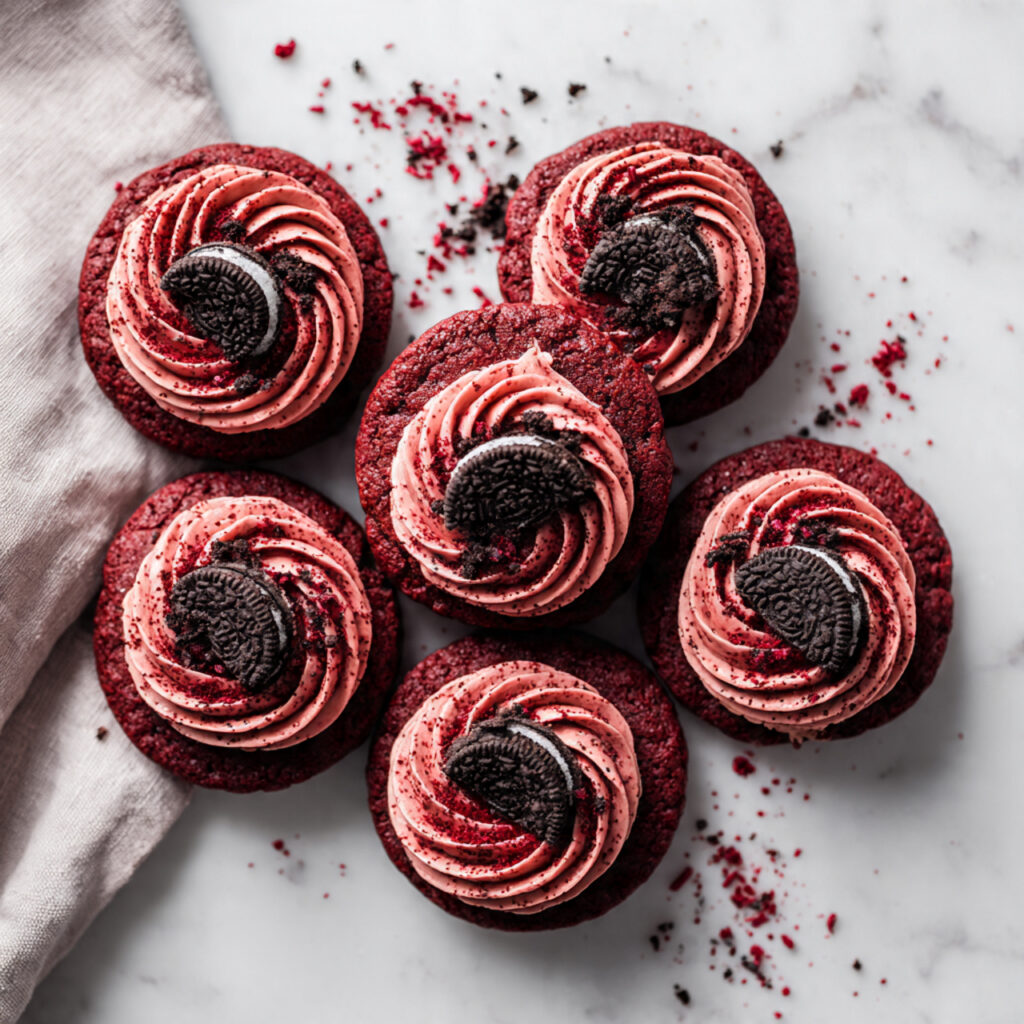
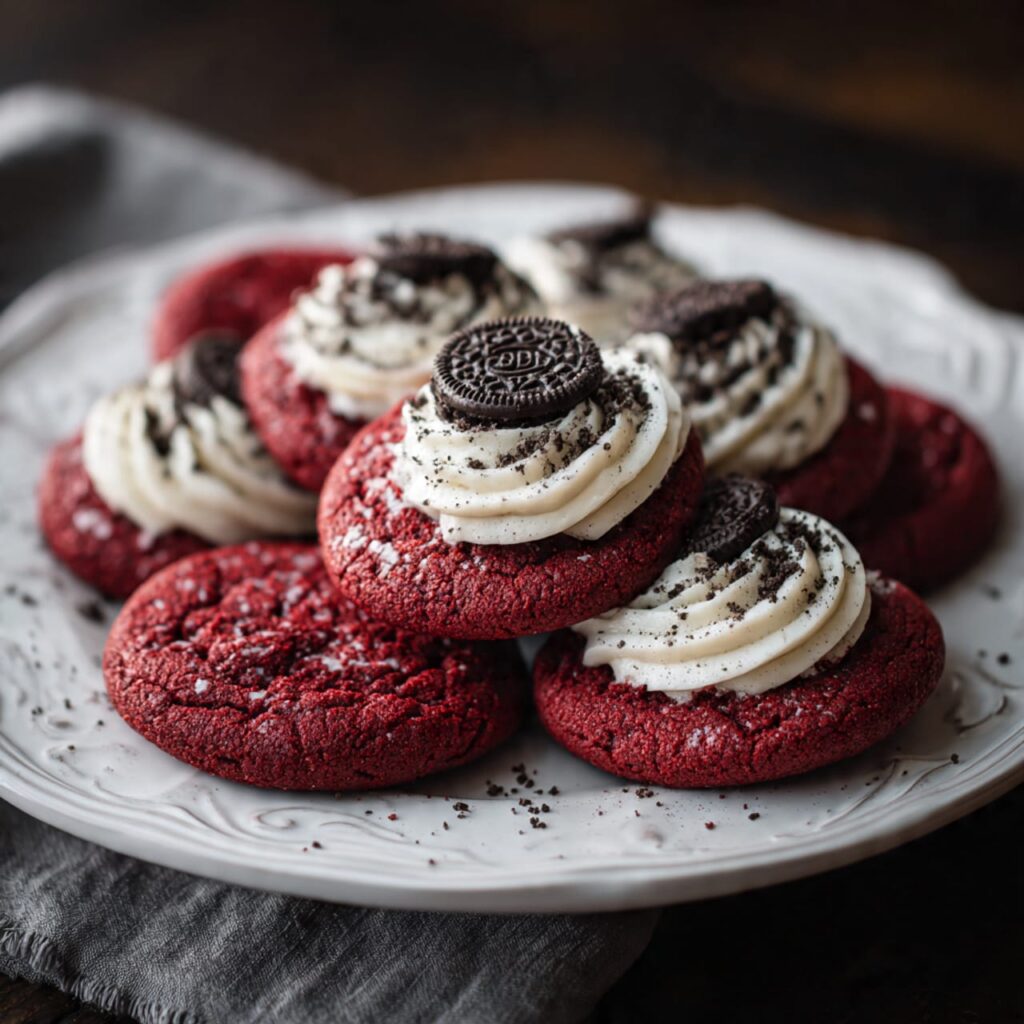
Soft red velvet cookies with Oreo buttercream frosting are, without question, the most requested thing I bake — and the moment you take your first bite, you’ll understand exactly why. There’s something almost theatrical about them. That deep, jewel-red cookie base catches your eye from across the room. The cloud of dark, cookies-and-cream frosting piled on top makes your brain short-circuit a little. And then the actual flavor experience — the subtle cocoa warmth of the cookie, the buttery crunch of Oreo crumbs folded into a frosting that somehow manages to be both light and intensely indulgent — seals the deal completely.
I developed this soft red velvet cookies with Oreo buttercream frosting over several months of testing, starting from the question: what if red velvet cake became a cookie, and what if that cookie wore the most spectacular frosting imaginable? The answer, it turns out, is something that disappears faster than you’d believe possible. I’ve brought these to potlucks, cookie exchanges, birthday parties, and quiet Sunday afternoons at home — and the reaction is always the same. People eat one, look slightly stunned, and immediately ask for the recipe.
What I love most about these cookies — beyond the taste, which is genuinely extraordinary — is that they are completely achievable for bakers at any skill level. You don’t need professional equipment, obscure ingredients, or years of pastry experience. You need a mixer, a baking sheet, some pantry staples, and a little patience. The technique is straightforward, the results are spectacular, and the whole project comes together in about an hour. Let’s get into everything you need to know.
Why This Recipe Works So Well
Before we get into the actual recipe, it’s worth spending a moment on the why behind the what. Red velvet has a flavor profile that sits in a genuinely interesting middle ground — it’s not quite chocolate, not quite vanilla, but something tangier and more complex than either. That complexity comes from the combination of cocoa powder, vanilla, a touch of vinegar, and the acidity that historically gave the dessert its name. In cookie form, that flavor profile becomes more concentrated and more satisfying per bite than a slice of cake, because there’s less batter and more crust, more edges, more texture.
The Oreo buttercream frosting isn’t just a gimmick. The crushed cookies fold genuine flavor into what would otherwise be a standard vanilla buttercream — a deep, toasted cookie flavor with a hint of cream filling sweetness that pairs with the red velvet base the way good music pairs with a perfect meal. The frosting also provides a textural contrast: the cookie base is soft and chewy, the frosting is airy and creamy with tiny bits of crunchy Oreo scattered throughout. Every element earns its place.
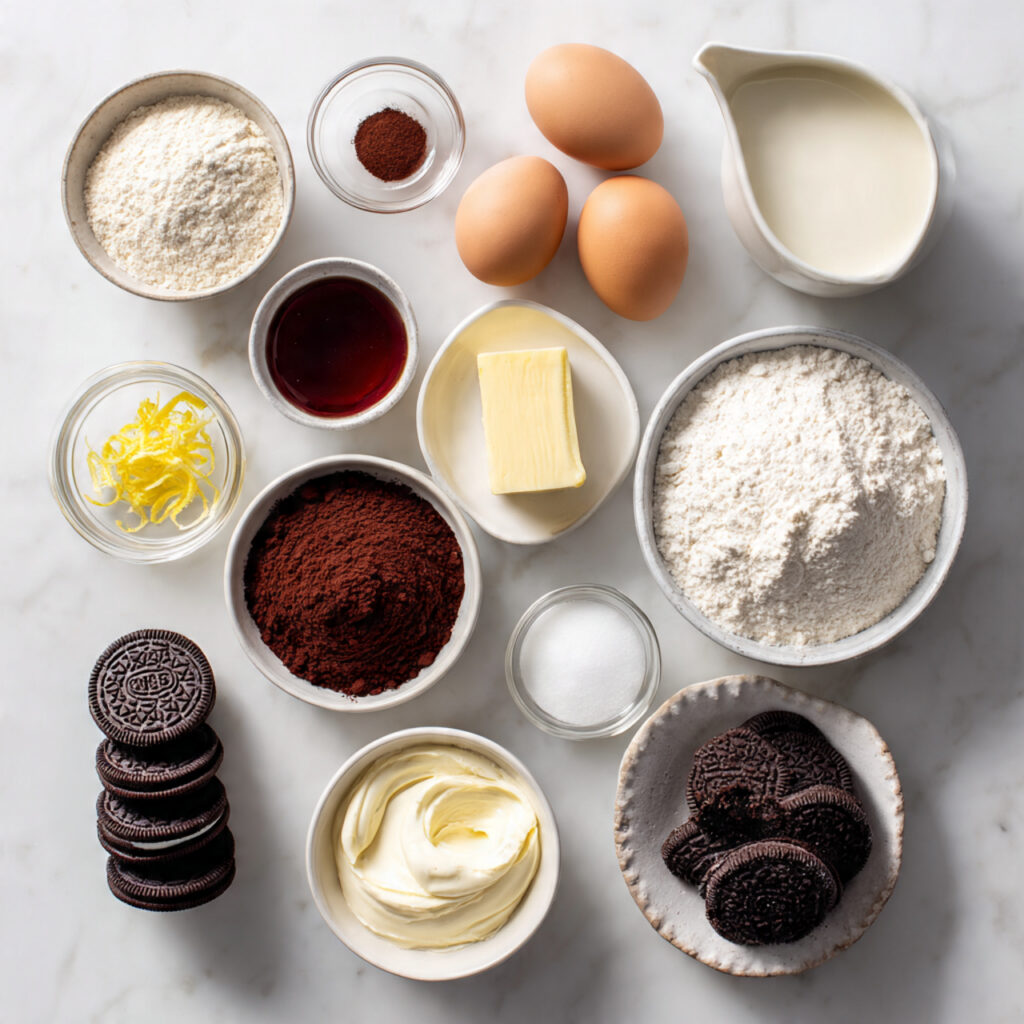
Ingredients
For the Soft Red Velvet Cookies
- 2¼ cups (280g) all-purpose flour
- 2 tablespoons unsweetened cocoa powder, Dutch-process preferred
- 1 teaspoon baking soda
- ½ teaspoon baking powder
- ½ teaspoon fine sea salt
- ¾ cup (170g) unsalted butter, softened to room temperature
- ¾ cup (150g) granulated sugar
- ½ cup (100g) packed light brown sugar
- 2 large eggs, room temperature
- 1½ teaspoons pure vanilla extract
- 2 tablespoons red food coloring, gel preferred over liquid
- 1 teaspoon white vinegar
- 2 tablespoons full-fat sour cream
For the Oreo Buttercream Frosting
- 1 cup (225g) unsalted butter, softened
- 3 cups (360g) powdered sugar, sifted
- 12 standard Oreo cookies, crushed to fine crumbs
- 3 to 4 tablespoons heavy cream or whole milk
- 1 teaspoon pure vanilla extract
- Pinch of fine salt
Optional Garnishes
- Mini Oreo cookies pressed into each frosted cookie
- Additional crushed Oreo crumbs scattered over the frosting
- Red sprinkles or sanding sugar for a festive finish
- A light drizzle of white chocolate
Step-by-Step Instructions
Step 1: Get Everything Ready Before You Start
Preheat your oven to 350°F (175°C) and line two large baking sheets with parchment paper or silicone baking mats. Take your butter and eggs out of the refrigerator a full 30 minutes before you begin — room temperature ingredients blend more smoothly and produce a more even, tender cookie than cold ones. Measure out your dry ingredients and have everything sitting ready before you turn on your mixer. This is a simple recipe, and prepping everything in advance makes the process feel completely effortless.
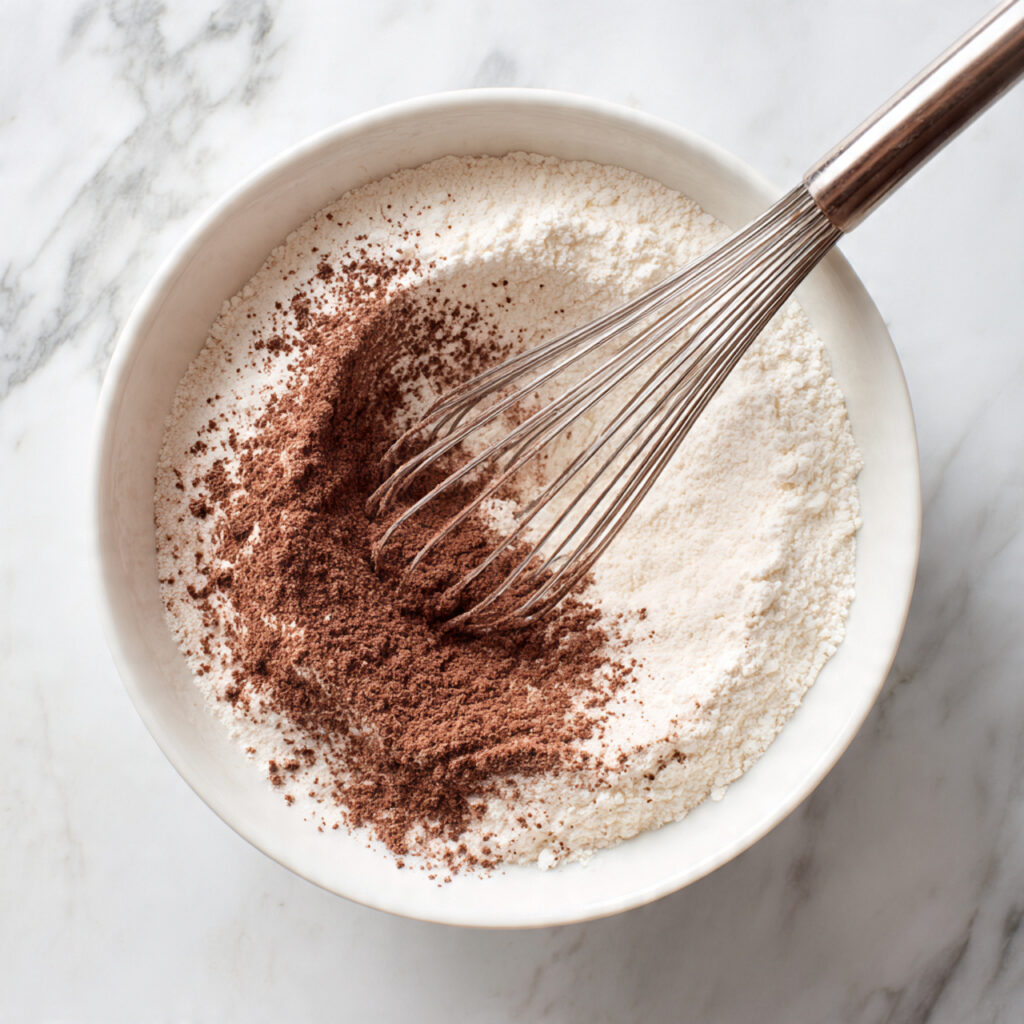
Step 2: Combine the Dry Ingredients
In a medium bowl, whisk together the flour, cocoa powder, baking soda, baking powder, and salt. Whisking rather than simply stirring ensures the leavening agents distribute evenly through the flour, which means your cookies will rise consistently and uniformly rather than unevenly. Set this bowl aside.
Step 3: Cream Butter and Sugars Until Genuinely Fluffy
In the bowl of your stand mixer fitted with the paddle attachment, or using a hand mixer and a large bowl, beat the softened butter on medium speed for two full minutes until it looks pale and creamy. Add both the granulated sugar and the brown sugar and continue beating for another two to three minutes. You’re looking for a mixture that’s noticeably lighter in color and fluffy in texture — this step incorporates air into the dough, and that air is what gives these soft red velvet cookies with Oreo buttercream frosting their tender, pillowy crumb rather than a flat, dense result.
Step 4: Add the Wet Ingredients
Reduce the mixer speed to low and add the eggs one at a time, mixing until each is fully incorporated before adding the next. Scrape the bowl down between additions. Then add the vanilla extract, red food coloring, white vinegar, and sour cream. Mix until everything comes together and the batter is a deep, vivid red. Don’t panic if it looks slightly curdled or separated at this stage — that’s completely normal and will resolve the moment the flour goes in.
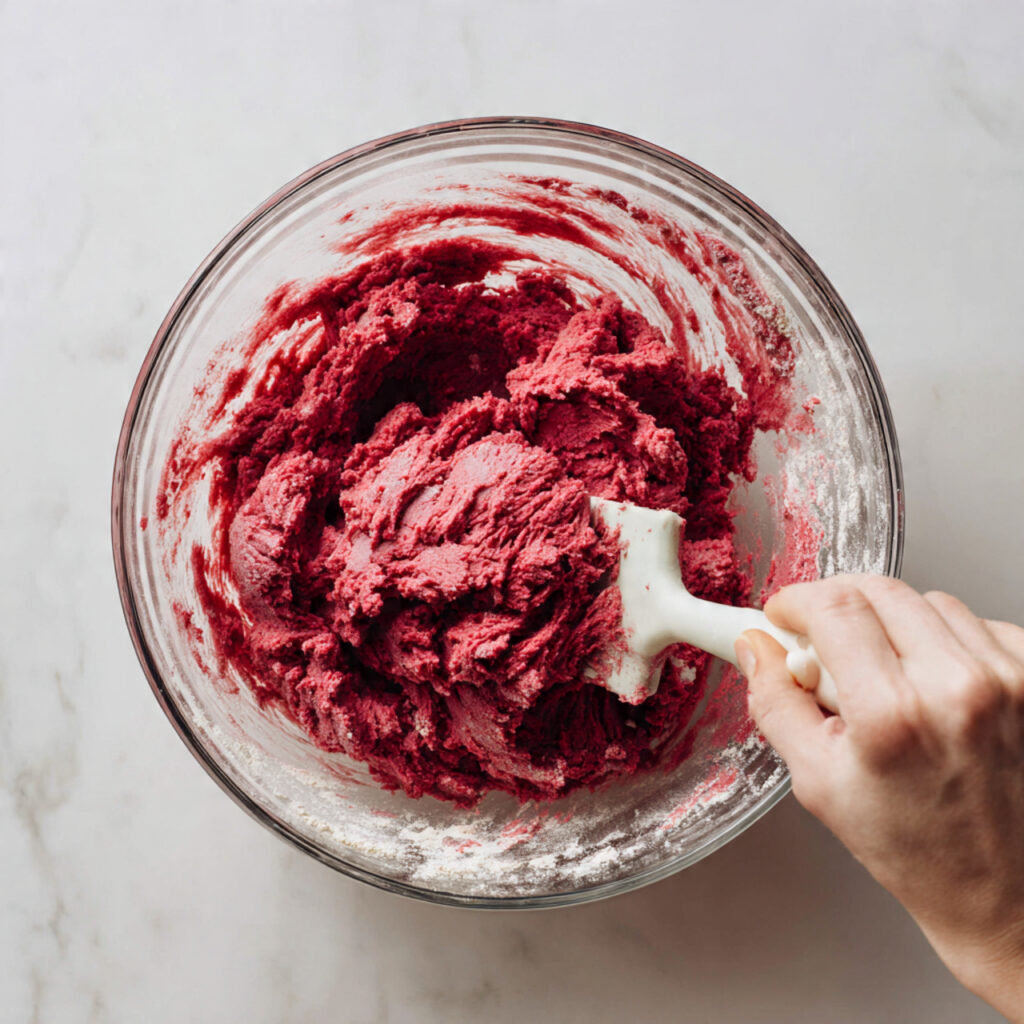
Step 5: Add the Dry Ingredients — Carefully
With the mixer still on low, add the flour mixture in two or three additions, mixing only until you no longer see dry streaks. The moment the last visible bit of flour disappears, stop the mixer. Do not keep mixing. Overmixing past this point develops gluten in the flour and is the primary reason cookies turn out tough and chewy in the wrong way instead of soft and tender in the right way. If you need to, do the last few folds by hand with a spatula.
Step 6: Scoop and Shape
Using a cookie scoop — ideally a 3-tablespoon size — portion the dough onto your prepared baking sheets, placing each ball about 2 inches apart to give the cookies room to spread. If you want particularly round, uniform cookies, roll each ball briefly between your palms before placing it on the sheet. The dough will be slightly tacky, which is completely normal.
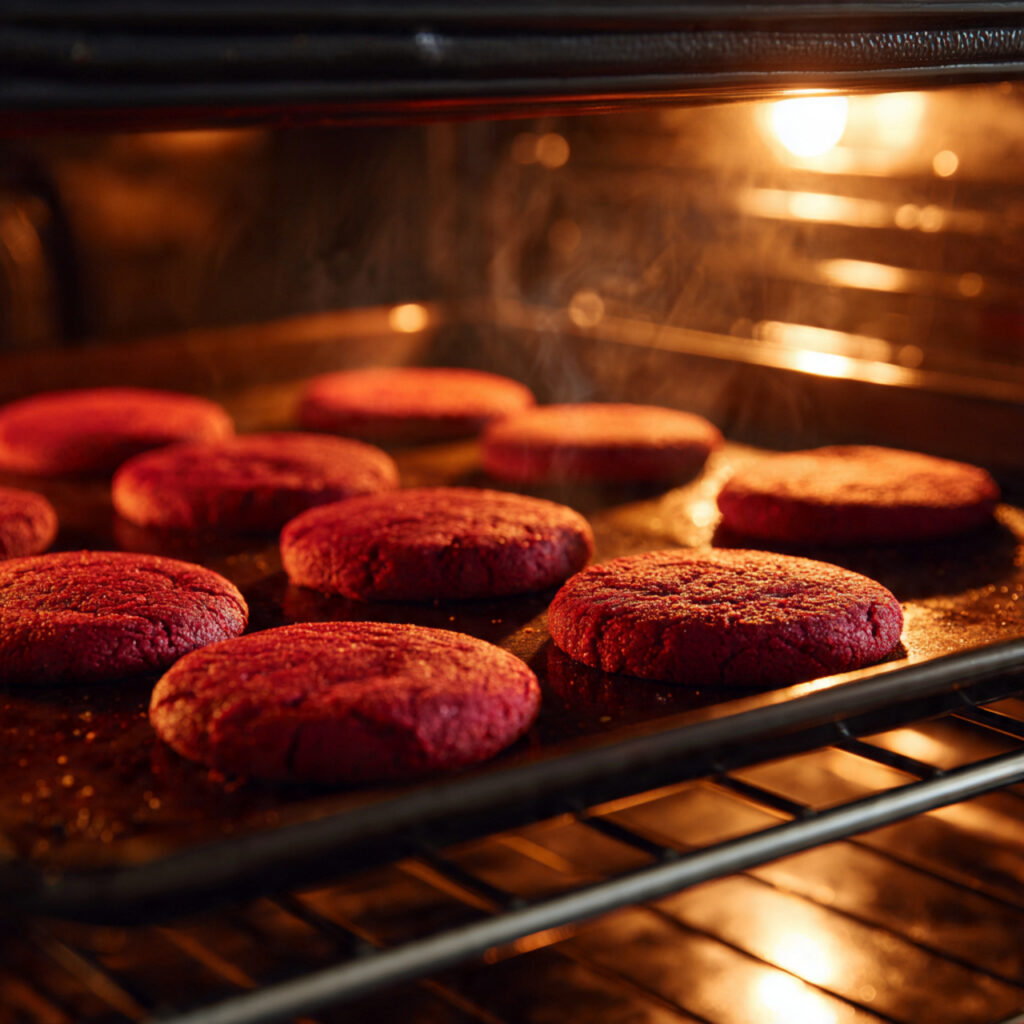
Step 7: Bake
Bake for 10 to 12 minutes. This is where your judgment matters. The edges should look just set and the centers should still look slightly underdone — almost glossy and just barely firm. This is intentional. The cookies will continue to cook from the residual heat of the pan after you remove them from the oven, and if you pull them when they look fully done, they’ll be overbaked by the time they cool. Trust the process and pull them early.
Step 8: Cool Without Touching Them
Let the cookies rest on the baking sheet for exactly 5 minutes before moving them to a wire rack. They need this time to firm up enough to be handled without falling apart. Once they’re on the rack, let them cool completely before you even think about frosting — this part is not optional, and it’s the step most people rush to their detriment.
Step 9: Make the Oreo Buttercream
While the cookies cool, make your frosting. Start by beating the softened butter alone in a clean mixer bowl on medium-high speed for a full three to four minutes, until it’s extremely pale — almost white — and very fluffy. Most people underbeat their butter at this stage, and it results in a frosting that’s too dense. The extra time makes a visible, meaningful difference.
Reduce the speed to low and add the sifted powdered sugar in three additions, mixing slowly to avoid a cloud of sugar. Add the vanilla, salt, and three tablespoons of heavy cream. Once incorporated, increase the speed back to medium-high and beat for two more minutes until the frosting is light and smooth. Finally, fold in the crushed Oreo crumbs by hand with a spatula until they’re evenly distributed. Taste and adjust — if you want more cookies-and-cream flavor, add a few more tablespoons of crumbs. If the frosting is too thick, add the fourth tablespoon of cream.
Step 10: Frost and Finish
Transfer your Oreo buttercream to a piping bag fitted with a large star tip — a 1M or 2D tip creates those beautiful, bakery-style swirls. Pipe starting from the outer edge of each cookie and spiral inward and upward, finishing with a little peak at the center. Press a mini Oreo gently into the center of the frosting, or scatter a pinch of additional Oreo crumbs across the top. If you want to be extra, a tiny drizzle of melted white chocolate takes these completely over the top in the best possible way.
Pro Tips for the Perfect Soft Red Velvet Cookies with Oreo Buttercream Frosting
Use gel food coloring, not liquid. Liquid food coloring is water-based, which adds extra moisture to your dough and produces a less vivid color. Gel coloring is highly concentrated — a smaller amount delivers a deeper, truer red without affecting the dough’s consistency. AmeriColor Super Red or Wilton No-Taste Red are both excellent options.
Don’t skip the sour cream. The sour cream is doing important work here — it adds moisture, a faint tang that mirrors the classic red velvet flavor profile, and a slight acidity that reacts with the baking soda to help the cookies rise. Greek yogurt at full fat can substitute in a genuine emergency, but sour cream is the right tool for this job.
Chill the dough for thicker cookies. If you want taller, bakery-style cookies that hold their shape more dramatically under the frosting, refrigerate the dough for 30 to 60 minutes before scooping and baking. The chilled butter takes longer to melt in the oven, which means the cookies spread less and rise more. It’s an optional step but one that makes a noticeable visual difference.
Beat the frosting butter longer than you think necessary. This is the single most impactful tip for the Oreo buttercream specifically. Three to four minutes of beating plain butter before adding any sugar transforms its texture completely — from dense and yellow to pale, airy, and silky. That foundational fluffiness carries through to the finished frosting and is the difference between a frosting that tastes homemade and one that tastes bakery-bought.
Crush the Oreos to different textures. Rather than processing all your Oreos to a uniform fine powder, try leaving some slightly coarser so there are small dark flecks and occasional crunch throughout the frosting. The variation in texture makes every bite more interesting and gives the frosting a genuine cookies-and-cream identity rather than just a flavored buttercream.
Season the frosting. A pinch of salt in the buttercream isn’t an oversight — it’s essential. Salt balances sweetness and makes the Oreo flavor pop in a way that the same frosting without salt simply doesn’t. Don’t skip it, and don’t be shy about it.
Common Mistakes to Avoid
Overmixing after the flour is added. We mentioned this in the instructions, but it deserves emphasis here because it’s the most common and most damaging mistake in cookie baking. The instant the flour disappears into the wet ingredients, stop the mixer. Every additional second of mixing makes the cookies tougher. This is not an exaggeration.
Baking on a single sheet or dark pan. Dark baking pans absorb more heat and can cause the bottoms of your cookies to overbake before the tops are done. Light-colored aluminum pans produce the most even bake. If you only have dark pans, reduce the oven temperature by 25°F and start checking for doneness a minute or two earlier than the recipe suggests.
Using cold butter in the frosting. Cold butter doesn’t aerate properly when beaten. It will result in a dense, slightly lumpy frosting that doesn’t pipe cleanly and has an unpleasant texture on the palate. The butter for the frosting should be genuinely room temperature — soft enough to leave an indent when pressed with your finger, but not melted or greasy.
Adding all the powdered sugar at once. Dumping the entire three cups of powdered sugar into the mixer at once creates an enormous mess and, more importantly, doesn’t allow the sugar to incorporate properly. Add it slowly, in stages, with the mixer on its lowest speed, and your frosting will be smoother and more consistent.
Frosting cookies that are still warm. If there is one absolute rule in this entire recipe, it’s this: do not frost warm cookies. Even slightly warm cookies will melt the buttercream from the bottom up, causing it to slide, pool, and lose all its structure. Be patient. Let the cookies reach complete room temperature, and your frosting will stay exactly where you put it.
Judging doneness by color. Because the cookie dough is already deep red, you can’t use color as a visual guide for doneness the way you would with a standard chocolate chip cookie. Rely on the texture cues instead — edges set, center slightly soft and just barely glossy — and you’ll pull them at the perfect moment every time.
Storage and Serving Suggestions
Storing Frosted Cookies
Store frosted soft red velvet cookies with Oreo buttercream frosting in a single layer in an airtight container at room temperature for up to 3 days. If you need to stack them, place a sheet of parchment between each layer to protect the frosting from being crushed or smeared. In warmer weather or a warm kitchen, refrigerate the cookies to keep the buttercream stable, and bring them to room temperature for 20 minutes before serving.
Refrigerator Storage
In the refrigerator, these cookies stay fresh for up to 5 days. The cold temperature firms up both the cookie and the frosting significantly, so always allow time for them to warm before eating — cold buttercream doesn’t taste the same as room temperature buttercream, and the cookie texture is noticeably better once it’s had time to soften.
Freezing Instructions
Both the unfrosted cookie dough and the baked, unfrosted cookies freeze exceptionally well. For dough, scoop into balls, freeze solid on a baking sheet, then transfer to a zip-lock freezer bag. Bake directly from frozen, adding 2 to 3 extra minutes to the baking time. Baked unfrosted cookies freeze for up to 2 months — thaw completely at room temperature before frosting. Frosted cookies can technically be frozen but the buttercream texture changes slightly after thawing, so unfrosted-then-frost is the better approach.
How to Serve Them
These cookies need very little accompaniment — they are fully complete on their own. That said, they pair beautifully with cold milk, strong black coffee, hot chocolate, or a cup of Earl Grey tea. For a dessert presentation, arrange them on a tiered cake stand alongside some fresh raspberries or strawberries — the red and white color contrast is genuinely beautiful. For gifting, stack two or three in a clear cellophane bag tied with a ribbon, or layer them in a bakery box with tissue paper.
FAQ
Can I make these without a stand mixer?
Absolutely. A hand mixer works just as well for both the cookie dough and the frosting. The process takes slightly longer, and you’ll need to make sure you’re holding the hand mixer at a consistent angle to incorporate air evenly, but the results are identical. If you don’t have any electric mixer at all, you can mix the dough by hand — but the frosting really does require electric beating to achieve the proper light, airy texture.
What can I use instead of sour cream?
Full-fat Greek yogurt is the closest substitute and can replace the sour cream in a 1:1 ratio. Buttermilk works as well — use 3 tablespoons of buttermilk in place of the 2 tablespoons of sour cream, and reduce any other liquid in the recipe accordingly. Cream cheese at a tablespoon or two, softened and mixed in, also works and adds a pleasant tanginess. Avoid low-fat substitutes, as the fat content is part of what gives these cookies their texture.
Can I make these without food coloring?
Yes, though they obviously won’t have the signature red velvet look. Without coloring, the cookies will be a warm, chocolatey brown — still delicious, still visually appealing in their own way, just not red. For a natural alternative, beet powder can be used at about 2 tablespoons — it imparts a muted, dusty rose rather than a vivid red, but it does work. The flavor is almost undetectable when combined with the other ingredients.
Why did my cookies come out cakey instead of chewy?
Cakey cookies almost always result from one of two things: too much flour, or too much baking powder relative to baking soda. Make sure you’re measuring flour correctly — spoon it lightly into the measuring cup and level off with a knife rather than scooping the cup directly from the bag, which compacts the flour and adds significantly more than the recipe intends. Also check that your baking soda and baking powder are in the correct proportions and that neither is old and expired, as both can affect texture.
Can I use Double Stuf Oreos in the frosting?
You can, and they do produce a creamier, slightly richer frosting because of the extra filling. However, the standard Oreo cookie gives a better ratio of chocolate cookie crumb to cream flavor in the frosting — Double Stuf can make the frosting slightly sweeter and a bit less distinctly “Oreo” in character. Either works, and the difference is subtle enough that you should use whatever you have.
How far in advance can I make these for a party?
The cookie dough can be made and refrigerated up to 48 hours in advance. The baked, unfrosted cookies can be made 2 days ahead and stored airtight. The frosting can be made up to 3 days ahead and kept in the refrigerator, brought to room temperature and re-beaten briefly before using. Fully frosted and assembled cookies are best on the day they’re made or the day after, though they remain good for up to 3 days.
Approximate Nutrition Information
Per cookie with frosting, based on a yield of 12 large cookies. Values are estimates and will vary based on specific brands and portion sizes.
| Nutrient | Per Cookie |
|---|---|
| Calories | 490 kcal |
| Total Fat | 26g |
| Saturated Fat | 15g |
| Cholesterol | 90mg |
| Sodium | 280mg |
| Total Carbohydrates | 62g |
| Dietary Fiber | 1g |
| Total Sugars | 44g |
| Protein | 4g |
| Calcium | 28mg |
| Iron | 2mg |
These values are calculated using standard nutrition databases and are intended as a general guide only. For precise dietary tracking, calculate using your specific ingredient brands and exact quantities.
The Only Thing Left to Do Is Make Them
Soft red velvet cookies with Oreo buttercream frosting are one of those recipes that genuinely earns a permanent place in your baking rotation. They deliver on every front — visual drama, flavor complexity, textural contrast, and the kind of crowd response that makes you feel, however briefly, like a professional pastry chef. They’re not complicated to make, but they feel special in a way that transcends the effort involved, which is exactly what the best recipes do.
The thing about this recipe that I keep coming back to is how it respects both the tradition behind red velvet and the playful, modern impulse to make something that surprises people. Red velvet as a flavor and a concept has been around for a very long time, but pairing it with cookies-and-cream frosting feels genuinely fresh and exciting. It’s familiar and unexpected at the same time, and that’s a very hard balance to strike in baking.
So make these for Valentine’s Day. Make them for Christmas. Make them for a birthday party, a bake sale, a friend who needs cheering up, or a Tuesday when you simply want something extraordinary to eat. Make them once and adjust to your taste — maybe you want more Oreo crumbs in the frosting, or an extra hit of cocoa in the cookie base, or a pinch of espresso powder to deepen the whole flavor profile. This recipe is a foundation, and it’s a strong one.
What I can promise you is this: the moment you pull the first batch from the oven, see that deep red against the parchment, smell that warm buttery cocoa in the air, and bite into one topped with a swirl of that Oreo buttercream, you will understand completely why this recipe exists. And you will be making it again very, very soon.
Happy baking.
Soft Red Velvet Cookies with Oreo Buttercream Frosting
Ingredients
Equipment
Method
- Preheat your oven to 350°F (175°C) and line two large baking sheets with parchment paper or silicone baking mats. Remove butter and eggs from the refrigerator 30 minutes before beginning to bring to room temperature. Measure and prepare all ingredients before turning on your mixer.
- In a medium bowl, whisk together the all-purpose flour, cocoa powder, baking soda, baking powder, and salt until evenly combined. Set aside.
- In the bowl of a stand mixer fitted with the paddle attachment, beat the softened butter on medium speed for 2 minutes until pale and creamy. Add the granulated sugar and brown sugar and continue beating for 2–3 minutes until the mixture is light, fluffy, and noticeably increased in volume.
- Reduce mixer speed to low and add the eggs one at a time, mixing well after each addition and scraping down the sides of the bowl as needed. Add the vanilla extract, red gel food coloring, white vinegar, and sour cream. Mix until fully incorporated and the batter is a deep, vivid red. The mixture may look slightly curdled — this is normal.
- With the mixer on the lowest speed, add the flour mixture in two to three additions, mixing only until no dry streaks remain. Stop the mixer immediately once the flour is incorporated — do not overmix. Finish the last few folds by hand with a spatula if needed.
- Using a 3-tablespoon cookie scoop, portion the dough onto the prepared baking sheets, spacing each ball about 2 inches apart. Optionally roll each ball briefly between your palms for perfectly round cookies.
- Bake for 10–12 minutes until the edges are just set but the centers still look slightly underdone and glossy. Remove from the oven and let cookies rest on the baking sheet for 5 minutes before transferring to a wire rack to cool completely.
- In a clean mixer bowl, beat the softened butter on medium-high speed for 3–4 minutes until extremely pale and fluffy. Reduce speed to low and add the sifted powdered sugar in three additions. Add vanilla extract, a pinch of salt, and 3 tablespoons of heavy cream. Increase to medium-high and beat for 2 more minutes until light and smooth.
- Fold the crushed Oreo crumbs into the buttercream by hand using a spatula until evenly distributed. If the frosting is too thick, add the remaining tablespoon of cream. If too loose, add an extra tablespoon of powdered sugar. Taste and adjust.
- Transfer the Oreo buttercream to a piping bag fitted with a large star tip (1M or 2D). Pipe generous swirls onto each fully cooled cookie, starting from the outer edge and spiraling inward and upward. Garnish with a mini Oreo pressed into the center, extra crushed Oreo crumbs, or a drizzle of melted white chocolate. Serve immediately or store as directed.


