7 Reasons This Chocolate Truffle Pie Will Ruin Every Other Dessert for You
Introduction: Why Chocolate Truffle Pie Deserves a Permanent Spot in Your Recipe Rotation
Chocolate Truffle Pie is the kind of dessert that makes people put down their forks, go completely quiet, and then immediately ask for the recipe. It is dense without being heavy, rich without being cloying, and elegant without requiring any professional pastry training whatsoever. If you have ever bitten into a perfectly made chocolate truffle — that smooth, melt-on-contact ganache center with its paper-thin shell — then you already understand what this pie is chasing. Now imagine that experience scaled up into a full, sliceable, shareable dessert. That is exactly what this recipe delivers.
What makes this particular version stand out from the dozens of chocolate pie recipes floating around the internet is the ratio. The filling is built like a true truffle — heavy cream, high-quality dark chocolate, a touch of butter for gloss, and just enough structure to hold a clean slice without turning stiff or rubbery. The crust is a pressed chocolate cookie base that adds crunch and a slight bitterness to contrast the silky filling. Together, they create something that tastes genuinely restaurant-worthy, made entirely in your own kitchen with tools you already own.
I have been making versions of this pie for years — for dinner parties, holiday tables, birthdays, and plenty of Tuesday evenings when the chocolate craving hit hard enough to justify it. Every time, without fail, it disappears before I expect it to. This guide will walk you through every single element: the ingredients, the technique, the pro tips that make the difference between good and unforgettable, and the mistakes that are easy to avoid once someone points them out to you.
Let’s build the best chocolate truffle pie you have ever tasted.
What Makes Chocolate Truffle Pie Different from Regular Chocolate Pie
Before we get into the recipe itself, it is worth understanding what separates a chocolate truffle pie from a standard chocolate pudding pie or a chocolate cream pie. The difference comes down entirely to the filling construction.
A pudding-style chocolate pie relies on cornstarch or flour as a thickener, which gives it a slightly pasty, dense texture and a matte finish. A chocolate cream pie uses whipped cream folded into a custard base, which produces something lighter and airier. A chocolate truffle pie uses neither. The filling is essentially a scaled ganache — chocolate melted directly into hot heavy cream, finished with butter, and poured into a crust to set. The result is a filling with the exact texture of a truffle center: smooth, glossy, intensely chocolatey, and rich in a way that feels almost luxurious.
The crust matters too. An Oreo cookie crust pressed into the pan and chilled rather than baked keeps everything in the no-bake territory, adds a satisfying crunch, and brings a slight cocoa bitterness that balances the sweetness of the filling beautifully.
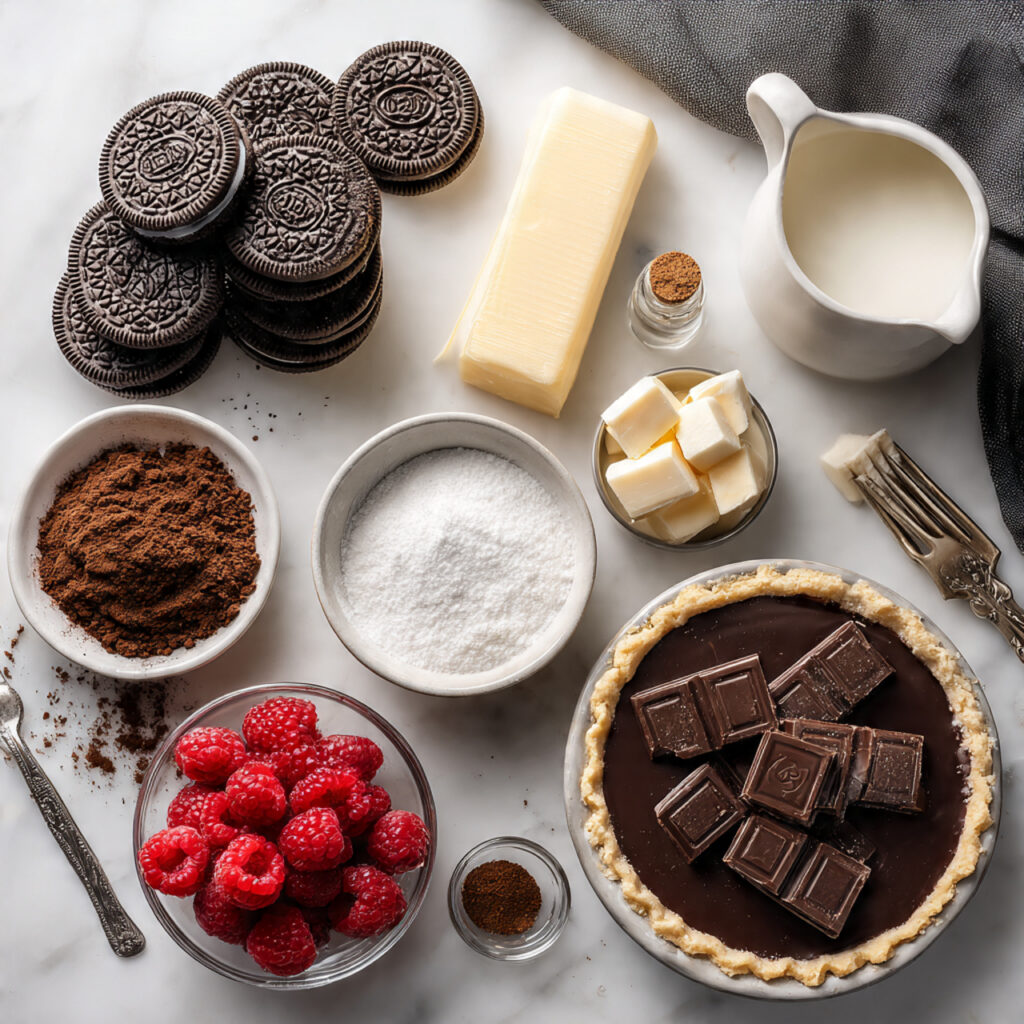
Ingredients
For the Chocolate Cookie Crust
- 24 Oreo cookies (or any chocolate sandwich cookies), finely crushed — filling included
- 5 tablespoons unsalted butter, melted
- Pinch of fine sea salt
For the Chocolate Truffle Filling
- 12 oz (340g) high-quality dark chocolate (60–70% cacao), finely chopped — bar chocolate, not chips
- 1¼ cups (300ml) heavy whipping cream
- 3 tablespoons unsalted butter, cut into small pieces, at room temperature
- 2 tablespoons granulated sugar (optional — omit if your chocolate is below 65% cacao)
- 1 teaspoon pure vanilla extract
- ¼ teaspoon fine sea salt
- 1 tablespoon espresso powder (optional but highly recommended — intensifies chocolate flavor without tasting like coffee)
For Serving and Topping
- Flaky sea salt (Maldon or similar) for finishing
- Fresh raspberries or sliced strawberries
- Lightly sweetened whipped cream
- Cocoa powder or chocolate shavings for dusting
- A drizzle of warm salted caramel sauce (optional but extraordinary)
Step-by-Step Instructions
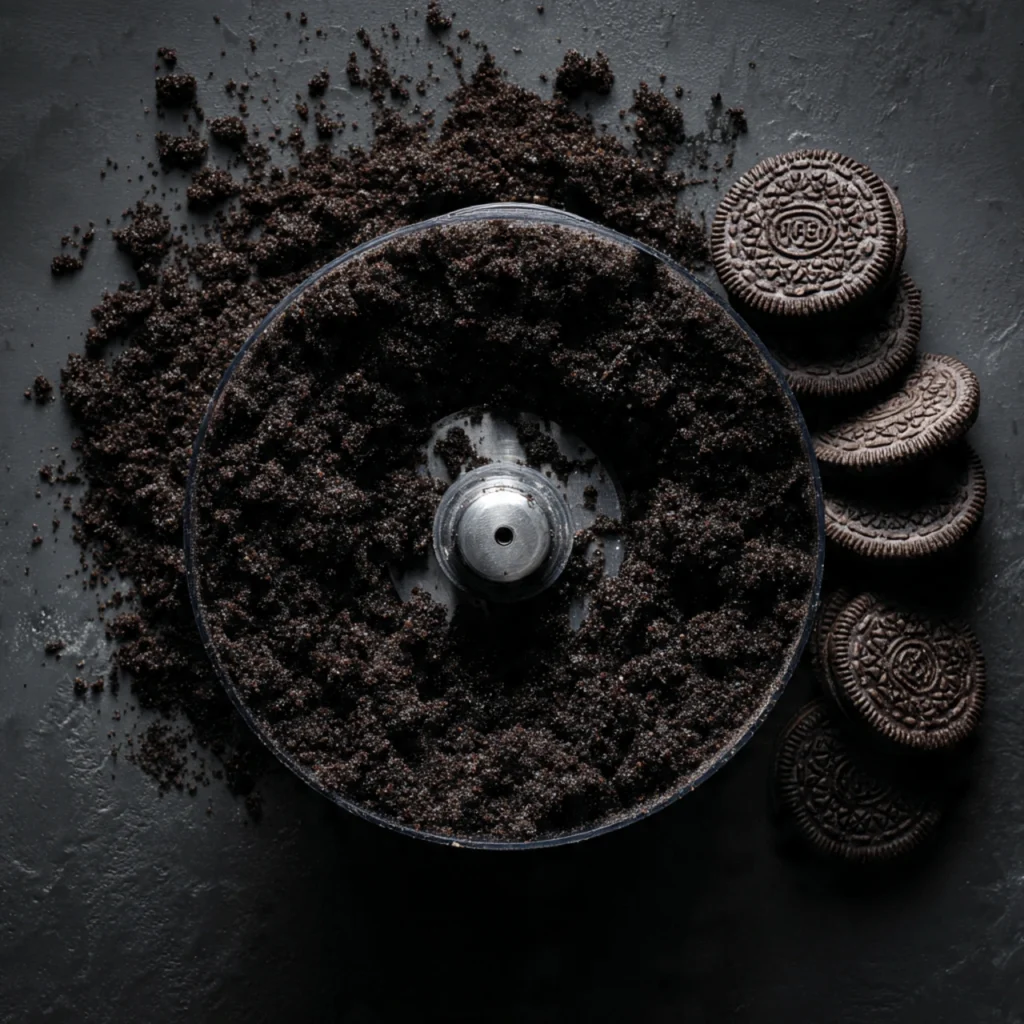
Step 1: Make the Chocolate Cookie Crust
Place the Oreo cookies — filling and all — into a food processor and pulse until you have fine, even crumbs with no large chunks remaining. If you don’t have a food processor, seal them in a zip-lock bag and crush with a rolling pin. Both methods work equally well.
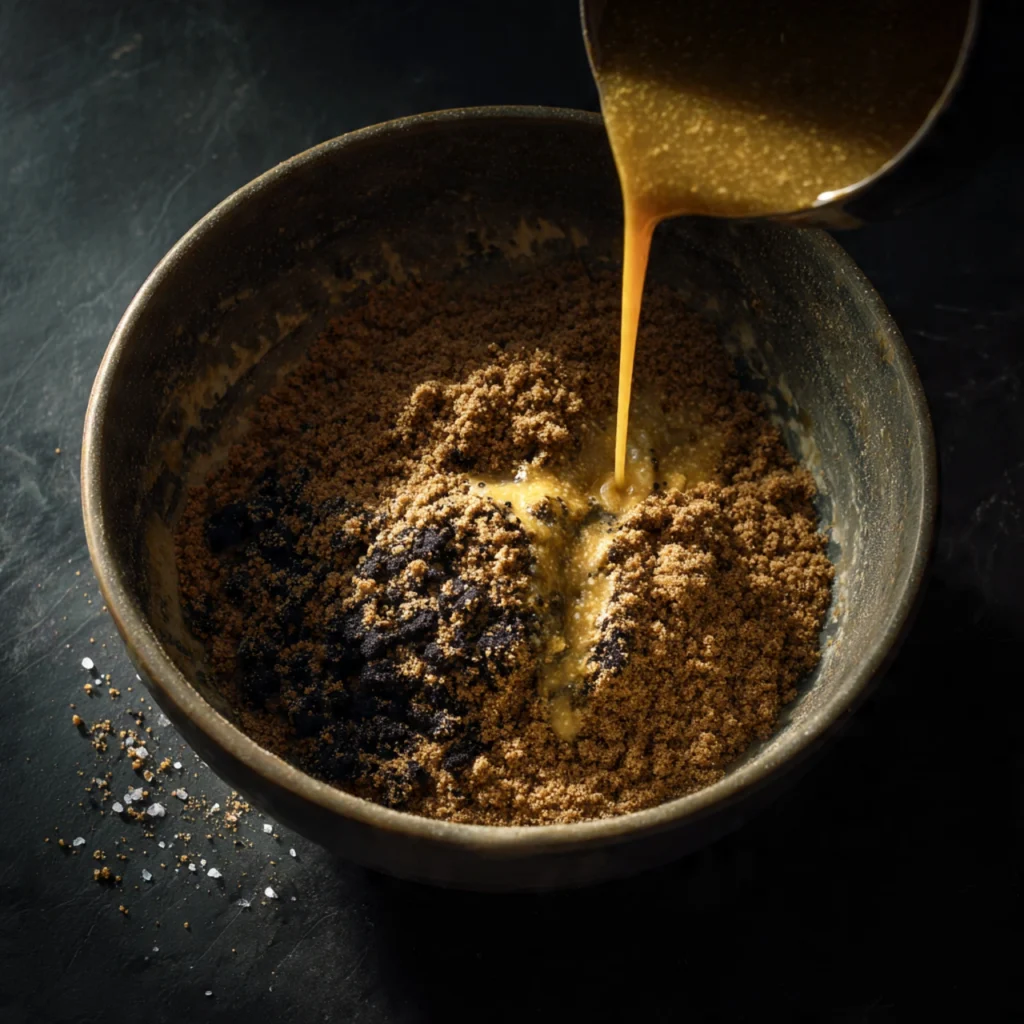
Transfer the crumbs to a large bowl and pour the melted butter over them. Add the pinch of salt. Stir until every crumb is moistened and the mixture holds together when you press a handful between your fingers — it should feel like wet sand. If it seems dry, add another half tablespoon of melted butter.
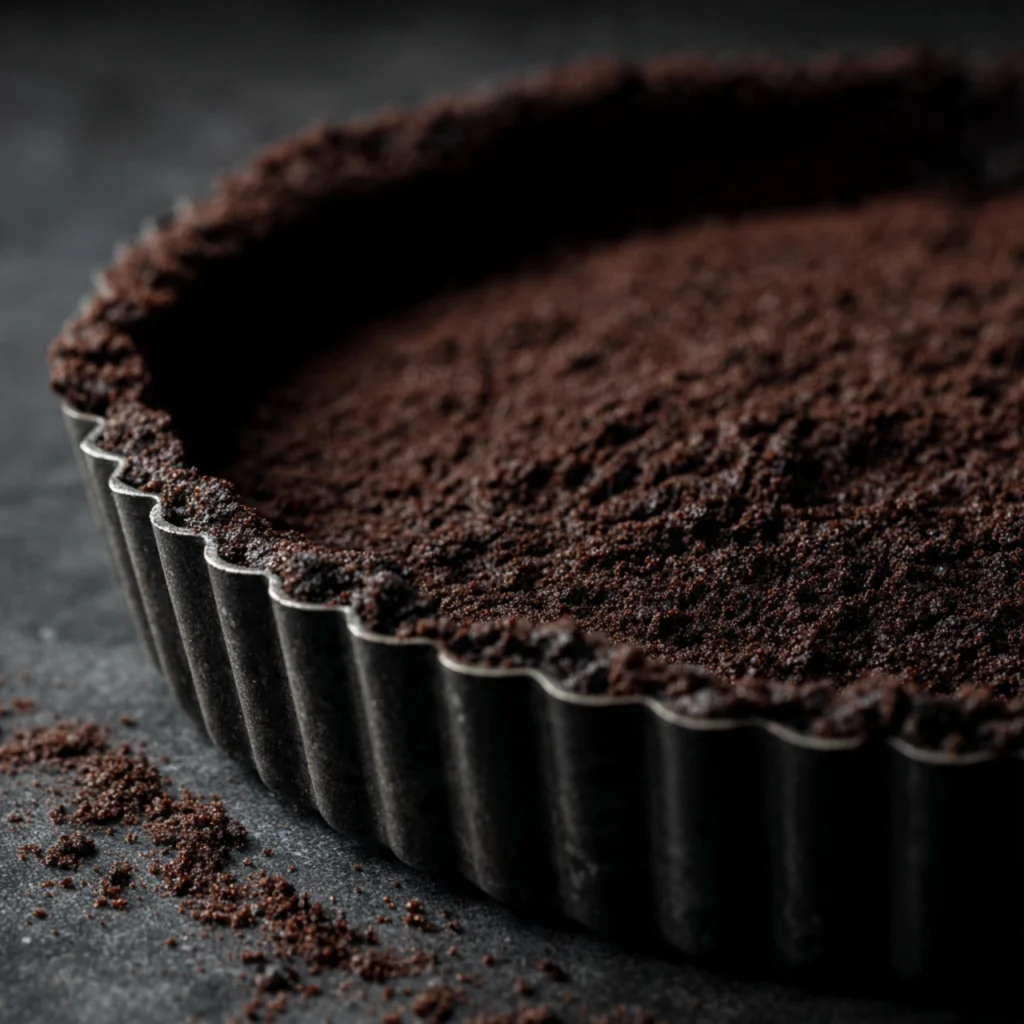
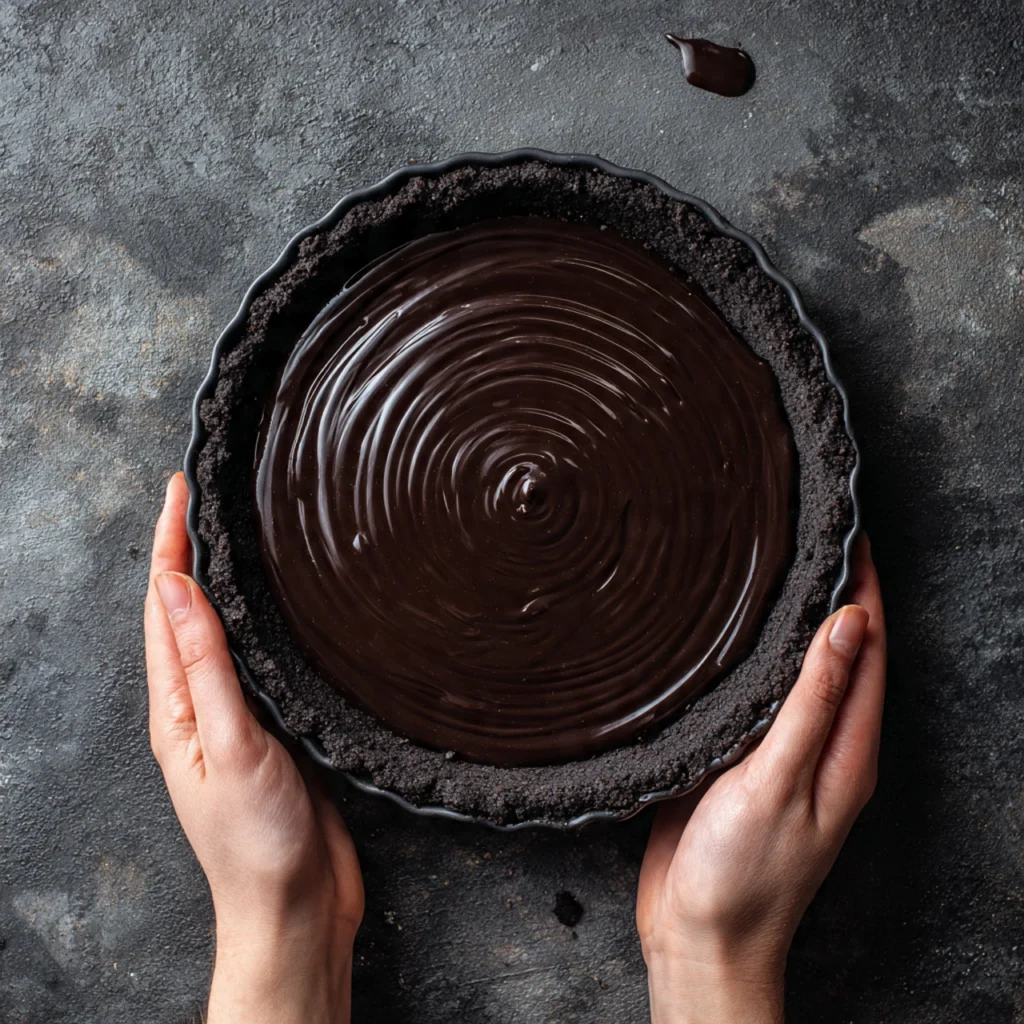
Press the mixture firmly and evenly into the bottom and up the sides of a 9-inch pie dish. Use the flat bottom of a measuring cup or drinking glass to press it into a compact, even layer — the sides are the trickiest part, so take your time there. A thick, even crust will hold together cleanly when sliced.
Refrigerate the crust for at least 20 minutes before adding the filling. This firms the butter and sets the structure so the crust doesn’t crumble when you pour the warm ganache in.
Step 2: Finely Chop the Chocolate
This step gets its own instruction because it genuinely matters. Use a sharp heavy knife and chop the chocolate into very small, roughly even pieces — aim for nothing larger than a pea. The finer your chop, the faster and more evenly the chocolate will melt when the hot cream hits it, which directly affects the smoothness of your final filling. Chocolate chips have stabilizers added to help them hold their shape during baking. Those same stabilizers resist melting and can give your ganache a slightly grainy texture. Use a chocolate bar.
Step 3: Make the Truffle Filling
Pour the heavy cream into a medium saucepan and add the sugar (if using) and espresso powder. Heat over medium heat, stirring occasionally, until the cream just reaches a simmer — you will see small bubbles forming around the edges and a gentle steam rising. Do not boil it.
Place the finely chopped chocolate in a large heatproof bowl. Pour the hot cream directly over the chocolate. Let it sit undisturbed for 2 full minutes — this is the cream softening and beginning to melt the chocolate, and stirring too early interrupts the process. After 2 minutes, add the butter pieces and vanilla extract, then begin stirring from the center of the bowl outward in slow, steady circles. Continue stirring gently — not vigorously — until the ganache is completely smooth, glossy, and uniform with no streaks or lumps remaining. Add the fine sea salt and stir once more.
If you have any small unmelted bits remaining, set the bowl over a pot of barely simmering water (double boiler method) for 30 seconds while stirring — they will dissolve quickly.
Step 4: Pour and Set the Filling
Remove the chilled crust from the refrigerator. Pour the warm ganache filling into the crust in a slow, steady stream, starting from the center and letting it spread naturally outward. Tap the pie dish gently on the counter two or three times to release any air bubbles and level the surface.
Let the pie sit at room temperature for 20 minutes to allow the ganache to begin setting, then transfer it to the refrigerator. Chill uncovered for at least 4 hours, or ideally overnight. The filling needs this time to firm up from a pourable liquid into a sliceable, truffle-textured solid. Covering it before it is fully set can cause condensation to form on the surface.
Step 5: Finish and Serve
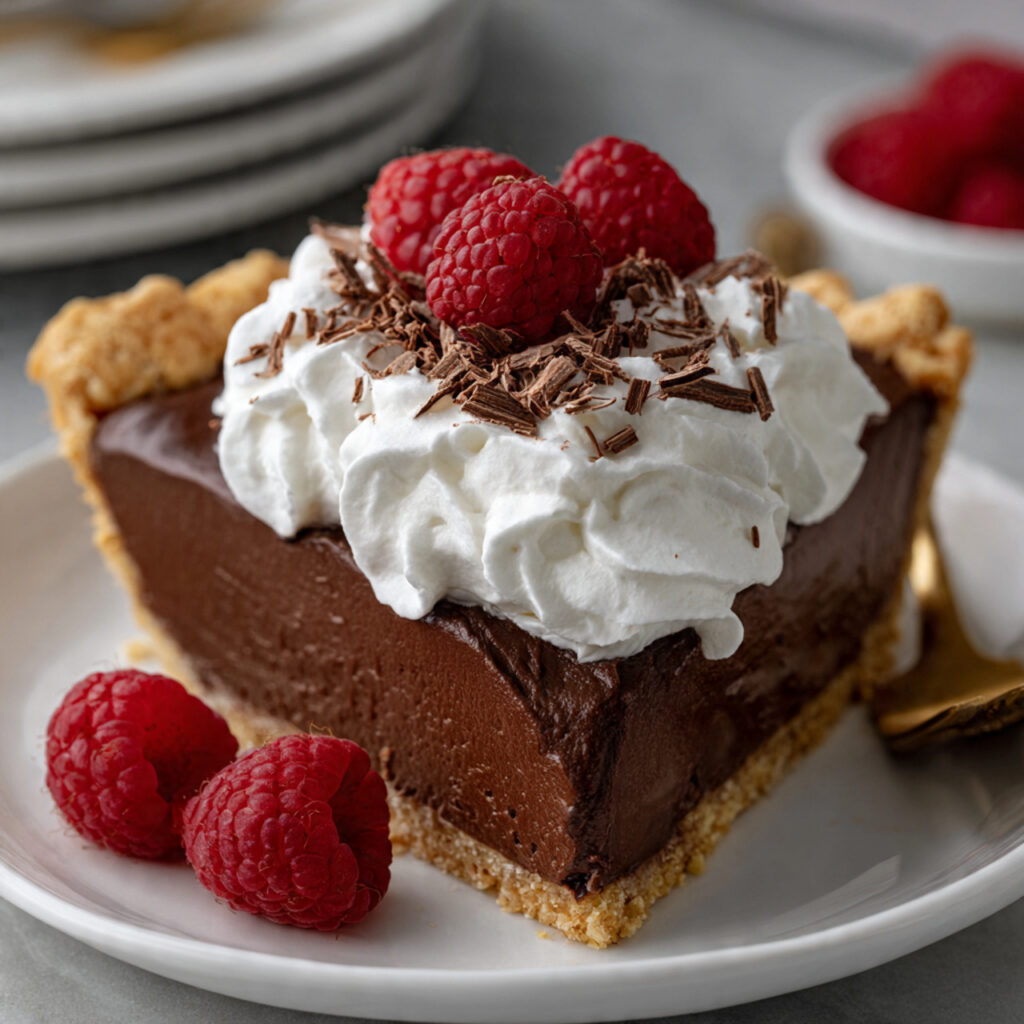
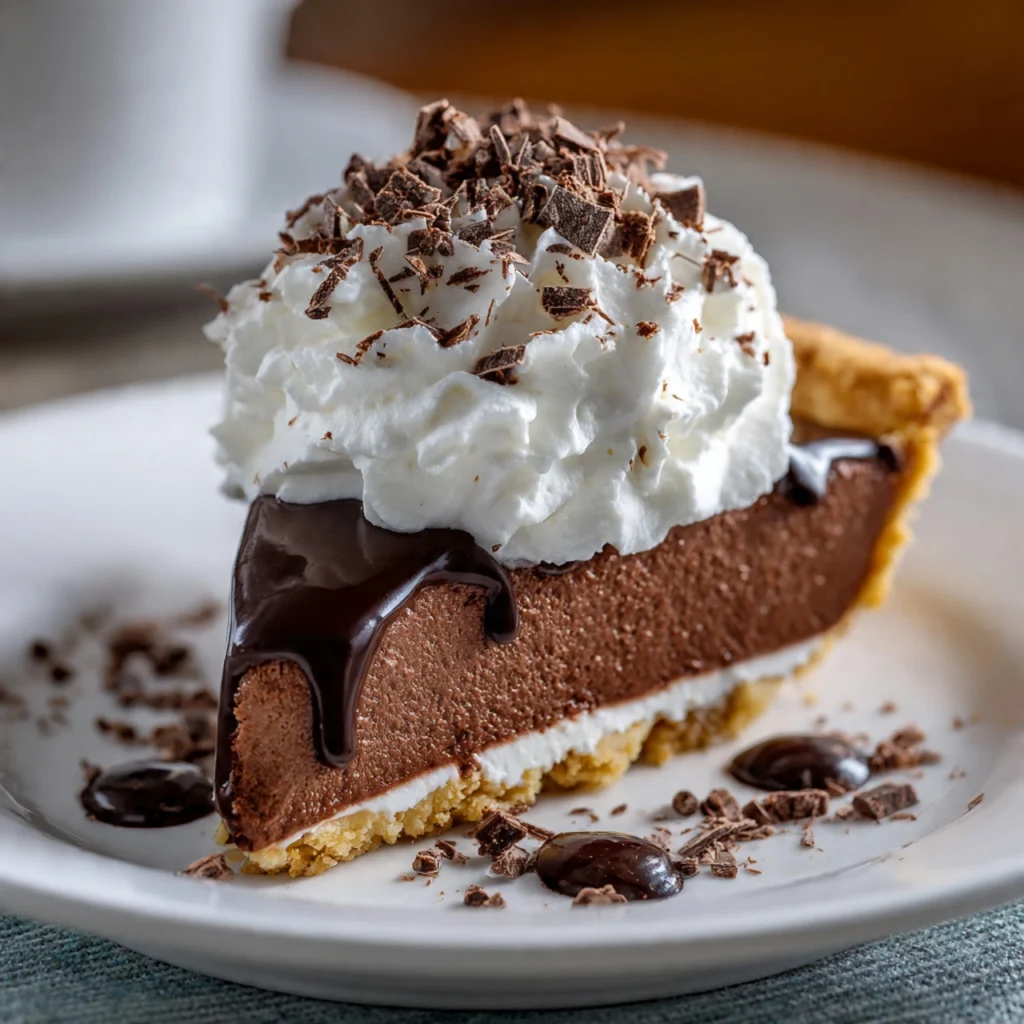
Once the pie is fully set, finish it just before serving. A light scatter of flaky sea salt over the top is the single most impactful finishing touch — it cuts through the richness and makes every bite more intensely chocolatey. Add fresh raspberries, a dusting of cocoa powder, or chocolate shavings depending on the occasion. A dollop of lightly sweetened whipped cream on each slice turns this into a full plated dessert.
To slice cleanly, run a sharp knife under hot water, wipe it dry, and cut with a single downward press — no sawing. Repeat between each slice. This is the difference between a beautiful clean cross-section and a smeared, crumbling mess.
Pro Tips for the Perfect Chocolate Truffle Pie
Use the Best Chocolate You Can Access
This filling has nowhere to hide. There is no competing flavor, no heavy spice, no fruit — just chocolate and cream. The quality of your chocolate is the quality of your pie. Choose a brand you would eat on its own. Valrhona, Guittard, Callebaut, and Lindt Excellence are all excellent options widely available in supermarkets and specialty stores. A 60–70% cacao range gives you deep flavor without the filling becoming too bitter or too stiff.
Room Temperature Butter is Non-Negotiable
Cold butter added to hot ganache will cause it to seize or create small greasy pockets. Let your butter sit at room temperature for at least 30 minutes before starting the recipe. It should be soft enough to press a fingerprint into but not so warm that it is shiny or melting. Room temperature butter emulsifies seamlessly into the ganache, contributing that characteristic truffle gloss.
The Espresso Powder is Your Secret Weapon
You cannot taste coffee in the finished pie — what espresso powder does is chemically amplify the chocolate flavor compounds in cocoa, making the chocolate taste more intensely of itself. Bakers have used this trick for decades and it works every single time. Even people who dislike coffee will not detect it. Do not skip it.
Press the Crust with Serious Pressure
A loosely pressed cookie crust will fall apart the moment you try to cut or serve a slice. Use the back of a spoon, a flat-bottomed glass, or a measuring cup and really compact those crumbs — especially up the sides. The sides need to be at least ¼-inch thick and completely even. Thirty seconds of extra effort here saves you a crumbling disaster later.
Chill Overnight If You Can
Four hours is the minimum. Overnight is better. The difference between a 4-hour pie and a 12-hour pie is a slightly firmer, more truffle-like texture in the filling that holds a cleaner slice and has a slightly deeper flavor as the vanilla and salt have time to fully integrate. If you are making this for an occasion, make it the night before and thank yourself in the morning.
Serve Slightly Below Room Temperature
Pull the pie from the refrigerator 15–20 minutes before serving. Dead-cold ganache can taste slightly muted and has a waxy texture on the palate. At just below room temperature, the filling softens to that perfect melt-on-contact consistency — exactly like biting into a chocolate truffle. This single step dramatically improves the tasting experience.
Common Mistakes to Avoid
Using chocolate chips instead of bar chocolate. Chocolate chips are engineered to hold their shape during baking, which means they resist melting smoothly. The stabilizers create a ganache that can be grainy, dull in color, and slightly waxy in texture. Always use a chopped chocolate bar for truffle-quality results.
Boiling the cream. Cream that is boiled rather than simmered can cause the fat to separate from the milk solids, resulting in a greasy or broken ganache. Heat your cream only until you see gentle bubbling at the edges and steam rising — pull it immediately at that point.
Stirring the ganache too early or too aggressively. Stirring immediately after pouring the cream does not allow the heat to distribute evenly, and stirring vigorously can incorporate air bubbles that dull the glossy finish. Wait the full 2 minutes, then stir slowly from the center outward.
Adding cold butter. As mentioned in the pro tips, cold butter does not emulsify properly into warm ganache. It can create a broken, greasy filling. Room temperature butter is not optional here — it is structural.
Not chilling the crust before adding filling. A warm or room-temperature crust is not fully set, and pouring hot ganache over it can cause the butter to re-melt and the crust to become soggy and shapeless. Twenty minutes in the refrigerator is the minimum — it costs nothing and protects the entire recipe.
Covering the pie before it is fully set. Plastic wrap touching a warm ganache will stick and pull the surface when removed. Condensation trapped under a cover on a setting ganache creates water droplets on the surface. Let it set fully uncovered, then loosely tent with foil if storing beyond the first night.
Cutting the pie straight from the refrigerator. Cold ganache is firm and slightly brittle. Cutting it with a dry knife from full-cold will cause the filling to crack and break rather than slice cleanly. Hot knife, wiped dry, from slightly below room temperature — every time.
Storage and Serving Suggestions
How to Store Chocolate Truffle Pie
Chocolate truffle pie stores exceptionally well, which makes it one of the best make-ahead desserts in the entire repertoire. Once fully set, cover the pie loosely with foil or plastic wrap and refrigerate for up to 5 days. The filling actually improves in texture and depth of flavor between day one and day two, making it ideal for preparing 24 hours ahead of serving.
For longer storage, individual slices can be wrapped tightly in plastic wrap and placed in a freezer-safe container. Frozen slices keep for up to 2 months. Thaw overnight in the refrigerator — the ganache filling returns to its original texture beautifully.
Do not store the finished pie at room temperature for more than 2 hours due to the high cream content in the filling.
Serving Suggestions
This pie is a natural partner for anything that cuts through or complements deep chocolate richness. Fresh raspberries are the classic pairing — their acidity slices right through the ganache and creates one of the most satisfying flavor contrasts in all of dessert. Lightly sweetened whipped cream adds lightness and visual height to each slice. A small drizzle of salted caramel over the top before serving adds a golden sweetness that plays beautifully against the bitterness of dark chocolate.
For a dinner party presentation, plate individual slices on chilled dessert plates, add a small handful of raspberries, a quenelle of whipped cream, a dusting of cocoa powder through a fine mesh sieve, and three to four flakes of Maldon salt. It looks like something from a tasting menu and takes approximately forty-five seconds to plate.
For casual serving, slice directly at the table, pass the whipped cream separately, and let people finish their own. Either way, expect silence followed by requests for seconds.
Frequently Asked Questions
Q1: Can I use milk chocolate instead of dark chocolate in a chocolate truffle pie? You can, but the ratios need to change. Milk chocolate has a higher sugar and milk solid content and a lower cacao percentage, which means the filling will be softer and slower to set. If using milk chocolate, reduce the heavy cream by 2–3 tablespoons to compensate. The finished pie will be sweeter, creamier, and milder in chocolate flavor — excellent for those who find dark chocolate too intense, but a different experience from the classic version.
Q2: Why did my ganache filling turn out grainy? Grainy ganache almost always comes from one of three causes: using chocolate chips instead of bar chocolate, overheating the cream to a rolling boil, or adding cold butter. In some cases it can also result from moisture contamination — even a single drop of water can cause chocolate to seize. If your ganache is grainy, try warming it gently over a double boiler while stirring slowly — it will often come back together. If not, adding a tablespoon of warm cream while stirring can re-emulsify a broken ganache.
Q3: Can I make chocolate truffle pie without a food processor? Absolutely. Place the cookies in a sealed zip-lock bag and crush them with a rolling pin, a heavy skillet, or the back of a large spoon until you have fine, even crumbs. It takes two to three minutes of work and produces results that are virtually identical to a food processor. The only thing to watch for is large chunks — any piece larger than a small pea can create a weak point in the crust wall.
Q4: How far in advance can I make this pie? This is one of the best make-ahead desserts you can choose. The fully assembled and set pie keeps covered in the refrigerator for up to 5 days, with the texture and flavor actually peaking around the 24–36 hour mark. For a dinner party, making it the evening before is genuinely the ideal approach. Add any fresh fruit or whipped cream toppings within an hour of serving.
Q5: Can I make a chocolate truffle pie without dairy? Yes, with good results. Substitute full-fat coconut cream for the heavy cream in a 1:1 ratio — use the thick, solid portion from a chilled can for best results. Replace the butter with refined coconut oil, also at room temperature. The filling will have a very slight coconut undertone, which actually pairs beautifully with dark chocolate. Use a dairy-free chocolate bar (most high-percentage dark chocolates are naturally dairy-free — check the label). The texture will be slightly softer than the dairy version, so extend the chilling time by at least 2 hours.
Q6: My filling has small bubbles on the surface. How do I fix this? Air bubbles typically enter the ganache from over-stirring or pouring too quickly. After pouring the filling into the crust, tap the pie dish firmly on the counter two or three times to bring any trapped bubbles to the surface. If you see a few remaining, use a toothpick to gently pop them or drag them to the edge. Working quickly — before the ganache begins to skin over — is key. The flaky salt and cocoa powder dusting at serving time will cover any minor surface imperfections.
Q7: Can I add flavors or mix-ins to the filling? The ganache base is wonderfully versatile. Add 1–2 tablespoons of bourbon, amaretto, or Kahlúa with the vanilla for a boozy version. Stir in ½ teaspoon of peppermint extract for a mint chocolate truffle pie. Fold in a pinch of cayenne and smoked paprika for a Mexican chocolate variation. Add 2 tablespoons of peanut butter to the warm ganache before pouring for a chocolate peanut butter truffle pie. All of these work beautifully — just keep the add-ins to a modest quantity so they complement the chocolate rather than compete with it.
Nutrition Information (Approximate Per Slice)
Based on 10 slices per 9-inch pie using the full recipe above, without toppings.
| Nutrient | Amount Per Slice |
|---|---|
| Calories | ~480 kcal |
| Total Fat | 34g |
| Saturated Fat | 19g |
| Cholesterol | 70mg |
| Sodium | 210mg |
| Total Carbohydrates | 42g |
| Dietary Fiber | 3g |
| Total Sugars | 28g |
| Added Sugars | 20g |
| Protein | 5g |
| Iron | 15% DV |
| Calcium | 4% DV |
| Magnesium | 12% DV |
Note: Values are approximate and will vary based on specific chocolate brand, exact cream fat content, and whether optional ingredients such as espresso powder or caramel are included. Calculated without whipped cream or fruit toppings.
Conclusion
There are desserts you make because they are expected, and then there are desserts you make because you genuinely cannot stop thinking about them. Chocolate Truffle Pie sits firmly in the second category. It is the kind of recipe that earns a reputation — the one people start requesting by name, the one that becomes your signature contribution to every gathering, the one that makes guests quietly wonder if you trained somewhere professionally.
The reality is that this pie is not technically difficult. It does not require a stand mixer, a thermometer, or any baking at all. What it requires is good chocolate, proper technique, and the patience to let it chill fully before cutting. Follow the steps, avoid the mistakes, use the best chocolate you can find, and pull it from the refrigerator twenty minutes before you serve it. Everything else takes care of itself.
Make it once and you will understand immediately why chocolate truffle pie has no competition at the dessert table. Make it twice and it will be yours — adjusted, refined, with your own preferred toppings and your own preferred chocolate — a recipe that belongs to you for keeps.
Now go chop that chocolate.
Chocolate Truffle Pie
Ingredients
Equipment
Method
- Place the Oreo cookies — filling and all — into a food processor and pulse until you have fine, even crumbs with no large chunks remaining. Alternatively, seal them in a zip-lock bag and crush with a rolling pin.
- Transfer the crumbs to a large bowl. Pour the melted butter over them and add the pinch of salt. Stir until every crumb is moistened and the mixture holds together when pressed between your fingers. Press the mixture firmly and evenly into the bottom and up the sides of a 9-inch pie dish using the flat bottom of a measuring cup or glass. Refrigerate for at least 20 minutes.
- Using a sharp heavy knife, chop the chocolate bar into very small, roughly even pieces — aim for nothing larger than a pea. Fine chopping ensures fast, even melting and a perfectly smooth ganache filling.
- Pour the heavy cream into a medium saucepan and add the sugar (if using) and espresso powder. Heat over medium heat, stirring occasionally, until the cream just reaches a simmer with small bubbles forming around the edges and gentle steam rising. Do not boil.
- Place the finely chopped chocolate in a large heatproof bowl. Pour the hot cream directly over the chocolate. Let it sit completely undisturbed for 2 full minutes. Add the room temperature butter pieces and vanilla extract, then stir slowly from the center outward in steady circles until the ganache is completely smooth, glossy, and uniform. Add the fine sea salt and stir once more.
- Remove the chilled crust from the refrigerator. Pour the warm ganache filling into the crust in a slow, steady stream starting from the center, letting it spread naturally outward. Tap the pie dish gently on the counter two or three times to release any air bubbles and level the surface.
- Let the pie sit at room temperature for 20 minutes, then transfer it to the refrigerator. Chill uncovered for at least 4 hours, or ideally overnight. Do not cover until fully set to prevent condensation forming on the surface.
- Once fully set, scatter flaky sea salt over the top. Add fresh raspberries, a dusting of cocoa powder, or chocolate shavings. To slice cleanly, run a sharp knife under hot water, wipe it dry, and cut with a single downward press — no sawing. Repeat between each slice. Add a dollop of lightly sweetened whipped cream to each slice before serving.
