Creamy Chocolate Walnut Fudge: The Rich, Indulgent Treat That Disappears Every Single Time
Creamy Chocolate Walnut Fudge – Rich, Smooth, and Impossible to Stop Eating
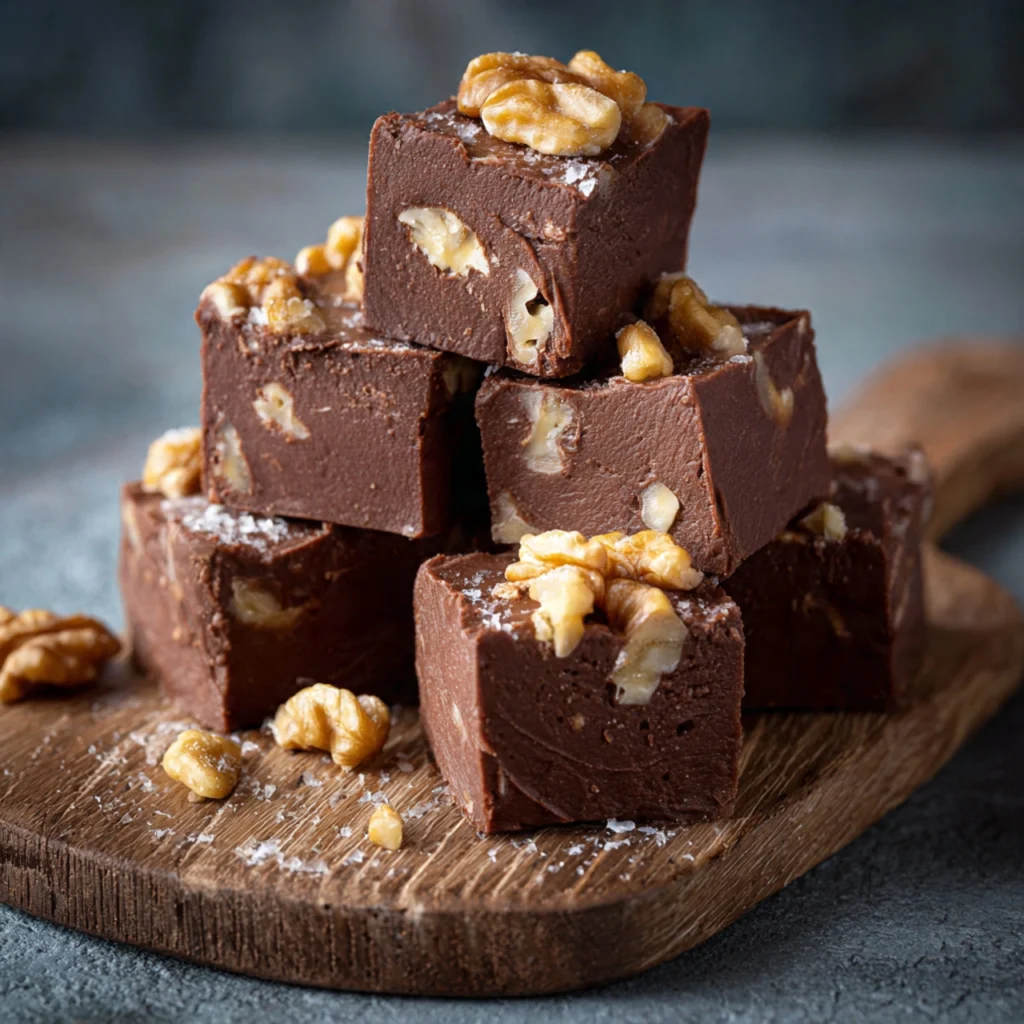
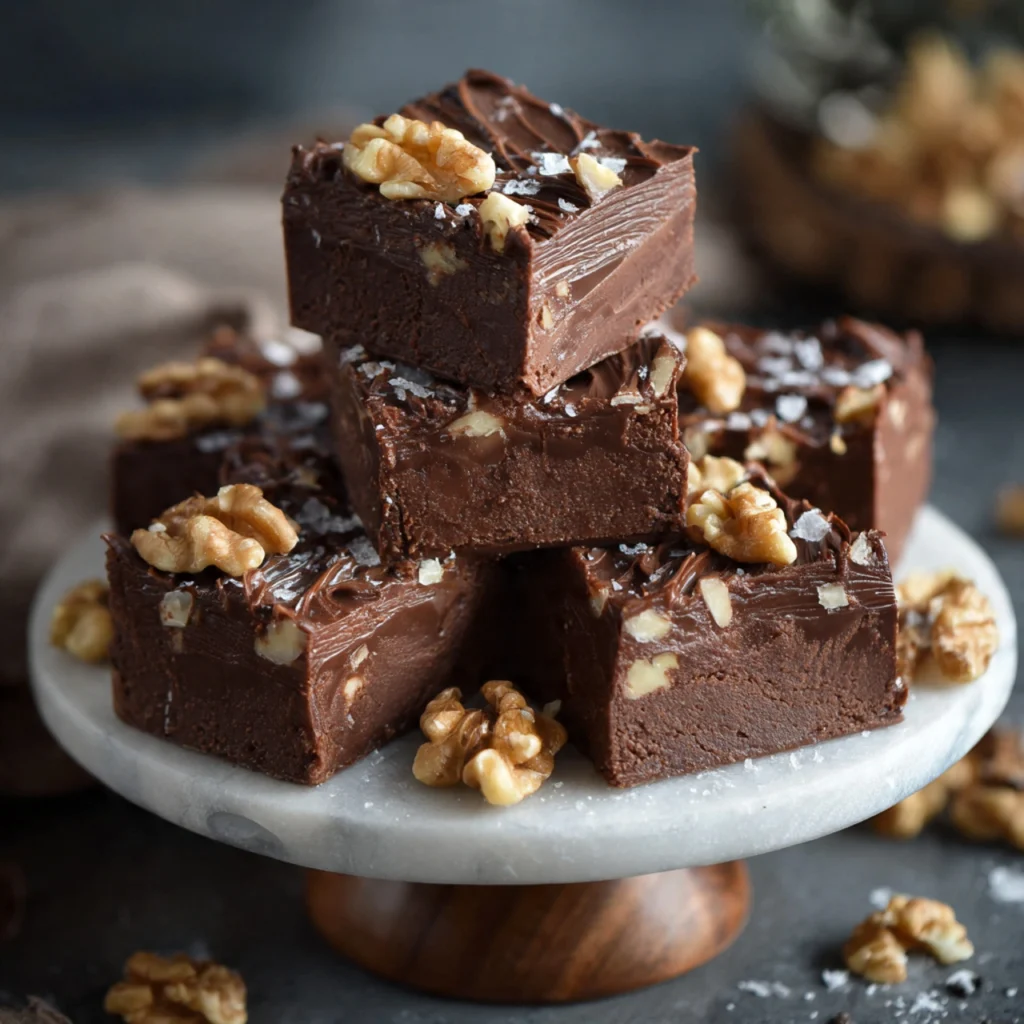
Creamy Chocolate Walnut Fudge is the kind of confection that has been stopping people mid-conversation at holiday parties, bake sales, and family gatherings for generations — and for reasons that are immediately obvious the moment you take the first bite. It is dense without being heavy, sweet without being cloying, and the toasted walnuts tucked throughout add a earthy crunch that makes every single square feel like a complete, intentional experience rather than just another piece of candy.
There is something deeply nostalgic about a good piece of chocolate fudge. It appears on holiday cookie trays wrapped in wax paper. It fills the glass jars at old-fashioned candy shops. It is the thing your grandmother made every December and that nobody has quite been able to replicate since — until now. This recipe is built to change that. It uses a method that is accessible to any home cook while delivering results that taste professional, intentional, and genuinely excellent.
What makes this version stand apart from the dozens of chocolate fudge recipes circulating online is the combination of techniques and ingredient choices that prioritize texture above all else. The fudge is smooth enough to melt on the tongue in the first second, then gives way to the resistance of toasted walnut pieces that add complexity, depth, and a slight bitterness that balances the sweetness of the chocolate perfectly. This is not an afterthought of a dessert. This is a recipe worth making carefully, and the results are worth every minute.
Why This Creamy Chocolate Walnut Fudge Recipe Is Different From the Rest
Most homemade fudge recipes fall into one of two categories. The first is the old-fashioned stovetop method that requires a candy thermometer, precise temperature monitoring, and a practiced hand with a wooden spoon — genuinely excellent results, but intimidating for anyone who has not made candy before. The second is the quick condensed milk method that produces a softer, ganache-like fudge that sets beautifully but sometimes lacks the depth and chew that people associate with the real thing.
This recipe sits deliberately between the two. It uses sweetened condensed milk as its base — which eliminates the need for a candy thermometer and makes the whole process reliable and repeatable — but it layers in techniques that coax out real complexity: toasting the walnuts to deepen their flavor, using a combination of semisweet and dark chocolate for a more nuanced chocolate profile, and adding a small amount of butter and vanilla at the end that rounds everything out into something genuinely special. The result tastes like a recipe that has been passed down and refined over decades. Because effectively, it has been.
Ingredients for Creamy Chocolate Walnut Fudge
Here is everything you need to make approximately 36 pieces of fudge in a standard 8×8-inch pan.
For the Fudge
3 cups semisweet chocolate chips (or a combination of semisweet and dark chocolate chips) 1 can (14 oz) sweetened condensed milk 3 tablespoons unsalted butter, cut into cubes 1 teaspoon pure vanilla extract ¼ teaspoon fine sea salt 1½ cups walnut halves and pieces, roughly chopped
For the Optional Topping
½ cup walnut halves (for pressing into the top before setting) Flaky sea salt for finishing (highly recommended) A drizzle of melted white or dark chocolate for visual contrast
Equipment You Will Need
8×8-inch square baking pan Parchment paper Heavy-bottomed medium saucepan Wooden spoon or silicone spatula Sharp knife for chopping walnuts and cutting fudge Dry skillet for toasting walnuts Cutting board Measuring cups and spoons
Step-by-Step Instructions for Perfect Creamy Chocolate Walnut Fudge

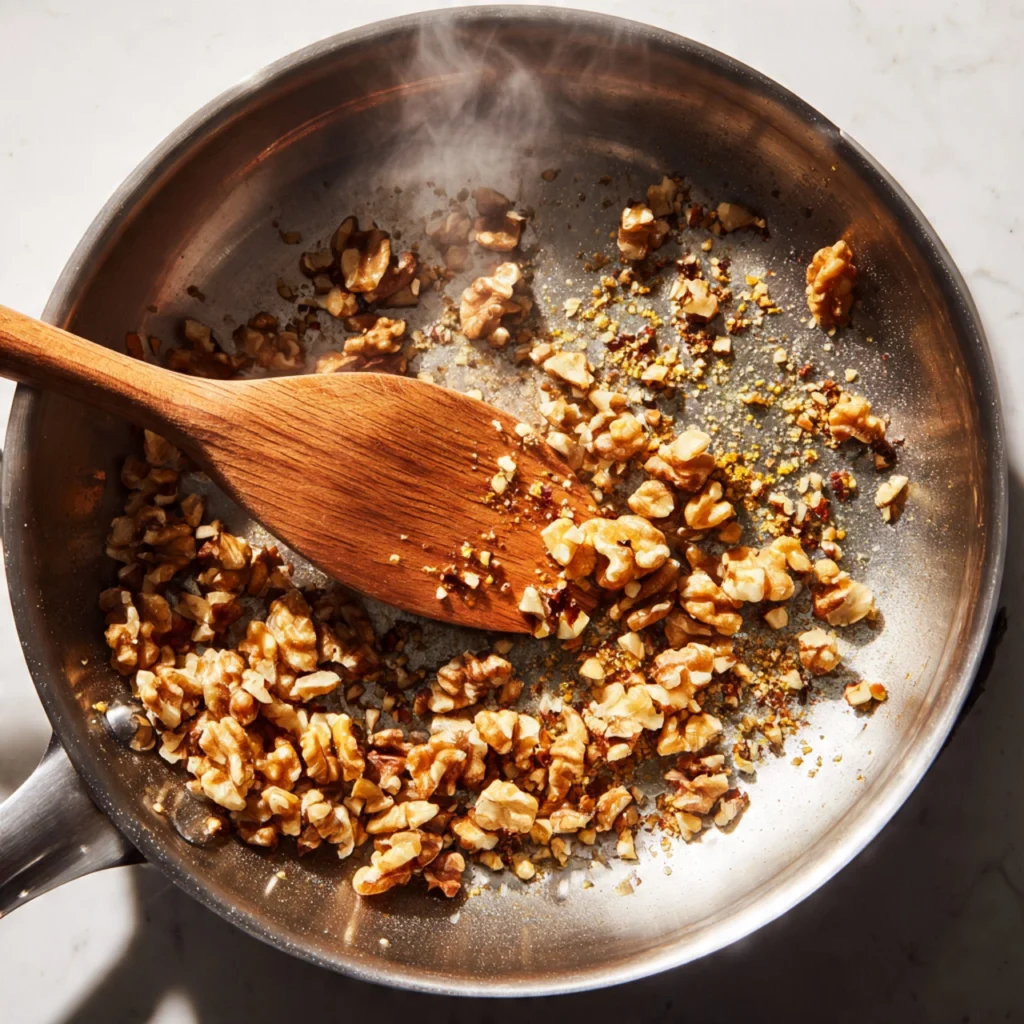
Step 1 – Toast the Walnuts
Place the chopped walnuts in a dry skillet over medium heat. Toast, stirring frequently, for 3 to 5 minutes until fragrant and lightly golden. Watch them carefully — walnuts go from perfectly toasted to burnt very quickly, and burnt walnuts will make the entire batch of fudge bitter and unpleasant. As soon as you smell that warm, nutty aroma and see the pieces turning a shade darker, remove them from the heat immediately and transfer to a plate to cool. This single step transforms the flavor of the walnuts from flat and slightly waxy to deeply nutty, complex, and richly aromatic. Do not skip it.
Step 2 – Prepare the Pan
Line your 8×8-inch baking pan with parchment paper, leaving enough overhang on two sides to use as handles for lifting the fudge out cleanly once it has set. Press the parchment into the corners as smoothly as possible. Lightly butter or spray the parchment if desired for extra insurance, though properly overhanging parchment typically releases without any additional greasing.
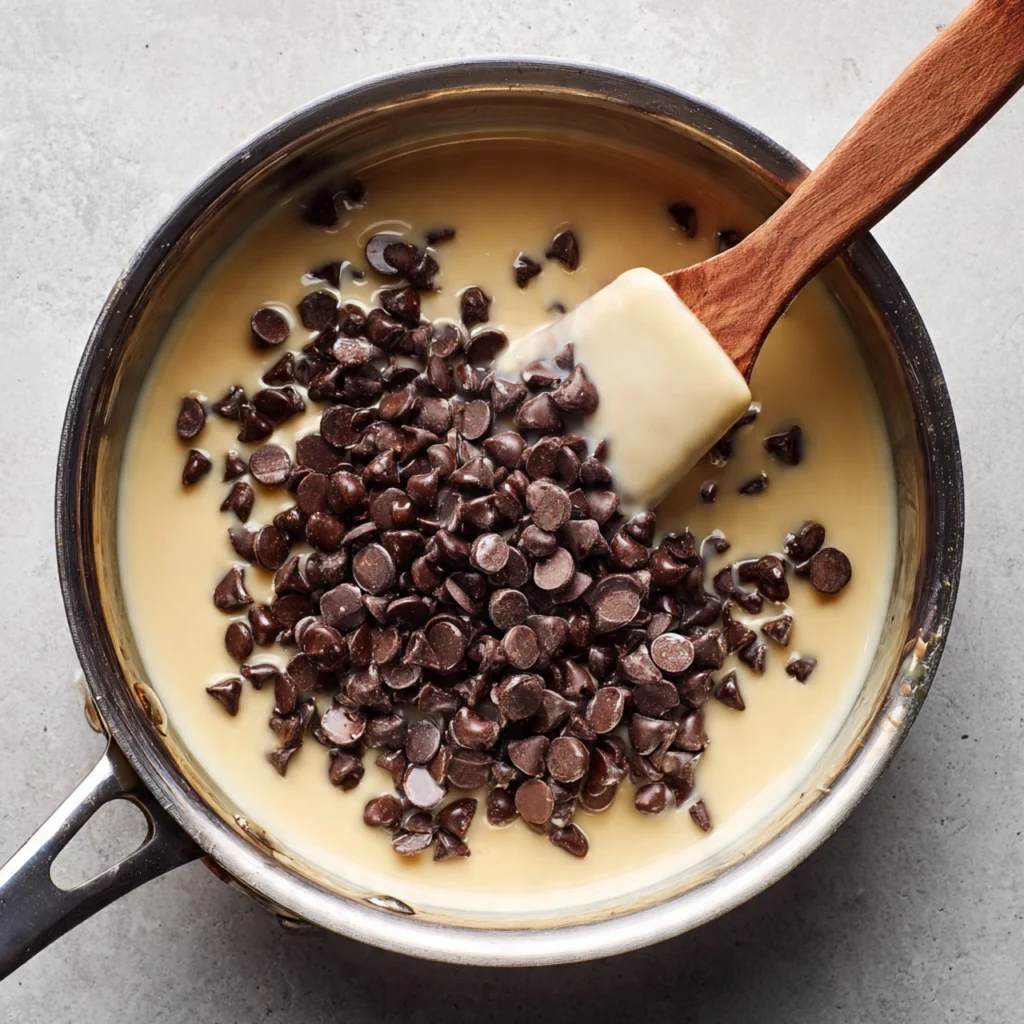
Step 3 – Melt the Chocolate and Condensed Milk
In a heavy-bottomed medium saucepan over low heat, combine the chocolate chips and sweetened condensed milk. Stir continuously with a silicone spatula or wooden spoon, scraping the bottom and sides of the pan frequently to prevent scorching. Continue stirring until the chocolate is completely melted and the mixture is perfectly smooth and glossy with no visible lumps or unmelted pieces remaining. This process takes approximately 5 to 8 minutes over low heat. Do not be tempted to raise the temperature to speed things up — chocolate scorches easily and a scorched fudge base cannot be recovered.
Step 4 – Add Butter, Vanilla, and Salt
Remove the saucepan from the heat. Add the cubed butter, vanilla extract, and fine sea salt to the melted chocolate mixture. Stir vigorously until the butter is completely melted and incorporated and the mixture is glossy, smooth, and uniform. The butter adds a richness and a slight silkiness to the finished fudge that makes it feel luxurious rather than dense, and the vanilla rounds out the chocolate flavor in a way that is subtle but unmistakably present.
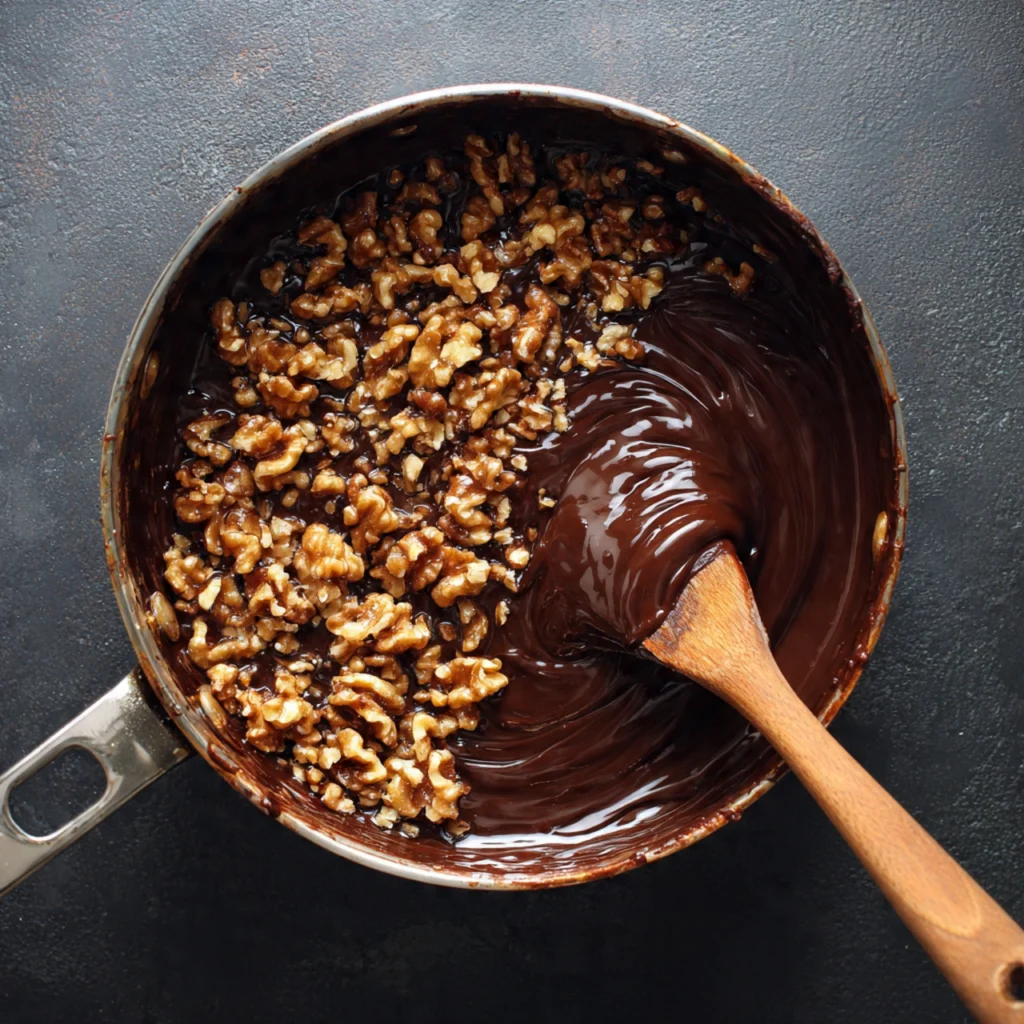
Step 5 – Fold in the Toasted Walnuts
Add the cooled toasted walnuts to the chocolate mixture and fold them in thoroughly with a spatula until they are evenly distributed throughout the fudge. Work quickly but gently — the mixture will begin to thicken as it cools, and you want to get the walnuts evenly incorporated before it becomes difficult to stir.
Step 6 – Pour and Spread
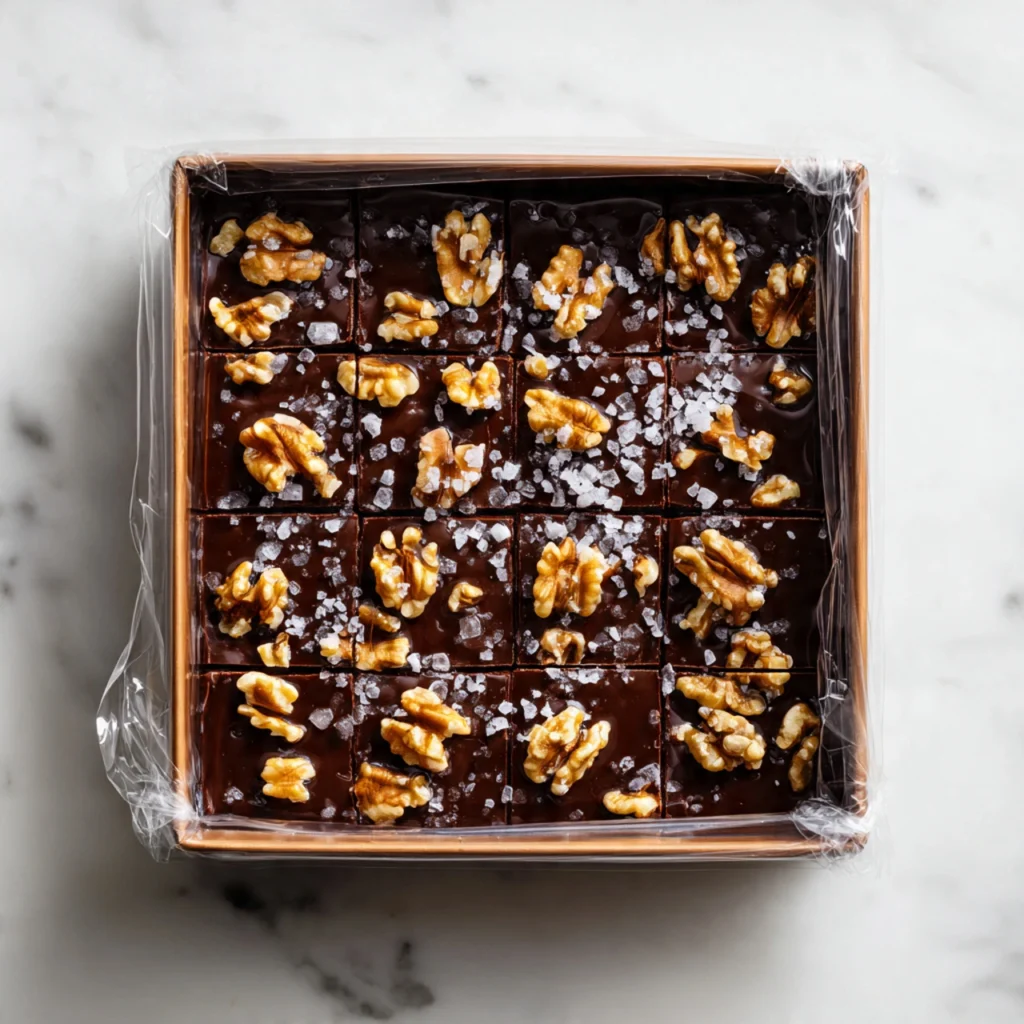
Pour the fudge mixture into the prepared lined pan and spread it into an even layer using an offset spatula or the back of a spoon. Work quickly and smooth the top as flat as possible. If you are adding whole walnut halves to the top, press them gently and evenly into the surface now before the fudge begins to set. Add a pinch of flaky sea salt across the top if desired — the contrast between sweet chocolate and flaky salt is one of the most satisfying flavor combinations in the entire dessert world.
Step 7 – Chill and Set
Allow the fudge to cool at room temperature for 15 minutes, then transfer the pan to the refrigerator. Chill for a minimum of 2 hours until the fudge is completely firm and set throughout. Do not try to cut it before it is fully set — fudge that has not chilled long enough will be soft, sticky, and will not cut cleanly no matter how sharp your knife is.
Step 8 – Cut and Serve
Lift the fudge out of the pan using the parchment paper handles and place it on a cutting board. Using a large, sharp knife, cut the fudge into 36 squares. For the cleanest cuts, dip the knife in hot water and wipe it dry between each cut. The heat helps the knife slide through the cold fudge cleanly rather than dragging and tearing the edges. Serve at room temperature for the best texture — fudge straight from the refrigerator is slightly harder than its ideal eating texture.
Pro Tips for the Perfect Creamy Chocolate Walnut Fudge
Use Good Quality Chocolate
The quality of the chocolate you use is the single most impactful variable in the final flavor of this fudge. Good chocolate tastes like good chocolate, and cheap chocolate tastes like cheap chocolate — and there is no amount of butter, vanilla, or technique that bridges that gap completely. Use a chocolate chip brand you genuinely enjoy eating on its own, or chop a good quality chocolate bar. Brands like Ghirardelli, Guittard, or Valrhona produce consistently excellent results.
Combine Semisweet and Dark Chocolate for Depth
Using exclusively semisweet chocolate produces a fudge that is good but one-dimensional in flavor. Replacing one cup of the semisweet chips with dark chocolate chips (60 to 72 percent cacao) adds a slight bitterness that makes the sweetness feel more balanced and gives the fudge a more complex, adult flavor profile. The combination is noticeably better than either chocolate used alone.
Low and Slow Is the Only Way
Every experienced candy maker will tell you the same thing — chocolate melts on low heat, not medium, and definitely not high. High heat causes the chocolate to seize, separate, or scorch, all of which result in a grainy, dull, and unpleasant fudge. Keep the heat at the lowest setting your stovetop offers and let patience do the work.
Salt Is Not Optional
The fine sea salt stirred into the batter and the flaky salt pressed into the top are not decorative choices — they are flavor choices. Salt suppresses bitterness, enhances sweetness, and makes chocolate taste more intensely like chocolate. A fudge made without any salt tastes flat and one-note by comparison. Use it with confidence.
Let It Come to Room Temperature Before Serving
Fudge served cold is harder, less fragrant, and less flavorful than fudge served at room temperature. Pull it from the refrigerator 15 to 20 minutes before serving and allow it to soften slightly. The texture at room temperature is smoother, the chocolate flavor is more pronounced, and the overall eating experience is noticeably better.
Common Mistakes to Avoid When Making Creamy Chocolate Walnut Fudge
Using High Heat to Melt the Chocolate
This is the most common and most damaging mistake in fudge making. Chocolate melted over high heat either scorches on the bottom of the pan, producing a bitter, grainy result, or seizes suddenly into a thick, dry mass that cannot be smoothed out. There is no fixing scorched or seized chocolate. Low heat and continuous stirring are the only way.
Skipping the Walnut Toasting Step
Raw walnuts have a slightly waxy, flat flavor that does not hold up against the intensity of the chocolate. Toasted walnuts have a deeper, richer, more complex flavor that complements the chocolate rather than being overwhelmed by it. The toasting step takes less than 5 minutes and makes a genuinely perceptible difference in the finished product. It is worth every second.
Not Lining the Pan Properly
Fudge that is poured into an unlined or poorly lined pan is extraordinarily difficult to remove without breaking, crumbling, or destroying the surface. Use parchment paper with generous overhang on at least two sides, press it into the corners carefully, and the fudge will lift out cleanly and completely every time.
Cutting the Fudge Before It Is Fully Set
Impatience at the cutting stage produces fudge with ragged, soft edges that look nothing like the clean, defined squares you are aiming for. Two hours in the refrigerator is the minimum — if you can wait longer, the fudge will be even firmer and easier to cut cleanly. The hot knife technique described in the instructions above makes a significant difference regardless of how long the fudge has chilled.
Storing It Uncovered
Fudge left uncovered in the refrigerator absorbs surrounding odors and dries out around the edges, developing a dull, slightly grainy crust that affects both the appearance and the texture. Always store it in an airtight container or wrapped tightly in plastic wrap.
Storage and Serving Suggestions
How to Store Creamy Chocolate Walnut Fudge
Store cut fudge in an airtight container at room temperature for up to 2 weeks. Place pieces in a single layer or separate layers with parchment paper between them to prevent sticking. If your home is warm or humid, store in the refrigerator in an airtight container for up to 3 weeks, bringing pieces to room temperature before serving for the best texture and flavor.
Creamy Chocolate Walnut Fudge freezes exceptionally well for up to 3 months. Wrap individual pieces or the entire block tightly in plastic wrap, then place in a freezer-safe bag or container. Thaw at room temperature for 1 to 2 hours before serving. The texture and flavor hold up remarkably well through freezing and thawing, making this an ideal make-ahead treat for the holidays.
Gifting Suggestions
This fudge is one of the most beloved homemade edible gifts for good reason. Cut it into neat squares, layer it in a small decorative tin or box lined with parchment paper, and tie it with a ribbon for an effortlessly beautiful holiday gift that costs a fraction of what comparable artisan fudge sells for in specialty stores. A small card with the flavor written on it — Dark Chocolate Walnut Fudge with Sea Salt — adds a professional, thoughtful touch that elevates the gift significantly.
Serving Suggestions
Serve Creamy Chocolate Walnut Fudge as part of a holiday dessert spread alongside other confections like peppermint bark, shortbread cookies, and caramel truffles. It pairs beautifully with a strong cup of black coffee, a glass of full-bodied red wine like Cabernet Sauvignon, or a mug of hot cocoa on a cold evening. For a more elevated dessert plate, serve two or three small squares alongside a scoop of vanilla bean ice cream with a drizzle of warm caramel sauce — the cold, creamy ice cream against the dense, rich fudge is a genuinely outstanding combination.
Frequently Asked Questions About Creamy Chocolate Walnut Fudge
Why did my fudge turn out grainy?
Grainy fudge is almost always caused by one of three things: the chocolate was overheated and scorched, the mixture was stirred too aggressively after the chocolate began to set, or sugar crystals formed on the sides of the pan and were incorporated back into the mixture. To prevent this, always use low heat, stir gently and continuously, and scrape the sides of the pan regularly throughout the melting process.
Can I make this fudge without walnuts?
Absolutely. This recipe works beautifully without nuts for anyone with allergies or preferences. You can substitute other additions — toasted pecans, dried cranberries, crushed pretzels, mini marshmallows, or a peppermint extract swap for a completely different flavor profile. The base recipe is flexible and forgiving of creative variations.
Can I use evaporated milk instead of sweetened condensed milk?
No — these two products are not interchangeable in this recipe. Sweetened condensed milk is thick, sweet, and provides the sugar and body that the fudge needs to set properly. Evaporated milk is thin and unsweetened, and substituting it will result in a fudge that never sets correctly and tastes significantly different from what is intended.
How do I know when the chocolate is fully melted and ready?
The mixture should be completely smooth, glossy, and uniform with no visible lumps, streaks, or unmelted chocolate pieces remaining. When you run a spatula through it, it should fall back into the pan in a smooth, even ribbon without any lumpy or irregular texture. If there are still visible pieces, continue stirring over low heat until completely smooth.
Can I double this recipe?
Yes. Double all ingredient amounts and use a 9×13-inch pan instead of an 8×8-inch pan. The spreading and chilling process remains the same. Doubling the recipe is a great idea for large holiday gatherings or when making fudge as gifts for multiple people — the additional time investment is minimal and the yield is significantly larger.
Can I add peanut butter to this fudge?
Yes, and the result is exceptional. Add ¼ to ½ cup of creamy peanut butter to the chocolate and condensed milk mixture as it melts and stir to combine completely. The peanut butter adds richness and a complementary flavor that pairs naturally with both the chocolate and the walnuts. Reduce the butter by 1 tablespoon if using peanut butter to maintain the right consistency.
Approximate Nutrition Information
Per piece based on 36 pieces without optional toppings:
Calories: 145 Total Fat: 9g Saturated Fat: 4g Cholesterol: 8mg Sodium: 35mg Total Carbohydrates: 16g Sugars: 13g Protein: 2g Fiber: 1g
Please note these values are approximate estimates based on standard ingredient amounts and will vary depending on the specific chocolate brands used, portion sizes, and any additions or substitutions made to the base recipe.
Why Creamy Chocolate Walnut Fudge Belongs in Your Recipe Collection Forever
Some recipes exist for a single season or occasion. Creamy Chocolate Walnut Fudge exists for all of them. It belongs on holiday tables in December and at summer potlucks in August. It belongs in gift boxes tied with ribbon and on kitchen counters cut into rough squares because someone could not wait for the presentation. It belongs at bake sales, birthday parties, and quiet Tuesday evenings when the craving for something rich and chocolatey arrives without warning or apology.
What makes this recipe worth returning to again and again is not just that it tastes exceptional — though it does. It is that it is genuinely reliable. The condensed milk base removes the guesswork. The toasted walnuts remove the flatness. The combination of semisweet and dark chocolate removes the one-dimensionality. Every choice in this recipe exists because it makes the final result measurably better, and the final result is something that people remember and ask about and request by name.
Make it for the holidays. Make it as a gift. Make it for yourself on a rainy afternoon with a good cup of coffee and no particular occasion required. Whatever the reason, make it carefully, follow the steps with patience, and trust that the process produces exactly what it promises — something rich, creamy, deeply chocolatey, and worth every single bite.
Creamy Chocolate Walnut Fudge
Ingredients
Equipment
Method
- Place the chopped walnuts in a dry skillet over medium heat. Toast, stirring frequently, for 3 to 5 minutes until fragrant and lightly golden. Remove from heat immediately as soon as they smell nutty and have darkened slightly. Transfer to a plate to cool completely.
- Line an 8×8-inch baking pan with parchment paper, leaving generous overhang on two sides to use as handles. Press the parchment into the corners as smoothly as possible.
- In a heavy-bottomed medium saucepan over low heat, combine the chocolate chips and sweetened condensed milk. Stir continuously with a silicone spatula, scraping the bottom and sides frequently, until the chocolate is completely melted and the mixture is perfectly smooth and glossy with no lumps remaining, about 5 to 8 minutes. Do not raise the heat.
- Remove the saucepan from heat. Add the cubed butter, vanilla extract, and fine sea salt. Stir vigorously until the butter is completely melted and the mixture is glossy, smooth, and uniform throughout.
- Add the cooled toasted walnuts to the chocolate mixture and fold them in thoroughly with a spatula until evenly distributed. Work quickly as the mixture will begin to thicken as it cools.
- Pour the fudge mixture into the prepared pan and spread into an even layer using an offset spatula or the back of a spoon. Press whole walnut halves gently into the surface if using. Sprinkle with flaky sea salt across the top.
- Allow the fudge to cool at room temperature for 15 minutes, then transfer to the refrigerator. Chill for a minimum of 2 hours until completely firm and set throughout.
- Lift the fudge out of the pan using the parchment paper handles and place on a cutting board. Using a large sharp knife dipped in hot water and wiped dry between each cut, slice into 36 even squares. Serve at room temperature for the best texture and flavor.


