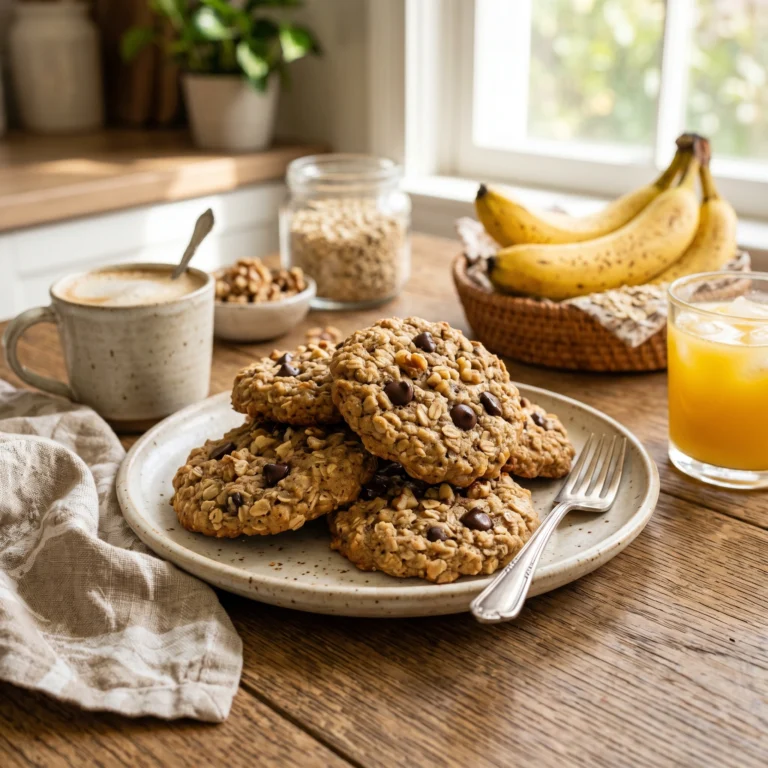
Buttermilk Waffles: The Crispy, Fluffy Breakfast That Makes Every Morning Feel Like the Weekend
Buttermilk Waffles – Crispy, Golden, and Worth Waking Up For
Buttermilk Waffles are the kind of breakfast that transforms an ordinary morning into something worth remembering. Not the thin, pale, vaguely cardboard-textured squares that come out of a toaster — real waffles, made from scratch, golden and crackling at the edges with a steam-soft interior that pulls apart in thick, satisfying layers. The kind of waffles that fill the kitchen with a smell so warm and inviting that everyone appears in the doorway before they are even fully awake.
What makes buttermilk the essential ingredient in this recipe is not just tradition — it is chemistry, and it is flavor. Buttermilk is slightly acidic, and when it meets baking soda in the batter, the two react to produce carbon dioxide bubbles that create an interior lift and lightness that regular milk simply cannot replicate. The result is a waffle that is genuinely airy and tender inside while still achieving the crisp, caramelized exterior that separates a great waffle from a mediocre one. And beyond the science, buttermilk contributes a subtle tang — a slight savory depth — that makes the sweetness of the waffle feel more complete and balanced rather than flat and one-dimensional.
This recipe has been developed to deliver the perfect buttermilk waffle every single time. There are no unusual ingredients, no equipment beyond a standard waffle iron, and no techniques that require any special skill. What there are is a carefully considered set of ratios and a few key methods that make the difference between a waffle that is good and a waffle that people talk about. Follow this recipe once and it will become a permanent fixture in your weekend rotation.
Why These Buttermilk Waffles Are the Only Recipe You Will Ever Need
There are hundreds of waffle recipes available, and most of them produce acceptable results. This one produces exceptional results, and the reasons are specific and intentional.
The batter uses both baking powder and baking soda. Baking powder provides lift throughout the baking process, while baking soda reacts immediately with the buttermilk’s acidity to create bubbles that begin aerating the batter the moment they meet. Using both leavening agents produces a waffle with more internal structure and a more pronounced rise than either agent produces alone.
The egg whites are beaten separately. This is the technique that separates truly fluffy waffles from merely acceptable ones. Whole eggs beaten into batter add moisture and richness, but beaten egg whites folded in at the end create a foam that holds air in the batter through the cooking process, producing a waffle interior that is light, cloud-like, and distinctly different in texture from anything a whole-egg batter can achieve.
The butter is browned. This is a small step that adds an enormous amount of flavor. Brown butter has a nutty, caramelized depth that regular melted butter lacks completely, and in a waffle that is eaten with sweet toppings, that savory complexity makes every bite more interesting and satisfying.
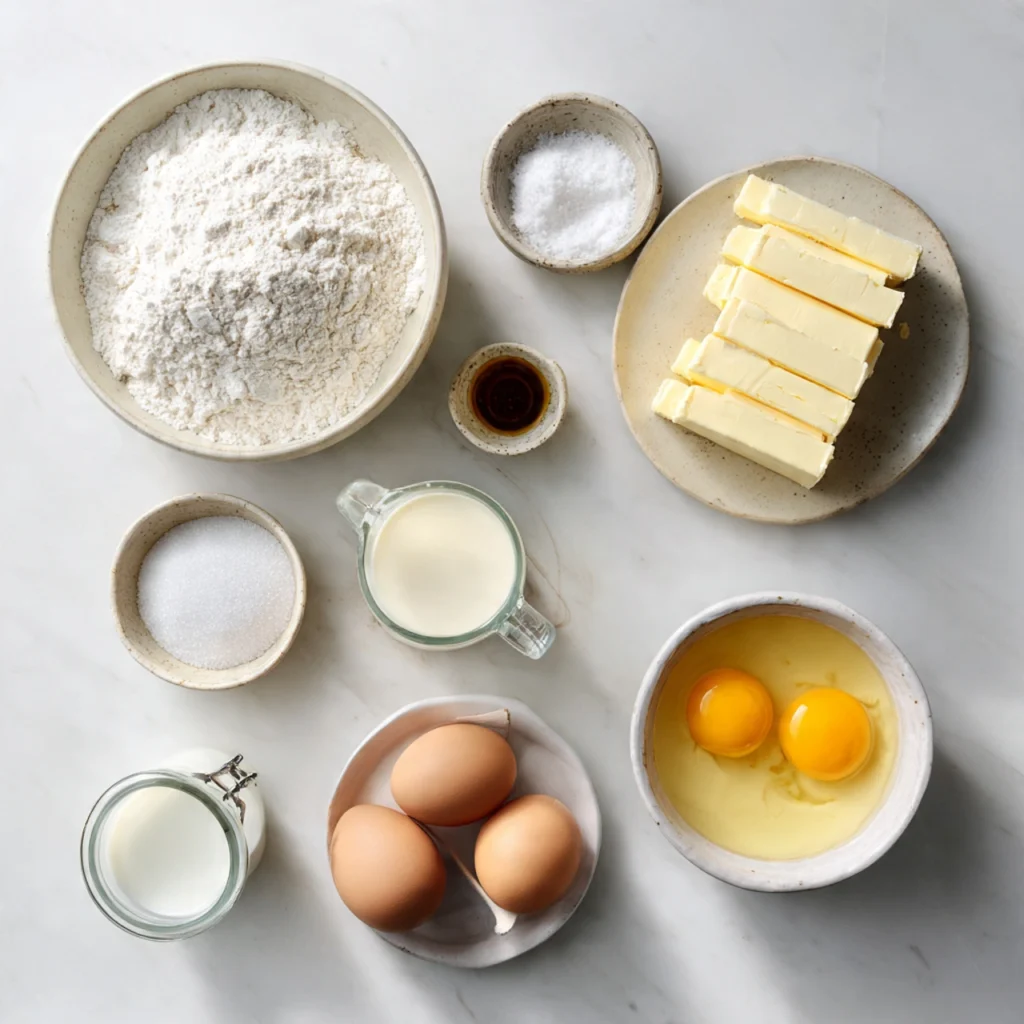
Ingredients for Buttermilk Waffles
Here is everything you need to make approximately 6 to 8 standard waffles depending on your waffle iron size.
For the Waffles
2 cups all-purpose flour 2 tablespoons granulated sugar 1½ teaspoons baking powder ½ teaspoon baking soda ½ teaspoon fine sea salt 2 cups full-fat buttermilk, room temperature 2 large eggs, separated, room temperature 6 tablespoons unsalted butter 1 teaspoon pure vanilla extract
Optional Add-Ins
1 teaspoon ground cinnamon folded into the dry ingredients for a warm spiced variation 1 tablespoon lemon zest for a citrus-brightened version ½ cup fresh blueberries folded gently into the finished batter
For Serving
Pure maple syrup Fresh berries or sliced bananas Whipped butter or compound butter Powdered sugar for dusting Whipped cream Crispy bacon or breakfast sausage on the side
Equipment You Will Need
Waffle iron (Belgian or standard) Two large mixing bowls Hand mixer or stand mixer (for beating egg whites) Small saucepan (for browning butter) Rubber spatula Ladle or large spoon for pouring batter Wire cooling rack Measuring cups and spoons Whisk
Step-by-Step Instructions for Perfect Buttermilk Waffles
Step 1 – Brown the Butter
Place the unsalted butter in a small light-colored saucepan over medium heat. Melt the butter, swirling the pan occasionally, and continue cooking past the point where it is fully melted. The butter will foam, then the foam will subside, and you will begin to see small golden-brown bits forming on the bottom of the pan. The moment the butter smells nutty and fragrant and turns a deep amber color, remove it from the heat immediately and pour it into a small bowl to stop the cooking. Allow it to cool for 5 minutes before adding it to the batter. If you skip the browning and simply melt the butter, the waffles will still be good — but browning takes less than 3 additional minutes and adds a flavor dimension that is immediately noticeable in the finished waffle.

Step 2 – Mix the Dry Ingredients
In a large bowl, whisk together the all-purpose flour, granulated sugar, baking powder, baking soda, and fine sea salt until evenly combined. Whisking the dry ingredients together ensures the leavening agents are evenly distributed throughout the flour so every waffle rises consistently.
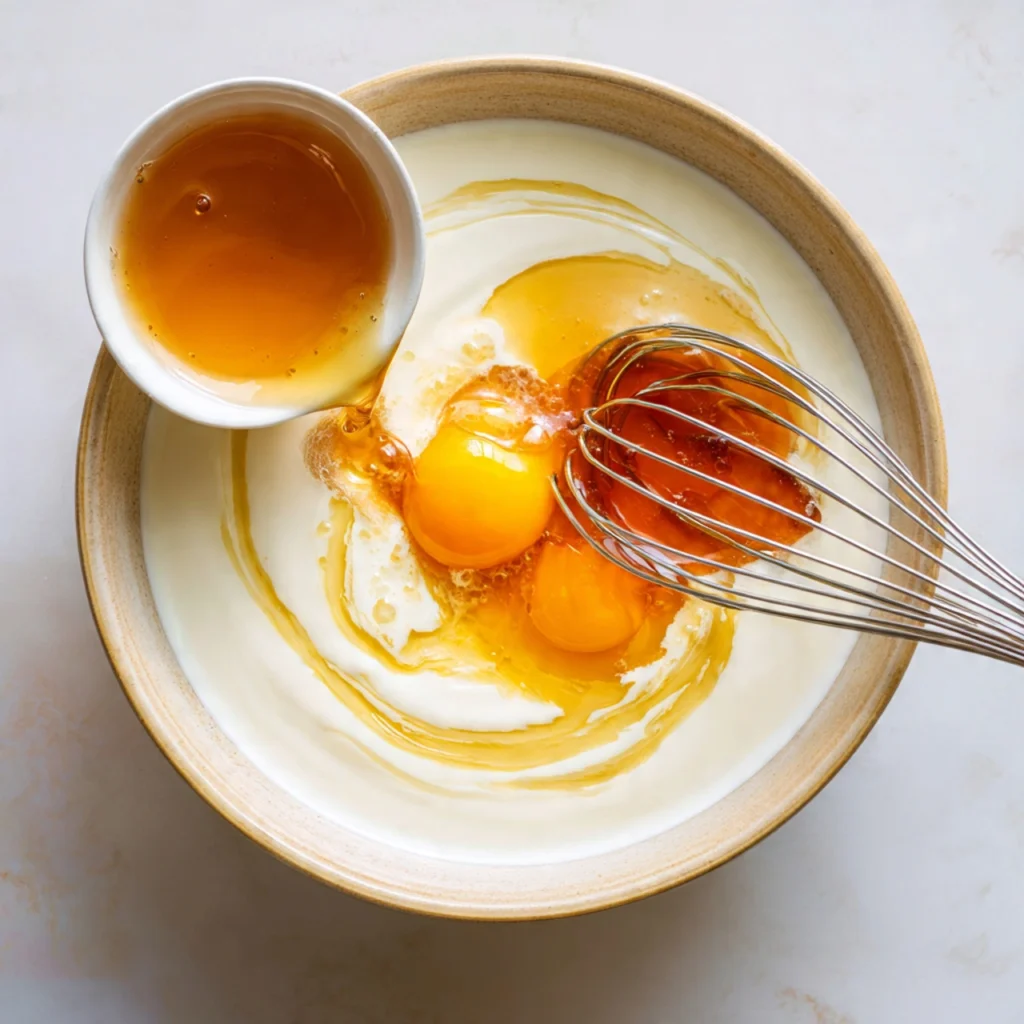
Step 3 – Mix the Wet Ingredients
In a separate medium bowl, whisk together the buttermilk, egg yolks, cooled brown butter, and vanilla extract until smooth and combined. The mixture should be uniform and slightly golden from the brown butter.
Step 4 – Beat the Egg Whites
In a clean, dry bowl, use a hand mixer or stand mixer to beat the egg whites on medium-high speed until stiff peaks form — meaning the whites hold their shape when the beaters are lifted but the tips of the peaks curl over slightly rather than standing completely rigid. This takes approximately 2 to 3 minutes. The bowl and beaters must be completely clean and free of any fat or yolk, which would prevent the whites from whipping properly. Even a small trace of yolk in the whites will significantly reduce their ability to form stiff peaks.
Step 5 – Combine Wet and Dry Ingredients
Pour the wet ingredient mixture into the bowl of dry ingredients and stir gently with a rubber spatula just until combined. The batter should still be slightly lumpy — do not stir until smooth. Lumpy batter is correct batter. Overmixed batter develops gluten, which produces tough, dense waffles rather than light, tender ones. A few streaks of flour are completely acceptable at this stage.
Step 6 – Fold in the Egg Whites
Add the beaten egg whites to the batter in two additions. Fold them in gently using a large rubber spatula, using a motion that cuts down through the center of the batter and sweeps up and over the sides. Fold only until the white streaks are just barely incorporated — some small visible wisps of white are perfectly fine. Overly aggressive folding deflates the air bubbles that make the waffles light and fluffy, and the goal is to preserve as many of those bubbles as possible.
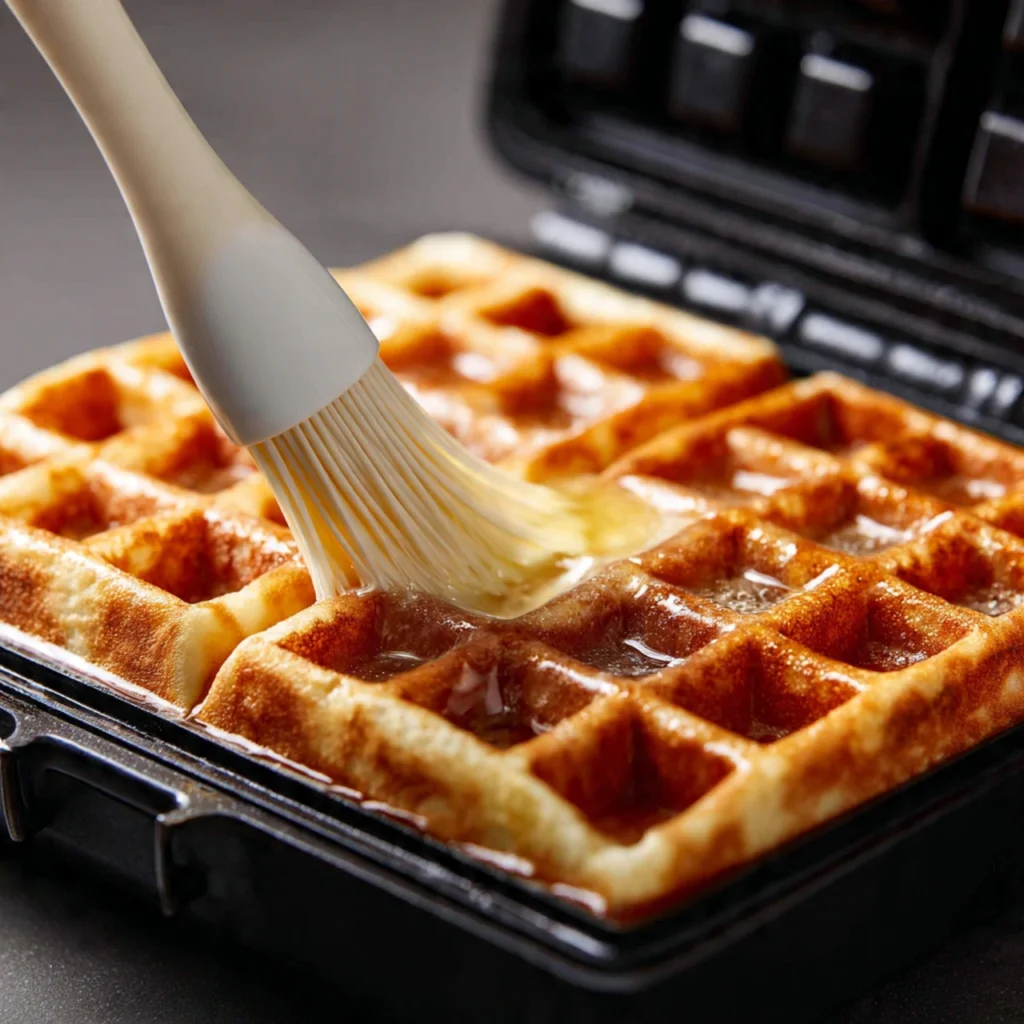
Step 7 – Preheat and Grease the Waffle Iron
Preheat your waffle iron according to the manufacturer’s instructions. Most waffle irons have an indicator light that signals when they have reached the correct temperature. Lightly brush or spray the waffle iron plates with neutral cooking oil or melted butter before the first waffle and again every two to three waffles as needed. Even non-stick waffle irons benefit from a light initial greasing to prevent sticking and to encourage a more golden, evenly browned crust.
Step 8 – Cook the Waffles
Pour enough batter to fill your waffle iron just to the edges without overflowing — this is typically between ¾ cup and 1 cup of batter depending on the size of your iron, but your iron’s manual will specify. Close the lid and cook according to your iron’s instructions, generally 4 to 5 minutes, until the waffle is deep golden brown and the steam has stopped escaping from the sides of the iron. The steam is a reliable indicator — waffles are done when the steaming stops. Do not open the lid early to check. Opening the iron before the waffle is set will cause it to split and tear.
Step 9 – Keep Warm and Serve
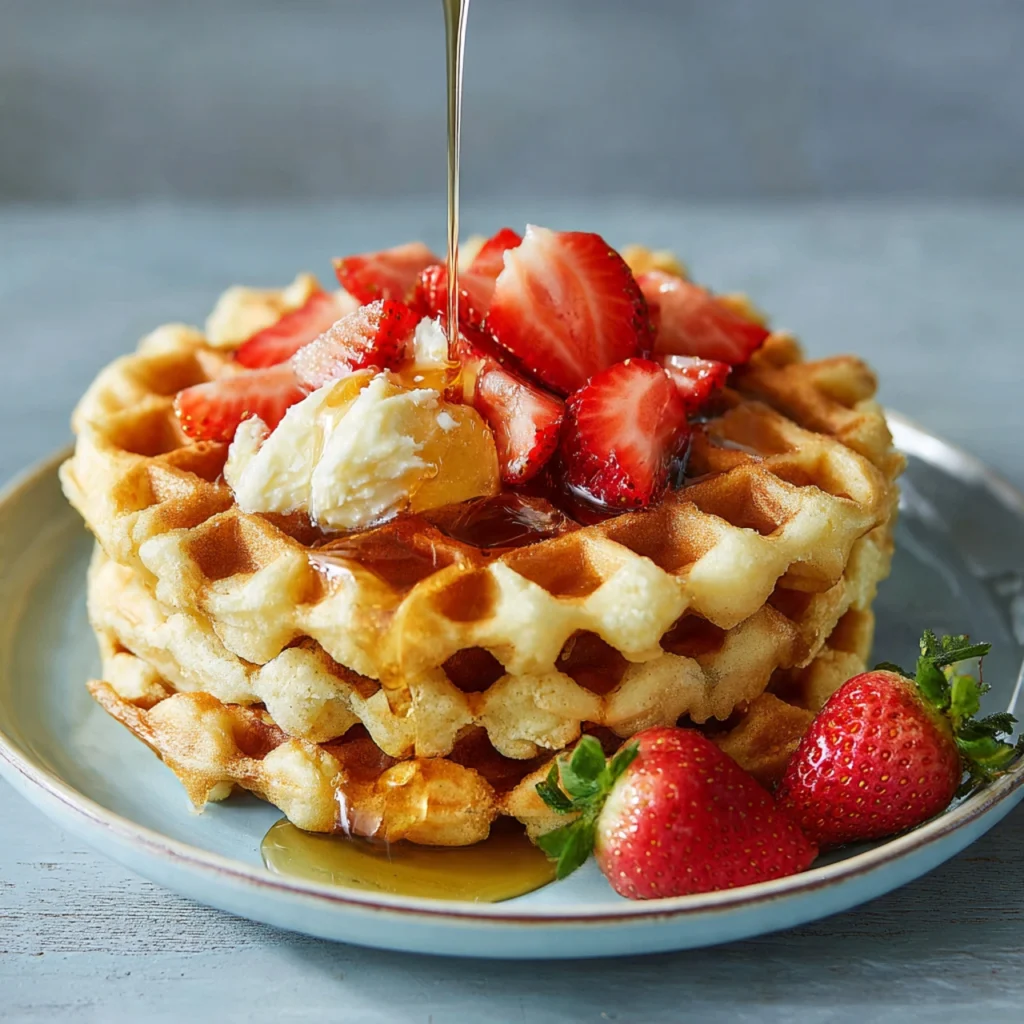
Place finished waffles directly on a wire rack in a single layer in a 200°F oven to keep warm while you cook the remaining batter. Do not stack them on a plate while warm — stacking traps steam and softens the crispy exterior that took all that effort to achieve. Serve the waffles on warmed plates with pure maple syrup, fresh berries, and a generous pat of softened butter.
Pro Tips for the Perfect Buttermilk Waffles
Use Room Temperature Buttermilk and Eggs
Cold buttermilk added to the batter can cause the brown butter to solidify into small clumps rather than incorporating smoothly throughout. Room temperature ingredients combine more evenly and produce a more consistent batter. Pull the buttermilk and eggs from the refrigerator at least 30 minutes before you begin.
Do Not Open the Waffle Iron Early
The single most common mistake in waffle making is opening the iron before the waffle is ready. The waffle needs uninterrupted contact with the hot plates to form its crust and set its interior structure. Opening early tears the waffle apart along its still-soft center. Wait for the steaming to stop — that is your signal.
Rest the Batter for 5 Minutes Before Cooking
After folding in the egg whites, let the batter rest for 5 minutes before ladling it onto the iron. This brief rest allows the gluten in the flour to relax, which produces a more tender waffle, and gives the leavening agents a moment to begin their work before the batter hits the heat.
Make the Batter the Night Before Without the Egg Whites
If you want fresh buttermilk waffles on a busy morning without doing all the work at once, mix the dry ingredients and wet ingredients separately the night before and refrigerate the wet mixture. In the morning, beat the egg whites fresh and fold them in before cooking. The extra five minutes pays off in both texture and convenience.
Keep the Waffle Iron Hot Between Batches
A waffle iron that cools between batches produces waffles that are pale, soft, and steamed rather than golden and crisp. Keep the iron plugged in and set to the correct temperature throughout the cooking process. If you are cooking multiple batches, do not turn the iron off until all the batter is used.
Common Mistakes to Avoid When Making Buttermilk Waffles
Overmixing the Batter
The instruction to stop stirring when the batter is still slightly lumpy feels counterintuitive to anyone who has spent time in a kitchen — lumpy batter looks wrong and the instinct to smooth it out is strong. Resist it. Gluten develops very quickly once flour is stirred in a liquid, and every extra stir produces a tougher, denser waffle. Lumpy is right. Smooth is wrong. Stop early.
Skipping the Separated Egg White Step
Beating the egg whites separately and folding them in takes an additional 5 minutes of effort. Many people skip this step and use whole eggs beaten directly into the wet mixture. The result is a waffle that is fine but noticeably less light and airy than one made with folded egg whites. If you have the 5 minutes, use them. The texture difference is immediately obvious in the finished waffle.
Using Skim or Low-Fat Buttermilk
The fat in full-fat buttermilk contributes to the richness, tenderness, and flavor of the finished waffle. Low-fat buttermilk produces a waffle that is slightly drier and less flavorful. Full-fat buttermilk is the correct choice for this recipe and produces measurably better results.
Stacking Hot Waffles
Hot waffles stacked on a plate steam each other. The crispy exterior that makes a great waffle great turns soft and limp within minutes of being stacked. Always keep finished waffles in a single layer on a wire rack in a warm oven until ready to serve. This is a small habit that makes a very visible difference on the plate.
Not Greasing the Iron Between Batches
Even the best non-stick waffle iron benefits from a light re-greasing every few waffles. A waffle iron that is not adequately greased produces waffles that stick, tear, and leave bits behind on the plates that burn and affect the flavor of subsequent batches. Use a pastry brush or a folded paper towel dipped in oil to lightly coat the plates between batches.
Storage and Serving Suggestions
How to Store Buttermilk Waffles
Leftover buttermilk waffles store exceptionally well and are one of the best make-ahead breakfast options available. Allow waffles to cool completely on a wire rack before storing to prevent moisture buildup. Store in an airtight container in the refrigerator for up to 3 days. Reheat in a toaster or toaster oven for 2 to 3 minutes until heated through and re-crisped — the toaster is significantly better than the microwave for reheating waffles, as the microwave produces a soft, steamed result while the toaster restores the crispy exterior.
For longer storage, freeze cooled waffles in a single layer on a baking sheet until solid, then transfer to a freezer-safe bag or container for up to 3 months. Reheat directly from frozen in the toaster or a 350°F oven for 5 to 7 minutes. Frozen and reheated buttermilk waffles are genuinely excellent — better than any frozen waffle product available commercially.
Serving Suggestions
Classic buttermilk waffles are a perfect canvas for toppings of every kind. Pure maple syrup is the traditional choice and the right one — real maple syrup has a complexity and depth that pancake syrup cannot replicate. Fresh strawberries, blueberries, or sliced bananas add brightness and color. A dollop of whipped cream turns breakfast into something that feels celebratory. For a savory direction, top waffles with a fried egg, crispy bacon, and a drizzle of hot honey for a combination that is increasingly popular and deeply satisfying. Fried chicken on waffles with hot sauce and maple syrup is a Southern classic that turns these waffles into a full, impressive dinner. For a dessert waffle, top with vanilla ice cream, warm chocolate sauce, and toasted pecans.
Frequently Asked Questions About Buttermilk Waffles
Can I make buttermilk waffles without a waffle iron?
No — a waffle iron is essential for producing the characteristic grid pattern, the crispy exterior, and the steam-cooked interior that defines a waffle. There is no effective substitute. Waffle irons are widely available at a range of price points, and even an inexpensive model produces excellent results with this batter.
What can I substitute for buttermilk if I do not have any?
Make a quick buttermilk substitute by adding 2 tablespoons of white vinegar or fresh lemon juice to 2 cups of whole milk. Stir briefly and allow to sit for 5 minutes until the milk curdles and thickens slightly. This substitute is not identical to real buttermilk but it is close enough to produce excellent waffles. For the best results, use real full-fat buttermilk when possible.
Why are my waffles not crispy?
The most common causes of soft waffles are undercooking, opening the iron too early, stacking hot waffles on a plate, or using too little fat in the batter. Make sure the iron is fully preheated before adding batter, cook until steaming stops, and keep finished waffles on a wire rack in a single layer in a warm oven rather than stacking them.
Can I make the batter ahead of time?
Yes, with one important adjustment. Mix the dry and wet ingredients separately and refrigerate the wet mixture overnight. In the morning, beat fresh egg whites and fold them into the combined batter just before cooking. The egg whites lose their air over time and cannot be made ahead — they must be beaten and folded in immediately before the batter hits the iron.
Can I make this recipe gluten-free?
Yes. Substitute the all-purpose flour with a 1-to-1 gluten-free baking flour blend. The texture will be slightly different — often a little more delicate — but the flavor and overall character of the waffle remain excellent. Make sure your baking powder is certified gluten-free if baking for someone with celiac disease.
Can I add mix-ins to the batter?
Absolutely. Blueberries, chocolate chips, diced strawberries, chopped pecans, or shredded coconut all work beautifully folded gently into the finished batter just before cooking. Add no more than ½ cup of any mix-in to avoid weighing the batter down and affecting the waffle’s ability to cook evenly and release cleanly from the iron.
Approximate Nutrition Information
Per waffle based on 8 waffles without toppings:
Calories: 255 Total Fat: 12g Saturated Fat: 7g Cholesterol: 75mg Sodium: 310mg Total Carbohydrates: 30g Sugars: 5g Protein: 7g Fiber: 1g
Please note these values are approximate estimates based on standard ingredient amounts and will vary depending on specific brands used, the size of your waffle iron, and any additions or toppings included.
Why Buttermilk Waffles Deserve a Permanent Place in Your Breakfast Rotation
There are breakfasts that fuel you and breakfasts that delight you. The best ones do both, and Buttermilk Waffles fall squarely and permanently into that category. They are filling without being heavy, indulgent without being excessive, and beautiful without requiring any presentation skill beyond a good pour of maple syrup and a handful of fresh berries placed with even the loosest sense of intention.
What this recipe ultimately delivers is not just a waffle — it is a morning ritual worth having. The smell of brown butter in a warm pan. The sound of batter hitting a hot iron. The way the steam rolls out from the sides while something golden and perfect forms underneath. These are small sensory pleasures that belong in every kitchen, every weekend, for as long as you are someone who makes breakfast.
Make these waffles once and they will be in your regular rotation by the following weekend. Make them for someone else and they will ask for the recipe before breakfast is finished. Make them on a slow Sunday morning with good coffee and no particular schedule, and you will remember exactly why cooking from scratch — even for the simplest things — is always worth the effort.
Buttermilk Waffles
Ingredients
Equipment
Method
- Place the unsalted butter in a small light-colored saucepan over medium heat. Melt and continue cooking, swirling occasionally, past the foaming stage until small golden-brown bits form on the bottom and the butter smells nutty and fragrant. Remove from heat immediately, pour into a small bowl to stop the cooking, and cool for 5 minutes.
- In a large bowl, whisk together the all-purpose flour, granulated sugar, baking powder, baking soda, and fine sea salt until evenly combined.
- In a separate medium bowl, whisk together the buttermilk, egg yolks, cooled brown butter, and vanilla extract until smooth and uniform.
- In a clean, completely dry bowl, beat the egg whites with a hand mixer or stand mixer on medium-high speed until stiff peaks form — the whites hold their shape when beaters are lifted but tips curl over slightly. This takes 2 to 3 minutes. The bowl and beaters must be completely free of fat or yolk.
- Pour the wet ingredient mixture into the bowl of dry ingredients and stir gently with a rubber spatula just until combined. The batter should still be slightly lumpy — do not stir until smooth. Overmixing develops gluten and produces tough, dense waffles.
- Add the beaten egg whites to the batter in two additions, folding gently with a large rubber spatula using a cut-down-and-sweep-over motion. Fold only until white streaks are just barely incorporated — small visible wisps of white are perfectly fine. Let the batter rest for 5 minutes before cooking.
- Preheat the waffle iron according to manufacturer’s instructions. Lightly brush or spray the plates with neutral oil or melted butter before the first waffle and again every 2 to 3 waffles. Pour enough batter to just fill the iron, close the lid, and cook for 4 to 5 minutes until deep golden brown and steaming has stopped. Do not open the lid early.
- Place finished waffles in a single layer on a wire rack in a 200°F oven to keep warm and crispy while cooking the remaining batter. Never stack hot waffles. Serve on warmed plates with pure maple syrup, fresh berries, and softened butter.