American Flag Layer Cake: A Show-Stopping Patriotic Dessert That Steals the Spotlight
Introduction
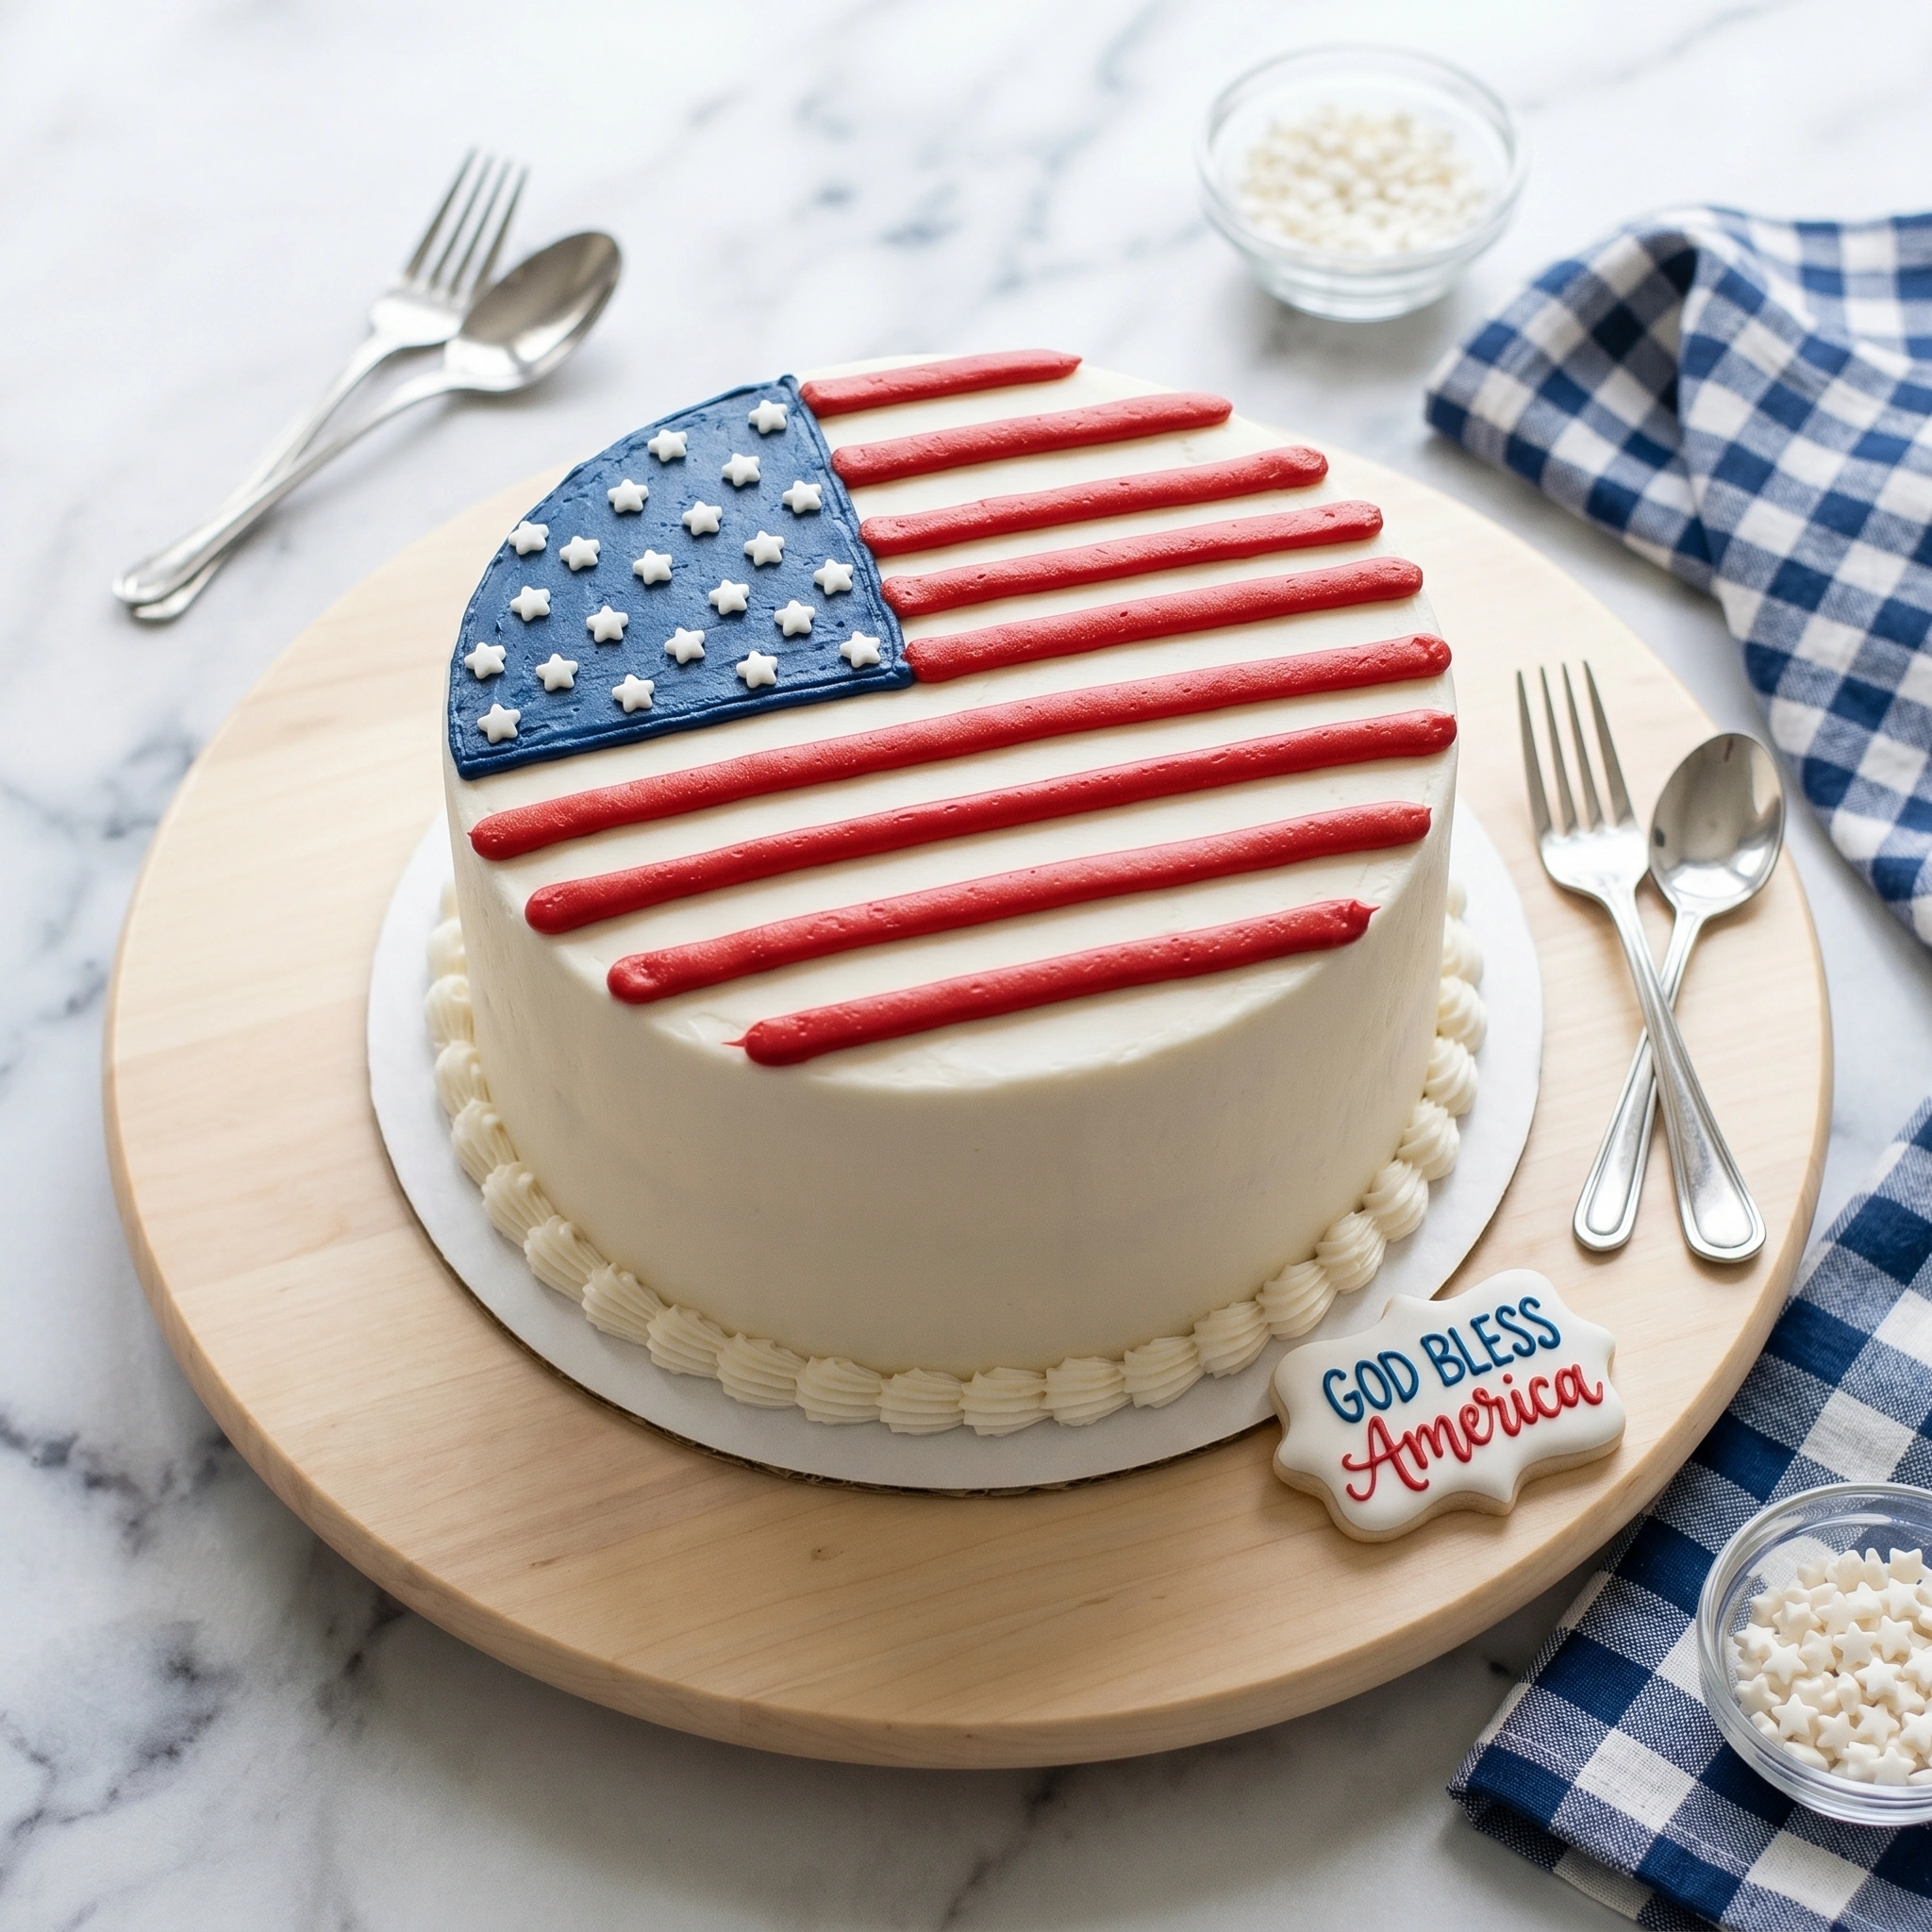
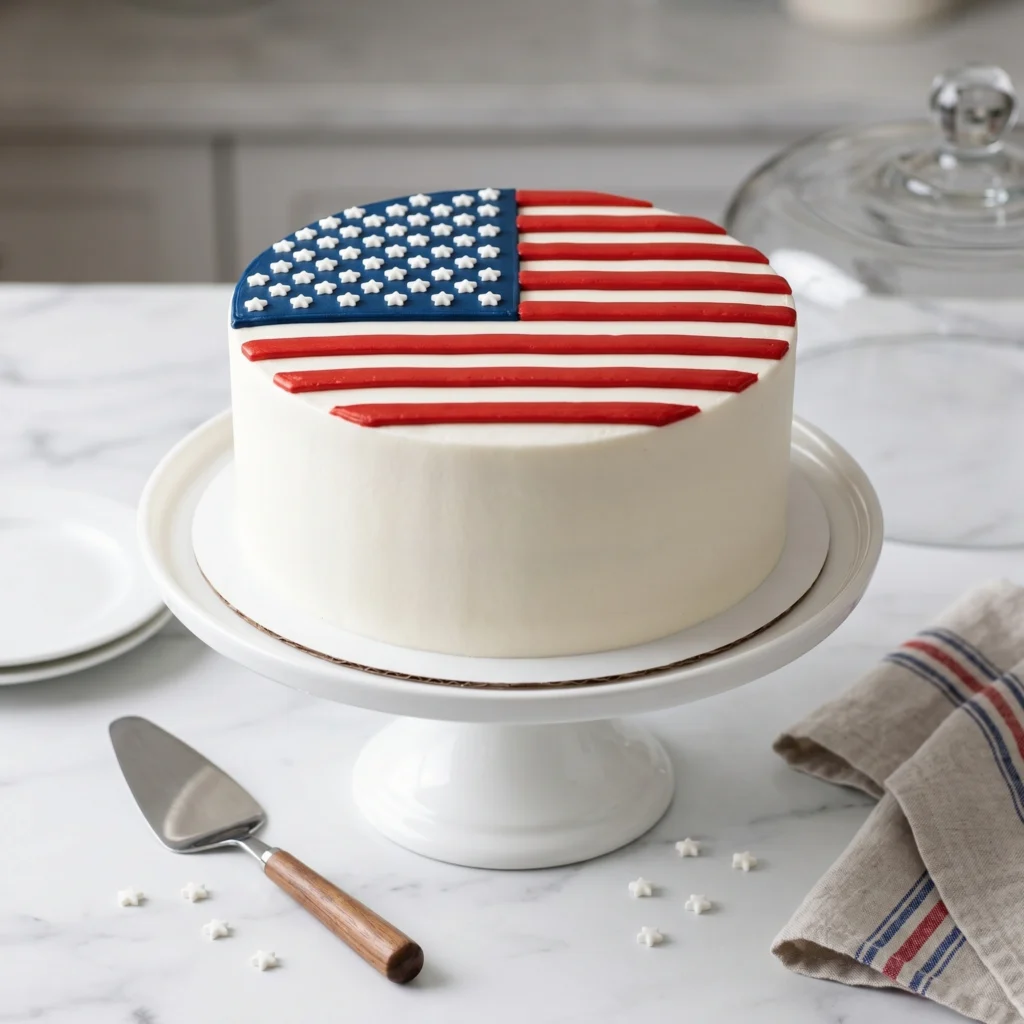
The American Flag Layer Cake is one of those breathtaking centerpiece desserts that draws an audible gasp the moment you slice into it — and an even louder round of applause once people taste it. If you’ve been searching for the ultimate patriotic showstopper to bring to your Fourth of July cookout, Memorial Day gathering, or any red-white-and-blue celebration, look no further. This American Flag Layer Cake delivers everything: a soft, buttery crumb, a luscious cream cheese frosting, and a hidden flag design inside that reveals itself only when you cut the first slice.
What makes this cake truly special is the marriage of drama and deliciousness. It isn’t one of those “looks amazing, tastes mediocre” desserts. Every single layer is moist vanilla sponge tinted to vibrant red and blue, sandwiched together with clouds of fluffy frosting. The outside is a pristine canvas of white buttercream, decorated to look exactly like Old Glory herself — stars, stripes, and all. It’s the kind of dessert that photographs beautifully, travels well to potlucks, and leaves people asking for the recipe before they’ve even finished their slice.
Whether you’re a seasoned home baker or someone tackling their first ambitious layer cake, this guide walks you through everything: the full ingredient list, step-by-step assembly instructions, pro tips, the most common mistakes to sidestep, and storage advice to keep your masterpiece fresh. Let’s bake something worth celebrating.
Why This American Flag Layer Cake Works
Before we dive into the recipe, let’s talk about what makes this specific version stand out from the dozens floating around the internet.
The hidden interior design. The real magic of this cake isn’t the frosted exterior — it’s what lives inside. By strategically layering red, white, and blue cake layers, then carving and reassembling them, you create a cross-section that resembles the American flag every single time a slice is cut. The “wow factor” never gets old.
A truly reliable crumb. This recipe uses the reverse creaming method, which coats the flour in fat before liquids are added. The result is an exceptionally tender, close-crumbed cake that holds its shape perfectly when you’re cutting and carving — essential for an interior design cake like this one.
Balanced sweetness. The cream cheese buttercream provides a slight tang that cuts through the sweetness of the colored sponge layers, creating a grown-up flavor profile that keeps adults coming back for seconds.
Ingredients
For the Cake Layers
Makes one 6-layer, 8-inch cake
Red Layers (you’ll make 2 of these):
- 2½ cups (300g) all-purpose flour
- 2 cups (400g) granulated white sugar
- 1 tablespoon baking powder
- ½ teaspoon fine sea salt
- ½ cup (113g) unsalted butter, softened to room temperature
- 3 large eggs, room temperature
- 1 cup (240ml) whole milk, room temperature
- ½ cup (120ml) sour cream, room temperature
- 2 teaspoons pure vanilla extract
- Red gel food coloring (start with 1 teaspoon, adjust to desired intensity)
White Layer (1 layer):
- Same base batter as above, no food coloring added
Blue Layer (1 layer, smaller — this becomes the “canton” or star field):
- 1¼ cups (150g) all-purpose flour
- 1 cup (200g) granulated white sugar
- 1½ teaspoons baking powder
- ¼ teaspoon fine sea salt
- ¼ cup (57g) unsalted butter, softened
- 2 large eggs, room temperature
- ½ cup (120ml) whole milk, room temperature
- ¼ cup (60ml) sour cream, room temperature
- 1 teaspoon pure vanilla extract
- Royal blue or navy gel food coloring
For the Cream Cheese Buttercream
- 1 cup (226g) unsalted butter, softened
- 8 oz (226g) full-fat block cream cheese, softened
- 5–6 cups (600–720g) powdered sugar, sifted
- 2 teaspoons pure vanilla extract
- ¼ teaspoon fine sea salt
- 2–3 tablespoons heavy cream (as needed for consistency)
For Decoration
- Additional white buttercream tinted blue (about 1 cup)
- Additional white buttercream left white (about 1 cup)
- Red gel food coloring for stripe accents
- White star sprinkles or edible silver star dragées
- Optional: piping bags fitted with a star tip (#1M) and a round tip (#4)
Step-by-Step Instructions
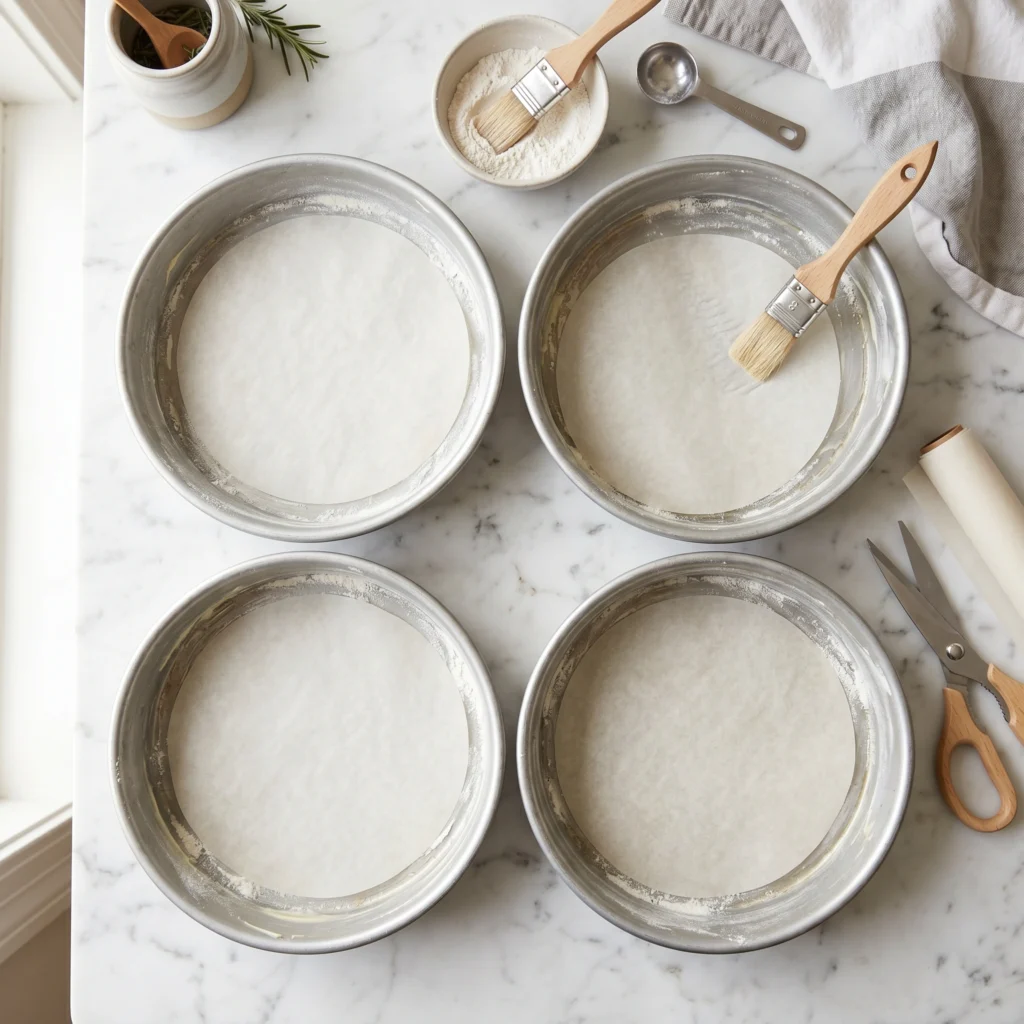
Step 1: Prepare Your Pans and Preheat
Preheat your oven to 350°F (175°C). Grease four 8-inch round cake pans (or bake in batches if you only have two). Line the bottoms with parchment paper circles, then grease and lightly flour the parchment. This ensures every single layer releases cleanly — critical when you’re working with dyed batters.
For the blue layer, use one 6-inch round pan instead of an 8-inch, since this smaller layer will be carved down to form the canton (the blue star field in the upper left corner of the flag).
Step 2: Mix the Base Cake Batter
In the bowl of a stand mixer fitted with the paddle attachment, whisk together the flour, sugar, baking powder, and salt on low speed until combined. Add the softened butter, cut into tablespoon-sized pieces, and beat on medium speed until the mixture resembles coarse, damp sand — about 2 minutes. This is the reverse creaming method at work.
In a separate bowl or large measuring cup, whisk together the eggs, milk, sour cream, and vanilla extract until smooth. Pour half of this liquid mixture into the flour-butter mixture, beat on medium-high for 1 full minute, then scrape down the bowl. Add the remaining liquid and beat for another 30 seconds until the batter is smooth and no streaks remain.
Do not overmix — stop as soon as you have a homogenous, silky batter.
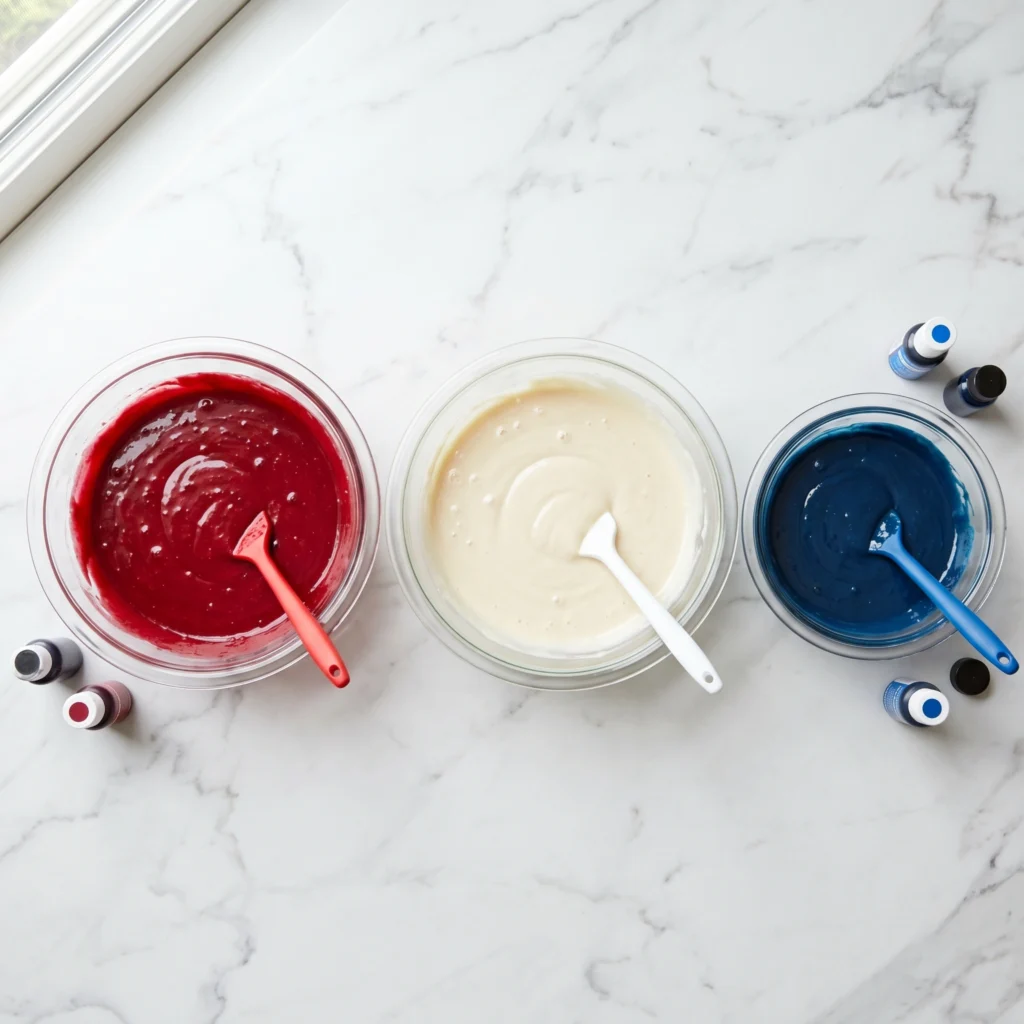
Step 3: Divide, Tint, and Bake
Divide your batter into three portions:
- Two red portions (about 2 cups each): Add red gel food coloring and fold with a spatula until the color is fully incorporated. The batter should look deeply red — it will bake up slightly lighter, so don’t be afraid to go bold.
- One white portion (about 2 cups): Leave as-is.
- One blue portion (from the smaller recipe): Tint with royal blue or navy gel food coloring until deeply saturated.
Pour each red portion into one prepared 8-inch pan. Pour the white portion into the third 8-inch pan. Pour the blue batter into the 6-inch pan.
Bake for 22–26 minutes, or until a toothpick inserted in the center comes out with just a few moist crumbs attached. The blue layer in the smaller pan may be done 3–4 minutes earlier, so check it first.
Let cakes cool in pans for 15 minutes, then turn out onto wire racks. Cool completely — at least 2 hours — before assembling. Warm cake = melted frosting disaster.
Step 4: Prepare the Cream Cheese Buttercream
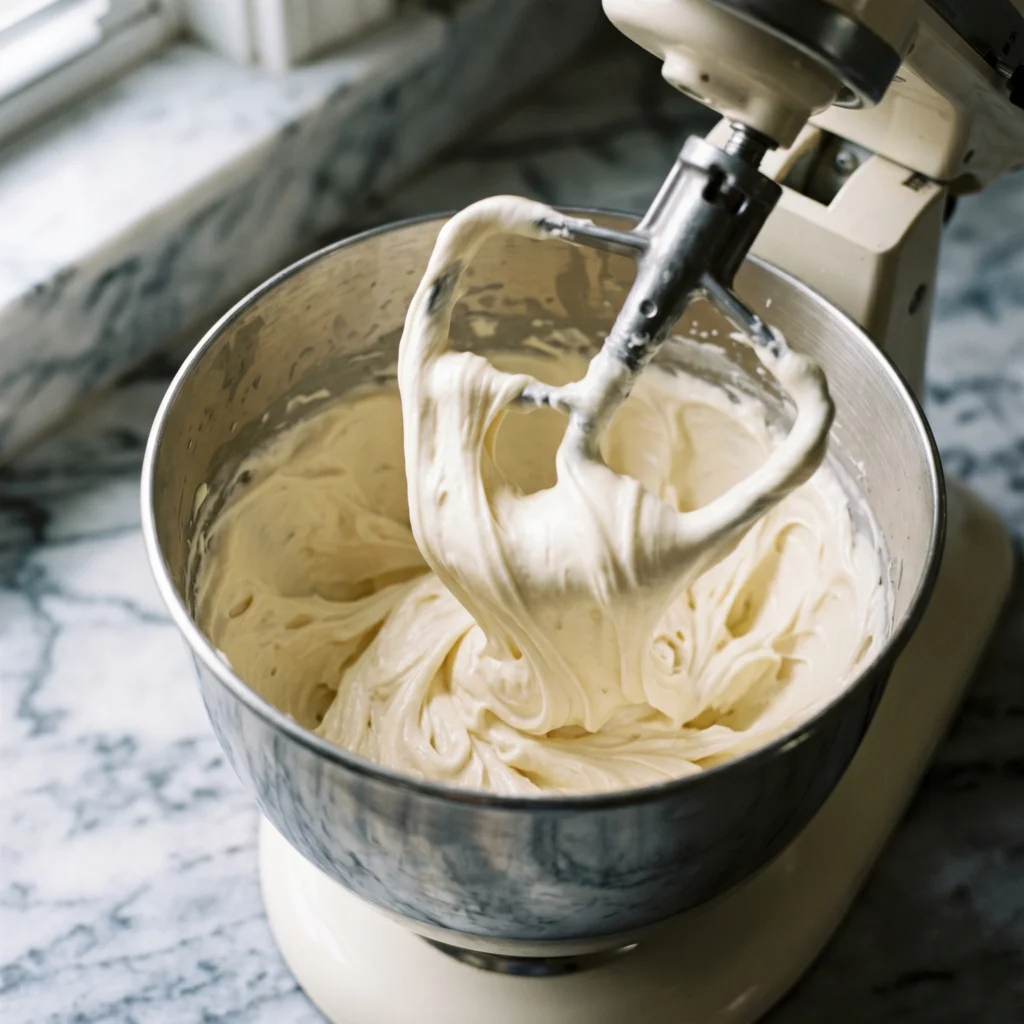
In the bowl of a stand mixer with the paddle attachment, beat the softened butter on medium-high speed for 3–4 minutes until pale and fluffy. Add the block cream cheese and beat for another 2 minutes — make sure both are at room temperature or the frosting will be lumpy.
Reduce speed to low, then add the sifted powdered sugar one cup at a time, beating between each addition. Add vanilla extract and salt. Once all the sugar is incorporated, turn the speed to medium-high and beat for 3 full minutes until light and smooth. Add heavy cream one tablespoon at a time if the frosting feels too stiff. You’re looking for a spreadable consistency that holds its shape.
Set aside approximately 1 cup of frosting for the blue star-field decoration and tint it navy blue. Keep the rest white.
Step 5: Level and Carve Your Layers
Using a serrated knife or a cake leveler, trim the domed tops off all your cake layers so each one is perfectly flat. This is non-negotiable for a professional-looking result.
Now comes the clever part. Take your blue 6-inch layer and trim it down to about ¾ inch in height. This thin blue disc will be nestled in the upper-left quadrant of the cake as it is assembled, replicating the canton of the flag.
Step 6: Assemble the Interior Flag Design
Place your first red 8-inch layer on a cardboard cake round or turntable. Spread a thin, even layer of white frosting over it. Place the white cake layer directly on top and apply another thin layer of frosting.
Before adding the second red layer, place it flat on your work surface. Cut out a 6-inch circle from the upper-left quadrant of this red layer, following the template of your 6-inch blue layer. Carefully drop the blue layer into this carved-out space. The edges should be flush — the blue “canton” is now built into the red layer. Gently place this assembled layer on top of the white layer and press lightly.
Add the final red layer on top.
Note: When you slice the assembled cake, each cross-section will show a blue rectangle in the upper left and alternating red/white stripes beneath — a stylized American flag.
Step 7: Crumb Coat and Chill
Apply a thin crumb coat of white buttercream over the entire outside of the cake using an offset spatula. This seals in all the colored crumbs so your final coat stays pristine and white. Refrigerate the crumb-coated cake for at least 30 minutes.
Step 8: Final Frosting and Decoration
Apply a generous final coat of white buttercream to the outside of the cake, smoothing it with a bench scraper for clean, sharp edges. Refrigerate again for 20 minutes.
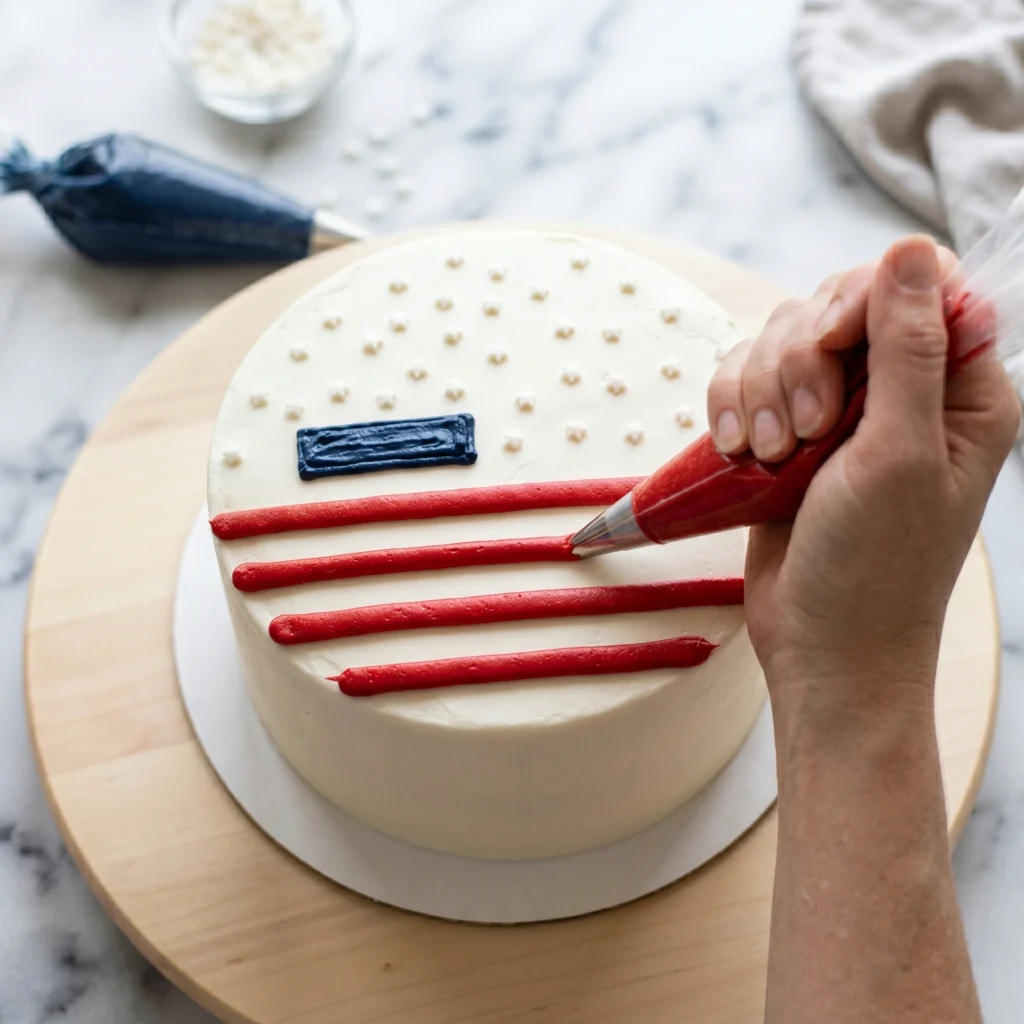
Decorating the exterior:
Using a piping bag fitted with a small round tip, pipe horizontal red stripes across the lower two-thirds of the cake’s side, spacing them evenly to mimic the flag’s 13 stripes (alternating with the white base frosting).
In the upper-left quadrant of the cake’s side, use the navy blue buttercream to pipe a filled-in rectangle. Using a star tip or a toothpick dipped in white food coloring, add small white stars arranged in rows inside the blue rectangle.
Top the cake with white swirls using a 1M star tip. Scatter white or silver star sprinkles over the top for a festive finishing touch.
Pro Tips for American Flag Layer Cake
1. Gel food coloring is non-negotiable. Liquid food coloring adds too much moisture to the batter and produces washed-out colors. Gel coloring is highly concentrated, so you use less and achieve vibrant, saturated reds and blues that don’t bake out.
2. Room temperature everything. Cold butter, cold eggs, and cold milk are the enemy of a smooth, properly emulsified batter. Pull everything out of the refrigerator at least 1 hour before you begin.
3. Weigh your batter. Use a kitchen scale to divide the batter evenly between pans. Equal-weight layers mean perfectly uniform stripes when sliced — a detail that takes this cake from homemade to professional.
4. Chill between every step. Frosting a warm or even room-temperature cake leads to sliding layers and color bleed. Refrigerate after each stage: after crumb coating, after the final coat, and after piping. Cold cake = stable structure.
5. Use a turntable. Decorating a cake without a rotating turntable is like trying to parallel park without a rearview mirror. A $15–$20 turntable makes smooth sides and even stripes dramatically easier to achieve.
6. Make components ahead. The cake layers can be baked 2 days ahead, wrapped tightly in plastic wrap, and refrigerated. The frosting can be made 3 days ahead and stored in an airtight container in the fridge — just re-whip before using.
7. Use a sharp, thin knife for slicing. When serving, use a thin, sharp knife wiped clean between cuts. This preserves the interior flag design so every slice looks as crisp as the first.
Common Mistakes to Avoid
Over-coloring the batter early. Many bakers add too much food coloring too quickly and end up with purple “blue” or orange “red.” Add coloring gradually — a little at a time — until you reach your target hue. Remember that colors deepen slightly as the cake bakes.
Skipping the parchment paper. A tinted cake batter that sticks to the pan is a stressful situation. Always line with parchment, always grease and flour over it, always.
Rushing the cooling process. Trying to frost a cake layer that’s even slightly warm will cause the frosting to slide, melt, and absorb color from the dyed crumbs. Patience here pays enormous dividends.
Pressing too hard when stacking layers. The carve-and-fill canton technique is delicate. Use gentle, even pressure when placing layers to avoid cracking the carved sections of the red layer.
Letting the crumb coat get too thick. The crumb coat is meant to be a thin seal, not a full coat. If it’s too thick, the final layer won’t adhere as well, and your edges won’t be as sharp. Thin and even is the goal.
Using whipped butter instead of block butter for frosting. Whipped or spreadable butter (sold in tubs) contains added air and water, which results in a frosting that’s too soft to pipe or hold its decorative shape. Always use solid block butter.
Storage and Serving Suggestions
How to Store Your American Flag Layer Cake
Because this cake contains cream cheese frosting, it must be refrigerated after the first 2 hours at room temperature. Store it under a cake dome or in an airtight cake box in the refrigerator for up to 5 days.
For longer storage, the undecorated cake layers can be individually wrapped in plastic wrap, then foil, and frozen for up to 2 months. Thaw overnight in the refrigerator, then bring to room temperature before frosting.
Do not freeze the assembled, decorated cake — the cream cheese frosting does not thaw well and the decorative piping will lose its definition.
Serving Tips
Remove the cake from the refrigerator 30–45 minutes before serving. Cold cake is denser and the flavors are muted; bringing it to room temperature lets the crumb soften and the frosting loosen to its ideal texture.
Serve with fresh strawberries, blueberries, and raspberries on the side to reinforce the patriotic color palette and add a fresh-fruit brightness that balances the richness of the cake.
For large gatherings, pre-slice the cake before transporting to the party, using a sharp knife and wiping clean between each cut. Arrange the slices on a platter so guests can see the flag reveal without requiring a whole-cake-cutting moment.
FAQ: American Flag Layer Cake
Q1: Can I use a box mix instead of making the cake from scratch?
Absolutely. Two boxes of white cake mix can be used in place of the scratch batter. Prepare the mix according to the package directions, then divide and tint as directed in this recipe. The texture will be slightly different (box mixes tend to be lighter and springier), but the interior flag design and decoration will work exactly the same way.
Q2: How far in advance can I make this cake?
You can bake and refrigerate the individual cake layers up to 2 days in advance. The fully assembled and frosted cake can be made 1 day ahead and refrigerated overnight — in fact, a make-ahead cake is often easier to decorate because fully chilled layers are more stable. Just add any delicate sugar decorations on the day of serving.
Q3: My red color turned orange when it baked. What happened?
This is a common issue when using red gel coloring in a batter with baking powder. The alkaline environment can shift certain red dyes toward orange or pink. Look for a “no-taste red” gel color from brands like AmeriColor or Chefmaster, which are more alkaline-stable. You can also add ½ teaspoon of white vinegar or ¼ teaspoon of cream of tartar to the batter to create a slightly more acidic environment that helps preserve the red hue.
Q4: Can I make this cake without dairy?
Yes, with a few swaps. Replace the butter with a high-quality vegan butter (such as Miyoko’s), the whole milk with full-fat oat or almond milk, the sour cream with coconut cream or vegan sour cream, and the cream cheese frosting with a vegan cream cheese alternative. The texture may be slightly different, but the results are still impressive.
Q5: My layers are sliding when I stack them. What should I do?
First, make sure your layers are completely cold before stacking. If sliding continues to be an issue, insert two or three wooden or plastic cake dowels through the center of the assembled layers before adding the final layer. You can also apply a slightly thicker layer of frosting between each tier to act as a “glue,” and refrigerate for 20 minutes after adding each layer.
Q6: What size cake does this recipe make, and how many people does it serve?
This recipe produces a 4-layer, 8-inch round cake approximately 5–6 inches tall. When sliced into standard portions, it serves 16–20 people generously. For larger crowds, the recipe can be scaled up to make a 9-inch or 10-inch cake.
Q7: Can I use natural food coloring instead of synthetic gel?
Natural food colorings (derived from beet powder, butterfly pea flower, etc.) can be used, but they behave differently from synthetic gels. Natural reds tend to skew pink and may fade during baking. Natural blues can be more vibrant but may turn purple when combined with acidic ingredients. If you prefer natural dyes, do a test batch first before committing to the full recipe.
Nutrition Information (Approximate Values Per Slice)
Based on 18 slices per cake. Values are estimates and will vary based on specific brands and exact measurements used.
| Nutrient | Amount Per Slice |
|---|---|
| Calories | 480–520 kcal |
| Total Fat | 22g |
| Saturated Fat | 13g |
| Cholesterol | 95mg |
| Sodium | 210mg |
| Total Carbohydrates | 68g |
| Dietary Fiber | 0.5g |
| Total Sugars | 52g |
| Protein | 5g |
| Calcium | 70mg |
| Iron | 1.2mg |
This is an indulgent celebration cake and is intended to be enjoyed as an occasional treat. Nutrition values do not account for optional garnishes or additional berry toppings.
Conclusion
The American Flag Layer Cake is far more than a dessert — it’s a moment. It’s the hush that falls over a party when the knife slices through and reveals those red, white, and blue layers inside. It’s the photos that get shared across every family group chat. It’s the reason people remember your 4th of July party years later.
Yes, this is a project. It requires time, a little patience, and a few specialized tools. But every step in this guide has been designed to make the process as clear and stress-free as possible. You don’t need to be a professional pastry chef to pull this off — you just need to read through the instructions, prep your ingredients ahead of time, and trust the process.
What you’ll get in return is a cake that looks like it came from a high-end bakery, tastes like something made with genuine love and care, and celebrates one of the most iconic symbols in American culture in the most delicious way imaginable. Whether you’re feeding your family on a summer evening or feeding a crowd at a neighborhood block party, this American Flag Layer Cake will be the highlight of the table.
Now go bake something worth celebrating.
Tried this recipe? Leave a comment below and let us know how your American Flag Layer Cake turned out! Don’t forget to tag us in your photos — we love seeing your patriotic creations.

American Flag Layer Cake
Ingredients
Equipment
Method
- Preheat your oven to 350°F (175°C). Grease four 8-inch round cake pans and one 6-inch round cake pan. Line the bottoms with parchment paper circles, then grease and lightly flour each pan. Set aside.
- In the bowl of a stand mixer fitted with the paddle attachment, whisk together the flour, sugar, baking powder, and salt on low speed until combined. Add the softened butter in tablespoon-sized pieces and beat on medium speed for about 2 minutes until the mixture resembles coarse, damp sand (reverse creaming method).In a separate bowl, whisk together the eggs, milk, sour cream, and vanilla until smooth. Pour half into the flour-butter mixture and beat on medium-high for 1 minute. Scrape down the bowl, add the remaining liquid, and beat 30 more seconds until a smooth batter forms. Do not overmix.
- Divide the batter and tint as follows: Two red portions (~2 cups each) — fold in red gel food coloring until deeply saturated. One white portion (~2 cups) — leave untinted. Blue batter (from the smaller recipe) — fold in navy blue gel coloring until deeply saturated.Pour each red portion into one 8-inch pan, the white portion into the third 8-inch pan, and the blue batter into the 6-inch pan.
- Bake at 350°F for 22–26 minutes, or until a toothpick inserted in the center comes out with just a few moist crumbs. The 6-inch blue layer may be done 3–4 minutes earlier — check it first. Cool in pans for 15 minutes, then turn out onto wire racks and cool completely (at least 2 hours) before assembling.
- Beat softened butter on medium-high for 3–4 minutes until pale and fluffy. Add the block cream cheese and beat 2 more minutes until fully combined. Reduce to low, add sifted powdered sugar one cup at a time, then add vanilla and salt. Turn speed to medium-high and beat for 3 full minutes until light and smooth. Add heavy cream one tablespoon at a time if needed for a spreadable consistency.Reserve about 1 cup of frosting, tint it navy blue, and set aside for decoration.
- Using a serrated knife or cake leveler, trim the domed tops off all cake layers until perfectly flat. Then trim the blue 6-inch layer down to ¾ inch in height. This thin blue disc will become the canton (star field) of the flag inside the cake.
- Place one red 8-inch layer on a cake board. Spread a thin, even layer of white frosting on top. Place the white cake layer on top and apply another thin frosting layer.Take the second red 8-inch layer and place it flat on your work surface. Cut out a 6-inch circle from the upper-left quadrant of this layer. Drop the blue 6-inch layer into this carved space so the surfaces are flush. Gently place this assembled layer on top of the white layer and press lightly. Top with the final red layer.
- Apply a thin crumb coat of white buttercream over the entire outside of the cake using an offset spatula to seal in all colored crumbs. Refrigerate for at least 30 minutes.Apply a generous final coat of white buttercream, smoothing with a bench scraper for clean, sharp edges. Refrigerate again for 20 minutes.
- Using a piping bag with a small round tip, pipe horizontal red stripes across the lower two-thirds of the cake’s side, evenly spaced to mimic the flag’s 13 stripes.In the upper-left quadrant of the cake’s side, use the reserved navy blue buttercream to pipe a filled-in rectangle. Use a star tip or toothpick dipped in white food coloring to add small white stars inside the blue rectangle.Pipe white swirls on top using a 1M star tip and scatter white or silver star sprinkles over the surface to finish.

