Tiramisu Cheesecake: The Most Gloriously Indulgent Mashup Dessert You Will Ever Make
Introduction: Why Tiramisu Cheesecake Is the Most Wonderfully Brilliant Dessert Mashup You Never Knew You Needed
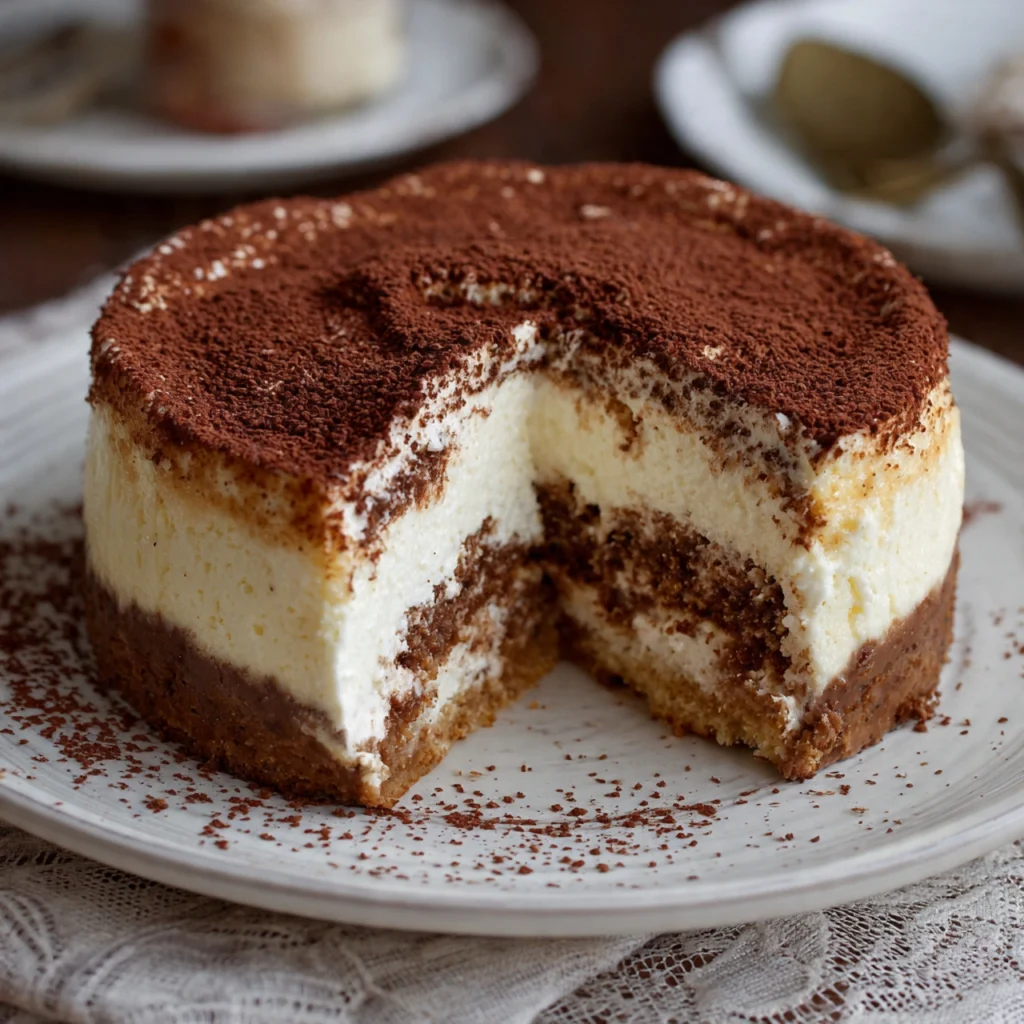
Tiramisu cheesecake is the dessert that happens when two of the most beloved, most requested, most universally adored desserts in the world decide to become one — and the result is somehow better than either of them individually. It takes everything that makes a classic Italian tiramisu extraordinary — the espresso-soaked ladyfingers, the rich mascarpone cream, the dusting of dark cocoa, the faint bitterness of good coffee against the sweetness of cream — and anchors it within the structural elegance of a cheesecake: sliceable, set, visually stunning, and genuinely showstopping on any table it appears on.
What makes tiramisu cheesecake particularly brilliant as a recipe is that it solves the one practical challenge that classic tiramisu presents — the tendency toward softness and imprecision when served, the difficulty of cutting a clean slice, the way it can look slightly undignified on a plate despite tasting absolutely magnificent. By building the same flavours within a cheesecake framework, you get all the flavour of tiramisu with the structural integrity of a cheesecake — clean slices, a defined crust, a filling that holds its shape beautifully, and the kind of visual presentation that makes people reach for their phones before they reach for their forks.
I have been making versions of tiramisu cheesecake for years — for dinner parties, for birthdays, for the kind of occasion where you want one dessert that will genuinely impress every single person at the table regardless of whether they are a tiramisu devotee or a cheesecake loyalist. Every time, it does exactly that. The tiramisu people are delighted. The cheesecake people are delighted. The people who did not know they had a preference discover a new one immediately.
This guide gives you everything — the complete ingredient list, the step-by-step technique, the pro tips that make the difference between a good tiramisu cheesecake and a genuinely transcendent one, the mistakes that are easy to avoid, storage and serving suggestions, a complete FAQ, and a full nutrition breakdown.
What Makes Tiramisu Cheesecake Different from Both Tiramisu and Regular Cheesecake
Understanding the architecture of this dessert helps you make every decision in the recipe with confidence. Tiramisu cheesecake takes the best structural and flavour elements from both desserts and builds them into something unified.
From tiramisu it takes the espresso-soaked ladyfinger base — used here as a pressed crust rather than a layered element — the mascarpone as the primary dairy component of the filling, the cocoa powder dusting as the signature finish, and the coffee and Marsala wine or rum flavour thread that runs through every layer. From cheesecake it takes the springform pan structure, the cream cheese component that provides tang and structural firmness, the baked or no-bake set filling technique, and the clean, sliceable presentation that makes it possible to serve twelve perfect portions from a single dessert with minimal effort.
The result is a dessert that is recognisably both things simultaneously — which is, of course, exactly what you want.
Ingredients
For the Espresso Ladyfinger Crust
- 200g (approximately 20–22) savoiardi ladyfinger biscuits
- 80ml (⅓ cup) strong espresso or very strong brewed coffee, cooled to room temperature
- 2 tablespoons coffee liqueur — Kahlúa, Tia Maria, or similar (or substitute with extra espresso)
- 60g (4 tablespoons) unsalted butter, melted
- 1 tablespoon granulated sugar
For the Mascarpone Cheesecake Filling
- 500g (17.5 oz) full-fat mascarpone cheese, at room temperature
- 400g (14 oz) full-fat cream cheese, at room temperature
- 150g (¾ cup) granulated white sugar
- 50g (¼ cup) light brown sugar — adds a subtle caramel note
- 3 large eggs, at room temperature
- 2 large egg yolks, at room temperature (adds richness and contributes to a silkier set)
- 2 teaspoons pure vanilla extract
- 1 teaspoon fine sea salt
- 80ml (⅓ cup) strong espresso or very strong coffee, cooled
- 2 tablespoons coffee liqueur
- 2 tablespoons cornstarch (cornflour) — prevents cracking and helps the filling set cleanly
- 200ml (¾ cup) heavy whipping cream
For the Mascarpone Cream Topping
- 250g (9 oz) full-fat mascarpone cheese, at room temperature
- 200ml (¾ cup) heavy whipping cream, very cold
- 3 tablespoons powdered sugar (icing sugar), sifted
- 1 teaspoon pure vanilla extract
- 1 tablespoon coffee liqueur, optional
For the Finishing
- 3–4 tablespoons Dutch-processed cocoa powder, for dusting
- Dark chocolate shavings or curls, optional
- A few whole ladyfinger biscuits for decoration, optional
- A dusting of finely ground espresso powder, optional

Step-by-Step Instructions
Step 1: Prepare Your Pan and Preheat
Preheat your oven to 160°C (320°F). Grease a 23cm (9-inch) springform pan thoroughly with butter, then line the base with a circle of parchment paper and grease the parchment. Wrap the outside of the springform pan tightly with two layers of heavy-duty aluminium foil — bring the foil up as high as possible on all sides. This foil wrapping is essential if you are using a water bath and is good practice regardless — it prevents any water ingress and protects the crust from steam.
Place a large roasting pan or deep baking dish on the lower oven rack — this will become the water bath. Boil a full kettle of water and set aside.

Step 2: Make the Espresso Ladyfinger Crust
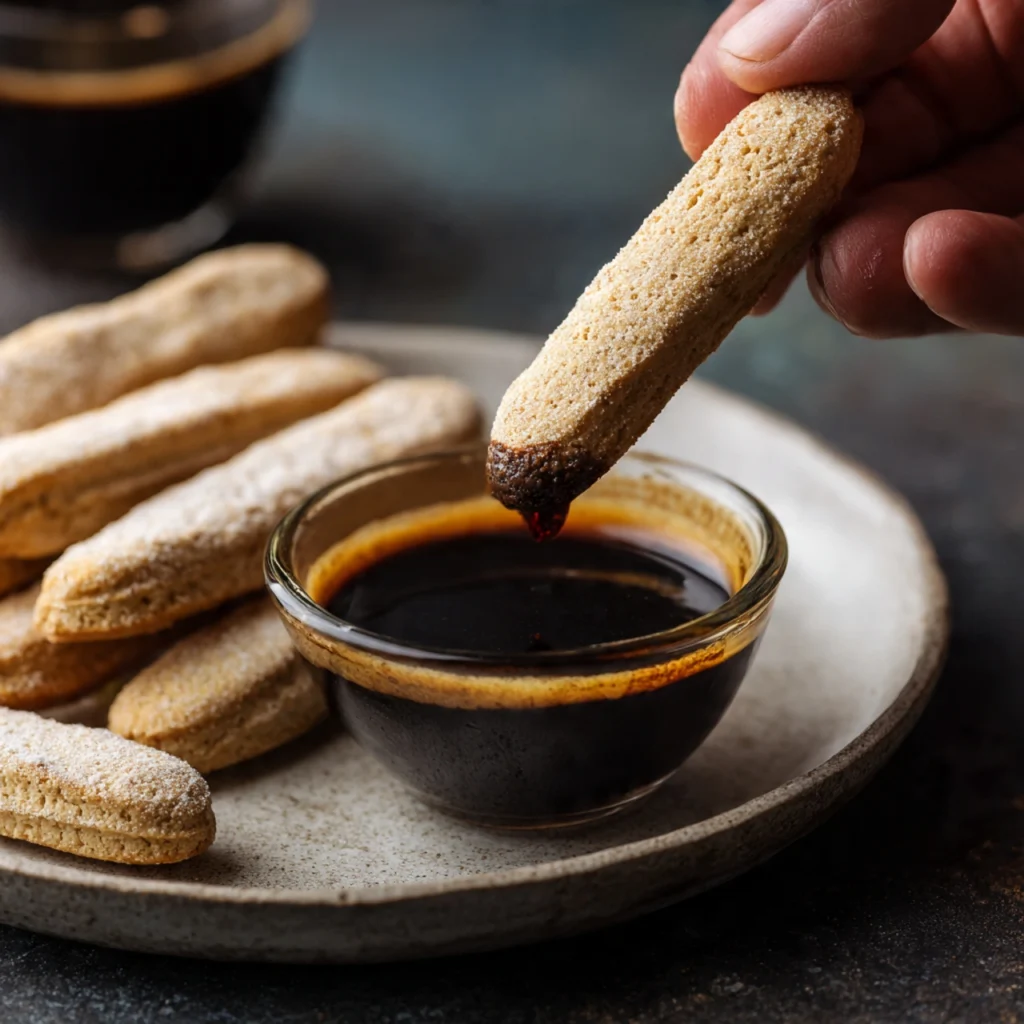
In a shallow bowl or rimmed plate, combine the cooled espresso and coffee liqueur. Working quickly one at a time, dip each ladyfinger into the espresso mixture for exactly one second per side — a brief dip, not a soak. The ladyfingers should be moistened but not saturated — saturated ladyfingers produce a crust that is soggy and structureless. Break the dipped ladyfingers roughly and arrange them in the prepared springform pan base, pressing them into an even layer. Add the melted butter and tablespoon of sugar over the pressed ladyfinger layer and press down firmly with the back of a spoon or the base of a flat glass to compact everything into a cohesive crust. Refrigerate for 15 minutes while you make the filling.
Step 3: Make the Cheesecake Filling
In a large mixing bowl, beat the room temperature mascarpone and cream cheese together using a hand mixer or stand mixer fitted with the paddle attachment on medium-low speed for about 2 minutes until smooth, creamy, and completely lump-free. The room temperature requirement is not optional — cold mascarpone and cream cheese will not blend smoothly and produce a lumpy filling that cannot be fully corrected.
Add both sugars and beat on medium-low speed for another 2 minutes until fully incorporated. Add the eggs and egg yolks one at a time, beating on low speed after each addition just until incorporated — do not beat vigorously after the eggs go in. Over-beating after the eggs are added incorporates too much air which causes the cheesecake to puff dramatically in the oven and then crack severely as it deflates during cooling.
Add the vanilla extract, fine sea salt, cooled espresso, coffee liqueur, and cornstarch. Beat on low until just combined — 30 seconds maximum. Add the heavy cream and fold it in gently with a wide rubber spatula rather than beating. The batter should be smooth, glossy, and pourable with a consistency similar to a thick milkshake. Taste it — it should taste like the most extraordinary tiramisu-flavoured thing you have ever eaten in unbaked form.
Step 4: Bake the Cheesecake in a Water Bath
Remove the springform pan from the refrigerator. Pour the cheesecake filling over the chilled ladyfinger crust in a slow, steady stream from the center, letting it spread naturally outward and self-level. Tap the pan gently on the counter three or four times to release any large air bubbles.
Place the foil-wrapped springform pan inside the roasting pan on the lower oven rack. Pour the boiled water carefully into the roasting pan until it reaches halfway up the sides of the springform pan. Slide the rack carefully into the oven.
Bake at 160°C (320°F) for 60–70 minutes. The cheesecake is done when the edges are set and slightly puffed and the center still has a gentle, slow wobble when you nudge the pan — like a barely-set jelly rather than a liquid. The center should not look dry or cracked. If the surface is browning, tent loosely with aluminium foil. Do not be tempted to overbake — an underdone-looking center is correct.

Step 5: Cool the Cheesecake Slowly
This step is as important as the baking itself. Turn off the oven, prop the door open with a wooden spoon, and leave the cheesecake in the oven for one hour. This gradual cooling prevents the dramatic temperature change that causes cheesecakes to crack — the outside edges cooling rapidly while the center is still hot creates tension that tears the surface. After one hour in the cooling oven, remove the cheesecake, run a thin knife or offset spatula carefully around the edge of the pan to release it from the sides, and allow it to cool completely at room temperature for another hour. Then cover loosely and refrigerate for a minimum of 6 hours — overnight is ideal and produces a significantly better-set, more flavourful result.

Step 6: Make the Mascarpone Cream Topping
Just before serving, make the mascarpone cream topping. In a large bowl, beat the room temperature mascarpone until smooth. In a separate bowl, whip the very cold heavy cream with the sifted powdered sugar, vanilla, and coffee liqueur if using, until it reaches firm peaks. Gently fold the whipped cream into the mascarpone using a wide spatula in slow, sweeping motions until completely combined and the mixture is thick, smooth, and holds its shape. Do not over-fold — stop the moment the mixture is uniform.

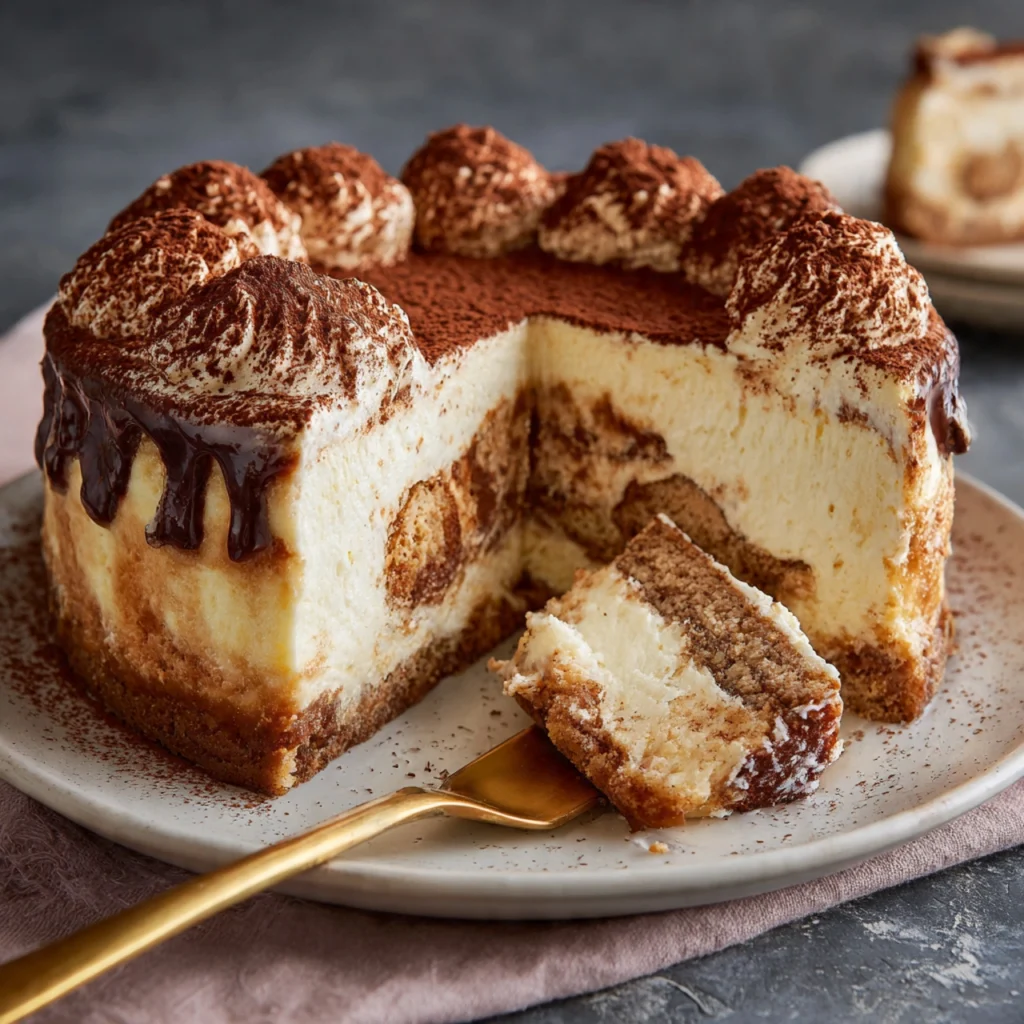
Step 7: Top, Dust and Serve
Release the springform pan sides and transfer the chilled cheesecake to a serving plate or cake stand. Spread or pipe the mascarpone cream topping evenly over the entire top surface of the cheesecake, creating swirls or a smooth finish according to your preference. Using a fine mesh sieve, dust a generous, even layer of Dutch-processed cocoa powder over the entire top — this is the signature tiramisu finish and it should be bold enough to be clearly visible. Add dark chocolate shavings or whole ladyfinger decorations if desired. Slice with a sharp knife dipped in hot water and wiped dry between each cut.
Pro Tips for the Perfect Tiramisu Cheesecake
All Dairy Must Be at Room Temperature
This is the most important technical tip in the entire recipe and it applies to every dairy element — mascarpone, cream cheese, eggs, and even the heavy cream in the filling. Cold dairy does not blend smoothly together. Cold mascarpone in particular becomes grainy and lumpy when beaten and cannot be fully smoothed out once that texture has developed. Take everything out of the refrigerator at least one hour before starting — two hours is better in a cool kitchen.
The Water Bath Is Not Optional
The water bath provides a gentle, humid, even heat that prevents the outside edges of the cheesecake from setting and drying out before the center has cooked through. It is the primary reason professional cheesecakes have a smooth, even, crack-free surface and home cheesecakes frequently do not. Wrap the pan in foil, fill the water bath to halfway, and use boiling water rather than cold or warm — the temperature needs to be high enough to maintain a consistent gentle steam environment throughout the baking period.
Never Beat the Eggs Vigorously
The eggs in a cheesecake filling should be mixed in on the lowest possible speed just until the yolk is broken and incorporated — nothing more. Vigorous beating of eggs in a cheesecake batter incorporates significant amounts of air, which causes the cheesecake to rise dramatically during baking and then collapse and crack as it cools. Low speed, brief mixing, stopping the moment each egg is incorporated.
Dip the Ladyfingers for One Second Only
The ladyfinger crust requires moistened but not saturated ladyfingers. One second per side in the espresso mixture is the maximum — any longer and the ladyfingers absorb so much liquid that they become structureless and the crust is wet and soggy rather than firm and flavourful. Work quickly and move immediately from the espresso bowl to the pan.
The Cocoa Goes On Just Before Serving
Dutch-processed cocoa powder absorbs moisture from the mascarpone cream beneath it over time, eventually turning from a dry dusting to a slightly wet, less attractive surface. For the most beautiful presentation, dust the cocoa just before the cheesecake goes to the table — not hours ahead. If you need to prepare everything in advance, add the cocoa topping within thirty minutes of serving.
Chill Overnight for the Best Result
Six hours is the minimum chilling time for a tiramisu cheesecake. Overnight is the standard. Twenty-four hours is the ideal. The difference between a six-hour chilled cheesecake and a twenty-four-hour chilled cheesecake is significant — the filling sets more firmly and slices more cleanly, the espresso flavour deepens and integrates throughout the filling, and the ladyfinger crust firms up completely into a proper sliceable base. Make it the day before your event without hesitation.
Use Dutch-Process Cocoa for the Dusting
Natural cocoa powder is lighter in colour and more acidic in flavour than Dutch-processed. For the authentic deep brown tiramisu finish and the smooth, rounded cocoa flavour that is characteristic of the classic dessert, Dutch-processed cocoa is the correct choice. The colour difference alone is immediately visible.
Common Mistakes to Avoid
Using cold mascarpone or cream cheese. This is the single most common cause of lumpy tiramisu cheesecake filling. Cold mascarpone in particular resists blending and forms grainy clumps that persist through the entire mixing process and into the baked cheesecake. One hour at room temperature is the absolute minimum — two hours is better.
Over-soaking the ladyfingers. A three-second dip produces wet, collapsing ladyfingers that make a soggy crust. One second per side, maximum. The ladyfingers should be moistened and flavoured but still structurally intact when pressed into the pan.
Over-beating after the eggs are added. As discussed in the pro tips, vigorous beating after eggs are incorporated creates air bubbles that cause cracking. Beat each egg on the lowest speed just until incorporated and stop immediately.
Skipping the water bath. The most common reason home tiramisu cheesecakes crack across the surface is skipping the water bath and exposing the cheesecake to the dry heat of a conventional oven. The water bath is what produces the smooth, uncracked surface. It takes five extra minutes to set up and saves the entire presentation.
Opening the oven door during baking. Temperature fluctuations during baking — caused by opening the oven door to check — cause the edges to set and then contract while the center is still expanding, creating cracks. Set your timer and do not open the oven until the minimum baking time has passed.
Cutting the chilling time short. A tiramisu cheesecake that has not chilled for at least six hours will not slice cleanly — the filling will be too soft and will smear rather than cut. Overnight chilling produces dramatically better results in both texture and flavour. Plan ahead.
Dusting the cocoa too far in advance. As noted in the pro tips, cocoa absorbs moisture from the cream topping over time. Dust immediately before serving for the best visual result.
Storage and Serving Suggestions
Tiramisu cheesecake stores exceptionally well and is genuinely one of the best make-ahead desserts in the repertoire. Once fully set and chilled, cover loosely with plastic wrap or store in an airtight container in the refrigerator for up to 4 days. The flavour peaks between 24 and 48 hours after making — the espresso deepens, the mascarpone cream integrates, and the ladyfinger crust firms to its ideal texture. Add the mascarpone cream topping and cocoa dusting within a few hours of serving for the best visual result.
Do not freeze tiramisu cheesecake — the mascarpone filling does not freeze and thaw cleanly, and the ladyfinger crust becomes waterlogged during the thawing process. This is a refrigerator-only dessert with a generous window of peak quality.
For serving, pull the cheesecake from the refrigerator 15–20 minutes before slicing and serving — at just below room temperature the filling is at its most silky and flavourful. Slice with a sharp knife dipped in very hot water and wiped completely dry between each cut — this produces clean, precise slices with smooth edges rather than ragged, smeared ones.
For a dinner party, the whole cheesecake on a cake stand with the cocoa dusted on at the table is a genuinely theatrical and impressive presentation — the act of sieving the cocoa over the white mascarpone cream in front of guests is unexpectedly satisfying to watch and creates a moment of anticipation before the first slice is cut. Serve with a small glass of cold espresso or a dessert wine alongside — Vin Santo or a good quality Marsala are the classic Italian pairings.
For a more casual serving suggestion, individual slices can be plated on dark ceramic plates with a small extra dust of cocoa and a single chocolate-covered coffee bean placed at the tip of each slice — this minimal garnish looks elegant and communicates the flavour profile immediately to anyone who does not already know what they are about to eat.
Frequently Asked Questions
Q1: Can I make tiramisu cheesecake without baking it? Yes — a no-bake version is a genuinely excellent alternative, particularly in warmer months when turning on the oven is unappealing. For a no-bake tiramisu cheesecake, replace the eggs and cornstarch with 2 teaspoons of powdered gelatine dissolved in 3 tablespoons of warm water and whipped into the filling mixture. The filling sets through refrigeration rather than baking — chill for a minimum of 8 hours, overnight is better. The texture is slightly different — softer and creamier rather than the firm, sliceable set of a baked version — but the flavour is equally excellent.
Q2: Can I make tiramisu cheesecake without coffee or espresso? The coffee is the defining flavour element of tiramisu and its absence significantly changes the character of the dessert. That said, for people who are sensitive to caffeine or who dislike coffee, there are workable substitutions. Decaffeinated espresso provides the same flavour with minimal caffeine. Chicory coffee provides a similar bitter, roasted note without caffeine. For a completely coffee-free version, a strong brew of hojicha (roasted Japanese green tea) provides a surprisingly compatible flavour profile with the mascarpone filling. The result will be delicious but distinctly different from a traditional tiramisu cheesecake.
Q3: Why did my tiramisu cheesecake crack on top? Cracking in a cheesecake is almost always caused by one of four things: over-beating the eggs which incorporates air that causes puffing and cracking during cooling, skipping the water bath which exposes the surface to dry oven heat, cooling the cheesecake too rapidly by removing it from a hot oven directly to a cold surface, or overbaking. The good news is that a cracked tiramisu cheesecake can be completely disguised by the mascarpone cream topping — spread it generously and the cocoa dusting will cover everything underneath. Taste is completely unaffected by surface cracking.
Q4: Can I use ricotta instead of mascarpone in tiramisu cheesecake? Ricotta can partially replace mascarpone — use a 50/50 blend for a slightly lighter, less rich result. Full-fat ricotta should be well-drained through a fine mesh sieve lined with cheesecloth for at least 2 hours before using — undrained ricotta contains too much water and will make the filling loose. The flavour with ricotta is slightly less luxurious and slightly more tangy than the pure mascarpone version, which some people actually prefer. Do not use low-fat ricotta — the water content is too high and the filling will not set properly.
Q5: What alcohol works best in tiramisu cheesecake? Traditional tiramisu uses Marsala wine or rum, and both work beautifully in this cheesecake. Coffee liqueurs — Kahlúa, Tia Maria, Mr. Black — add an additional layer of coffee flavour and a sweetness that integrates seamlessly with the mascarpone filling. Dark rum adds warmth and a slight caramel note. Amaretto adds an almond character that is unusual but complementary. The alcohol is present in small quantities and its primary role is flavour depth — the specific choice affects the character of the finished dessert noticeably. For an alcohol-free version, replace with additional espresso and a teaspoon of pure vanilla extract.
Q6: How far in advance can I make tiramisu cheesecake? Up to 48 hours in advance is the ideal window — the flavour and texture are genuinely at their peak at this point. Up to 72 hours is still very good. Beyond 3 days the ladyfinger crust begins to soften significantly and the filling starts to lose its fresh dairy brightness. The mascarpone cream topping should be made and applied within a few hours of serving, and the cocoa dusting should go on within thirty minutes of serving. The base cheesecake without topping is what stores for 3–4 days.
Q7: Can I make individual tiramisu cheesecakes instead of one large one? Yes — individual tiramisu cheesecakes made in small springform pans, ramekins, or even a muffin tin lined with parchment strips are a brilliant option for dinner parties. Reduce the baking time to 20–25 minutes for individual portions — the visual cue for doneness is the same: set edges with a gentle wobble at the center. Individual portions look extremely elegant plated on dark ceramic plates with the mascarpone cream piped in a rosette and the cocoa dusted just before service.
Nutrition Information (Approximate Per Slice)
Based on 12 slices from a 23cm (9-inch) cheesecake using the full recipe with mascarpone cream topping, without optional chocolate shavings.
| Nutrient | Amount Per Slice |
|---|---|
| Calories | ~520 kcal |
| Total Fat | 38g |
| Saturated Fat | 23g |
| Cholesterol | 175mg |
| Sodium | 280mg |
| Total Carbohydrates | 36g |
| Dietary Fiber | 1g |
| Total Sugars | 24g |
| Added Sugars | 20g |
| Protein | 8g |
| Calcium | 10% DV |
| Vitamin A | 25% DV |
| Iron | 6% DV |
Note: Values are approximate and will vary based on specific mascarpone and cream cheese brands, exact alcohol inclusion, ladyfinger brand, and exact slice size. Calculated for the full baked version with mascarpone cream topping and cocoa dusting, without optional decorative additions.
Conclusion
There are desserts that are technically impressive and desserts that make people genuinely emotional — the kind of dessert that produces an involuntary sound of satisfaction with the first bite, that makes the table go quiet in the way that only truly excellent food manages to accomplish. Tiramisu cheesecake belongs in that second category without reservation or qualification.
It takes the flavours that two of the world’s most beloved desserts have spent decades perfecting and brings them together in a format that is simultaneously more elegant, more precise, more shareable, and more versatile than either parent dessert manages individually. The espresso-soaked ladyfinger crust provides the foundation. The mascarpone and cream cheese filling provides the silky, deeply coffee-flavoured heart. The mascarpone cream topping and the bold cocoa dusting provide the signature finish that makes every slice look like something from the window of a Milanese pasticceria.
The techniques in this recipe are all in service of that result — the room temperature dairy for a smooth filling, the water bath for an uncracked surface, the slow cooling for structural integrity, the overnight chill for the best possible set and flavour development. Follow them and what comes out of your refrigerator will be something genuinely worth being proud of.
Make it the day before your next special occasion. Dust the cocoa at the table. Watch the reaction. Accept the recipe requests graciously.
Now go take that mascarpone out of the refrigerator.
Tiramisu Cheesecake
Ingredients
Equipment
Method
- Preheat your oven to 160°C (320°F). Grease a 23cm (9-inch) springform pan thoroughly with butter and line the base with a circle of parchment paper. Grease the parchment. Wrap the outside of the springform pan tightly with two layers of heavy-duty aluminium foil, bringing the foil as high as possible on all sides. Place a large roasting pan on the lower oven rack. Boil a full kettle of water and set aside for the water bath.
- Combine the cooled espresso and coffee liqueur in a shallow bowl. Working quickly one at a time, dip each ladyfinger into the espresso mixture for exactly one second per side — moistened but not saturated. Break the dipped ladyfingers roughly and press into the prepared springform pan base in an even layer. Drizzle the melted butter and tablespoon of sugar over the pressed layer. Press down firmly with the back of a flat glass to compact into a cohesive crust. Refrigerate for 15 minutes while making the filling.
- Beat the room temperature mascarpone and cream cheese together on medium-low speed for 2 minutes until completely smooth and lump-free. Add both sugars and beat on medium-low for 2 more minutes. Add the eggs and egg yolks one at a time, beating on low speed just until incorporated after each addition — do not beat vigorously. Add the vanilla extract, fine sea salt, cooled espresso, coffee liqueur, and cornstarch. Beat on low for 30 seconds maximum. Gently fold in the heavy cream with a wide rubber spatula until just combined.
- Remove the springform pan from the refrigerator. Pour the cheesecake filling over the chilled ladyfinger crust in a slow steady stream from the center, letting it spread naturally. Tap the pan gently on the counter 3–4 times to release air bubbles. Place the foil-wrapped springform pan inside the roasting pan on the lower oven rack. Pour boiled water into the roasting pan until it reaches halfway up the sides of the springform pan. Bake at 160°C (320°F) for 60–70 minutes until the edges are set with a gentle slow wobble at the center. Tent loosely with foil if the surface begins to brown.
- Turn off the oven, prop the door open with a wooden spoon, and leave the cheesecake in the oven for 1 hour. Remove, run a thin knife carefully around the inside edge of the pan. Cool completely at room temperature for another hour. Cover loosely and refrigerate for a minimum of 6 hours — overnight is ideal and produces a significantly better-set, more flavourful result.
- Beat the room temperature mascarpone until smooth. In a separate bowl, whip the very cold heavy cream with the sifted powdered sugar, vanilla, and coffee liqueur if using, until firm peaks form. Gently fold the whipped cream into the mascarpone with a wide spatula using slow sweeping motions until completely combined, thick, smooth, and holding its shape. Stop folding the moment the mixture is uniform.
- Release the springform pan sides and transfer the chilled cheesecake to a serving plate or cake stand. Spread or pipe the mascarpone cream topping evenly across the entire top surface creating swirls or a smooth finish. Using a fine mesh sieve, dust a generous even layer of Dutch-processed cocoa powder over the entire top within 30 minutes of serving. Add dark chocolate shavings or whole ladyfinger decorations if desired. Slice with a sharp knife dipped in hot water and wiped dry between each cut.


